Windows Server 2008 R2 Unleashed (27 page)
Read Windows Server 2008 R2 Unleashed Online
Authors: Noel Morimoto

92
CHAPTER 3
Installing Windows Server 2008 R2 and Server Core
will present a message to this effect and prevent the installation from proceeding.
Therefore, in this scenario, select Custom (Advanced) to perform a client installation of
Windows Server 2008 R2. Click Next to continue, as shown in Figure 3.3.
ptg
FIGURE 3.3
Specifying whether to upgrade or install a clean copy of Windows.
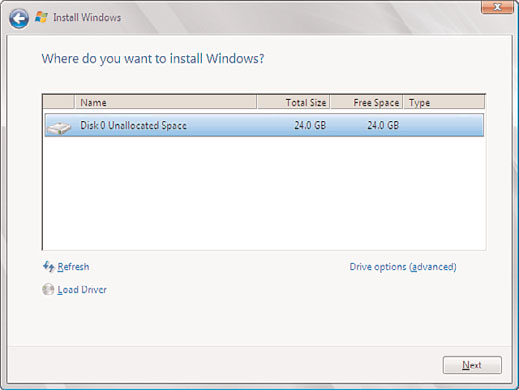
6. Selecting the Location for the Installation
On the next page, the Install Windows Wizard asks where you want to install Windows.
You need to specify where you want to install the OS and then click Next to continue, as
illustrated in Figure 3.4. This section replaces the portion of both Windows 2000/2003
server installs where decisions about disk partitioning and formatting are made during the
initial steps of the installation. At this point, you can supply additional disk drivers, or
add, delete, extend, or format partitions in preparation for the install. It’s another small
change to the process for preparing a system for loading the OS, but that change simpli-
fies and organizes the process in a logical way.
NOTE
With older versions of the Windows operating system, you had two options when parti-
tioning the hard drive: NTFS or FAT/FAT32. When creating and formatting partitions with
Windows Server 2008 or Windows Server 2008 R2, FAT and FAT32 are no longer sup-
ported as NTFS is the only file system that can be sustained.
7. Finalizing the Installation and Customizing the Configuration
After the Windows Server 2008 R2 Install Windows Wizard collects the information and
installs the Windows operating system, the system will restart. The administrator must set
a password before logging in to complete the installation process. When logged in, the
Installing a Clean Version of Windows Server 2008 R2 Operating System
93
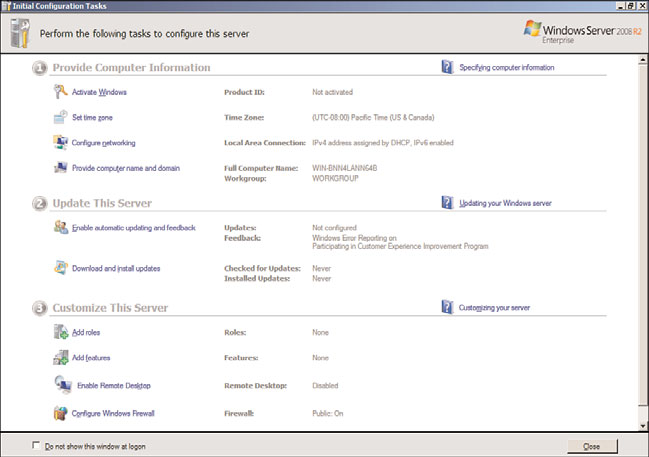
Initial Configuration Tasks Wizard is automatically invoked. This wizard presents the
following tasks, as shown in Figure 3.5, to initially configure the server. The high-level
initial configuration tasks include the following:
1. Provide Computer Information
. Activate Windows
. Set Time Zone
3
ptg
FIGURE 3.4
Specifying the location for the installation.
FIGURE 3.5
The Initial Configuration Tasks Wizard.
94
CHAPTER 3
Installing Windows Server 2008 R2 and Server Core
. Configure Networking
. Provide Computer Name and Domain
2. Update This Server
. Enable Automatic Updating and Feedback
. Download and Install Updates
3. Customize This Server
. Add Roles
. Add Features
. Enable Remote Desktop
. Configure Windows Firewall
Traditionally, these configuration tasks were addressed during the initial installation of
Windows; however, now these elements are configured after the initial installation of the
operating system is complete. By removing these elements from the installation, the
installation process is much faster.
ptg
Setting the Administrator Password
The first configuration task to perform after installing Windows Server 2008 R2 is to set an
administrator password. This must be done before you can log on the first time. The
installation process automatically creates the default administrator account called, surpris-
ingly enough, Administrator. This account has local administrative privileges and enables
you to manage all local configuration settings for the server.
As a best practice, you should rename this account after you complete the installation and
assign a strong password. You must enter it twice: first in the Password text box and then
again in the Confirm Password text box. As in previous Windows operating systems, the
password is case sensitive and can contain up to 127 characters. In addition, a strong pass-
word should include both upper- and lowercase letters, numbers, and symbols.
You should choose your password carefully to ensure the security of the system. You can
change both the Administrator account name and password in the Change Password
dialog box.
Activate Windows
Once the administrator password has been set, initial configuration tasks can be executed,
starting with Activation. As with other Microsoft operating systems, Windows Server 2008
R2 must be activated. Click Activate Windows, which is the first initial configuration task.
In the Windows Activation dialog box, enter the product key and click Next to activate the
product. Choose to Automatically Activate Windows if you want to have Windows acti-
vate the next time the server comes online or remove the checkmark if you want to manu-
ally choose to activate Windows later. Click Next to continue with the installation process.
Installing a Clean Version of Windows Server 2008 R2 Operating System
95
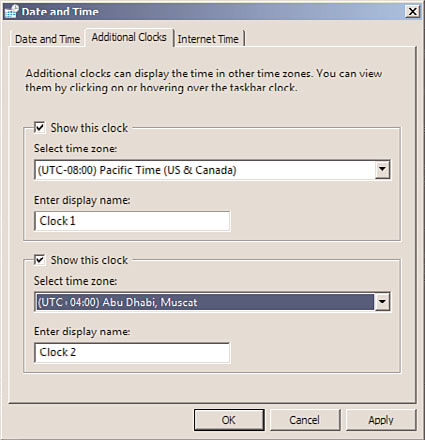
Setting the Time Zone
Next on the initial task list is setting the date and time of the server. Click the Set Time
Zone link in the Initial Configuration Tasks Wizard to invoke the Date and Time dialog
box. On the Date and Time tab, set the time zone where the server will operate by clicking
the Change Date and Time button. In addition, click the Change Time Zone button to
configure the time zone for the server. The next tab, Additional Clocks, as displayed in
Figure 3.6, should be utilized if there is a need to display the time in another time zone.
Up to two clocks can be configured on this tab. The final tab, Internet Time, is where you
configure a time server for the server to synchronize its clock with. Time.windows.com is
the default time server; however, other time servers can be selected by clicking the Change
3
Settings button.
ptg
FIGURE 3.6
Configuring additional clocks.
Configuring Networking
The third setting in the Provide Computer Information section of the Initial
Configuration Tasks Wizard is Configure Networking. You need to decide on network
settings for the server so it can connect to other computers, networks, and the Internet. By
default, Windows Server 2008 R2, as with previous versions of Windows, installs Client for
Microsoft Networks, File and Printer Sharing for Microsoft Networks, and TCP/IPv4. In
addition, Windows Server 2008 R2 installs QoS Packet Scheduler, Internet Protocol version
6 (TCP/IPv6), Link-Layer Topology Discovery Mapper I/O Driver, and Link-Layer Topology
Discovery Responder.
Don’t be alarmed. The default client, service, and protocols that are installed by default will
meet most companies’ needs and require little manual configuration. You will, however,
likely want to change the TCP/IPv4 settings and assign a static address for the server.
96
CHAPTER 3
Installing Windows Server 2008 R2 and Server Core
NOTE
Windows Server 2008 R2 utilizes IPv6 as the default protocol. If you do not have plans
to utilize IPv6, you might want to disable this protocol to facilitate future server role
installation. Many server roles, such as Domain Controller, DNS Server, and DHCP
Server, require static IP addresses. You will either need to disable IPv6 or assign the
server a static IPv6 address to install these roles. You can disable IPv6 by clearing the
check box for Internet Protocol Version 6 (TCP/IPv6) and clicking OK.
For more details on configuring TCP/IP and the new protocol stack, review the chapters in
Part III of this book, “Networking Services.”
Providing the Computer Name and Domain
Use the Provide Computer Name and Domain link to change the name of your computer
and to add your computer to a domain or workgroup. If you are joining an existing
domain, you will need the logon name and password for an account with appropriate
domain permissions. Alternatively, you can have the administrator of the domain add
your computer name into the domain so that your server can connect. If you do not
know the name of the domain that the server will be a member of, or if you do not have
ptg
the administrative rights to join the server to the domain, you can still change the
computer name and you can always join the server to a domain at a later time.
Now that we configured the elements in the Provide Computer Information section of the
Initial Configuration Tasks Wizard, the next step is to focus on the second configuration
section called Update This Server.
Enabling Automatic Updating and Feedback
The Enable Automatic Updating and Feedback link in the Update This Server section is
used to configure how your system maintains its health and security by automatically
downloading and configuring software updates and the degree to which you want to
participate in Microsoft’s information gathering efforts.
Although it’s easy to dismiss these features, the tools do provide you an easy way to patch
your systems and contribute your experience with Microsoft products with very little or
no effort. Anonymous information gathered from users shapes Microsoft products and
technologies, so if you don’t have corporate policies around sharing technical information
outside of your organization, give some thought to participating. If selected, the following
options can be configured automatically, or you can manually configure the settings:
.
Automatic Updates—
Automatic Updates are not configured by default. You can
leave this setting as is or configure the server to check for updates automatically on a
schedule that fits your maintenance procedures. When patching large enterprise
environments, it is a best practice to control software updates via a patching solu-
tion, such as System Center Configuration Manager 2007 R2 or WSUS 3.0 SP1.
.
Windows Error Reporting—
Windows Error Reporting, by default, prompts you to
send detailed information to Microsoft when errors occur on your server. You can
Installing a Clean Version of Windows Server 2008 R2 Operating System
97
turn this function off or configure it to automatically send the error information to
Microsoft. Reports contain information that is most useful for diagnosing and
solving the problem that has occurred.
.
Customer Experience Improvement Program—
The Customer Experience
Improvement Program (CEIP) gathers anonymous information and periodically
sends it to Microsoft. CEIP reports generally include information about the features