Windows Server 2008 R2 Unleashed (286 page)
Read Windows Server 2008 R2 Unleashed Online
Authors: Noel Morimoto

service is only required if the Windows SharePoint Services 3.0 sites need to be enabled to
receive incoming email. This is generally considered to be a more advanced feature, as a
certain amount of configuration is required, and both site end users will need to under-
stand that new email addresses are needed and then understand what the results are. Fully
configuring incoming email in WSS 3.0 typically involves coordination with the Exchange
or email administrator, so the following covers the basic steps only.
CAUTION
Some organizations have policies in place that prohibit the installation of SMTP ser-
vices on production servers that are not dedicated mail servers.

1450
CHAPTER 35
Windows SharePoint Services
To install the SMTP service, follow these steps:
1. Click the Start button, then click All Programs, Administrative Tools, Server Manager.
2. Click on the Features node in the Server Manager pane. Click on Add Features in the
Features Summary pane.
3. Click on the box next to SMTP Server, and the Add Features Wizard window opens
clarifying which role services and features need to be installed. Click the Add
Required Role Services button. Click Next.
4. Click Next on the page that discusses the Web Server (IIS) role, which is already
installed.
5. Click Next on the Select Role Services page.
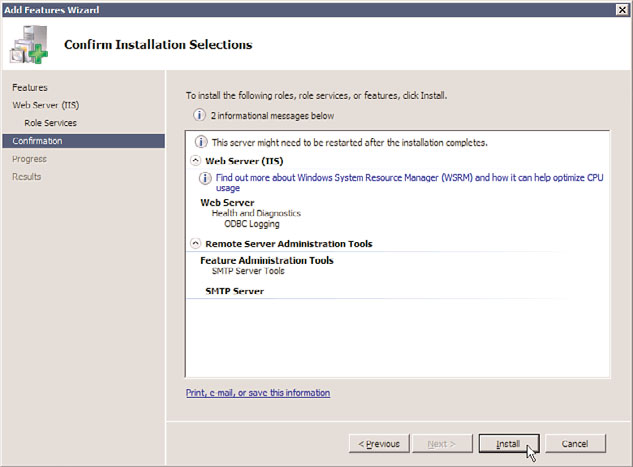
6. Review the installation selection on the next page, and note that ODBC Logging and
SMTP Server will be installed, as shown in Figure 35.6, and click Install.
ptg
FIGURE 35.6
Adding the SMTP feature to the server.
7. Make sure that the installation is fully successfully, and then click Close.
Completing the Configuration for Incoming E-Mail Settings
Now that SMTP Server features have been installed, the Incoming E-Mail Settings can be
configured. To finish the configuration, follow these steps:
1. Open the Central Administration console by clicking the Start button, then clicking
All Programs, Administrative Tools, and SharePoint 3.0 Central Administration.
Provide your username and password if needed. After you have successfully logged
on to the Central Administration console, the Home tab displays.
Installing Windows SharePoint Services
1451
2. Click the Incoming E-Mail Settings task.
3. Click the Configure Incoming E-Mail Settings link.
4. Click Yes under Enable Sites on This Server to Receive E-Mail.
5. Under Settings Mode, leave Automatic selected. (Note: If Automatic can’t be selected,
a reboot of the server might be needed because the SMTP service configuration
might not be registered by the Central Administration console.)
6. In the Directory Management Service section, leave No selected. If Yes is selected,
users can create distribution groups and contacts, but an AD container needs to be
identified where new distribution groups and contacts will be created and additional
settings configured. This is a more complex configuration to administer and is not
recommended for most test implementations unless this feature is of specific interest.
7. In the Incoming E-Mail Server Display Address section, either leave the default
email suffix or enter a desired display address. A general best practice is to leave the
WSS 3.0 server name unless the mail administrator is going to be involved in the
configuration.
8. In the Safe E-Mail Servers section, either select Accept Mail from All E-Mail Servers or
35
Accept Mail from These Safe E-Mail Servers. If the second option is selected, the
FQDN of the “safe” email server needs to be entered.
ptg
9. Click OK when you are finished.
Note that there are typically configuration steps needed on the mail server as well for this
feature to work, and then individual document libraries need to be enabled for incoming
emails. These steps will vary based on whether Exchange Server 2003 or Exchange Server
2007 is being used, or whether another SMTP mail server is being used.
Configure Outgoing E-Mail Settings
From the Home tab for the Central Administration console, a link for Outgoing E-Mail
Settings will be visible. Outgoing email enables WSS 3.0 lists and libraries to send alerts to
users, and to send workflow forms and perform other mail-based communications when
needed. This is a simpler configuration than incoming emails and is generally considered
a “must-have” for WSS 3.0 testing and production configurations.
Follow these steps to configure outgoing emails:
1. From the Home tab for the Central Administration console, click on the Outgoing E-
Mail Settings link in the Administrator Links section.
2. Once the form opens, click on the Configure Outgoing E-Mail Settings link in the
Actions section.
3. From the Outgoing E-Mail Settings page, provide information in the Outbound
SMTP Server, From Address, and Reply-to Address fields. Leave the character set as
65001 (Unicode UTF-8) unless a different character set is required.
4. Click OK to complete.
Once this is complete, the administrator should test to make sure that alerts are functional
by visiting a document library, creating an alert for the library, and then performing an

1452
CHAPTER 35
Windows SharePoint Services
action that will trigger the alert. If the alert emails are not sending properly, additional
troubleshooting will be required.
Exploring the Default Site Collection
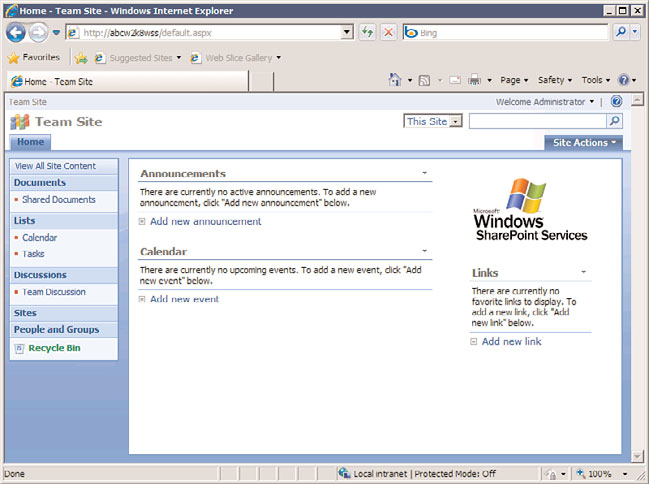
When Windows SharePoint Services 3.0 is installed, an empty top-level site is created, as
seen in Figure 35.3. Access this site by opening a browser on the server or from a worksta-
tion with access to the server and entering the URL you saw after completing the basic
installation (typically the FQDN of the server). Enter the username and password of the
account that was used to configure Windows SharePoint Services 3.0 and you should see a
page identical to the one shown in Figure 35.7.
ptg
FIGURE 35.7
Default top-level site in Windows SharePoint Services 3.0.
The main components of this site are as follows:
.
Current user—
In the upper-right corner, the identity of the currently logged-on
user is listed. Clicking this link opens a menu that gives options such as My Settings,
Sign In as Different User, Request Access, and Personalize This Page.
.
Help icon—
You can click the question mark icon to gain access to Windows
SharePoint Services 3.0 Help and how-to information. This information is actually
quite useful and is a good place to start when getting familiar with WSS 3.0.
.
Drop-down search options—
The drop-down menu next to the search field offers
only the option to search This Site, but depending on the context will offer other
choices, such as searching only a specific document library.
Lists and Libraries in Windows SharePoint Services 3.0
1453
.
Quick Launch area—
On the left side of the page is the Quick Launch area, which
by default lists the option to View All Site Content, or access Documents, Lists,
Discussions, Sites, People and Groups, and the Recycle Bin.
.
Web parts—
To the right of the Quick Launch area are several web parts, including
Announcements, Calendar, the Windows SharePoint Services logo, and Links. If the
titles of Announcements, Calendar, or Links are clicked, the list it is connected to
opens, allowing more interaction with the data. For example, new items can be
created, existing ones edited, alerts set, workflows started, and other actions.
.
Site actions—
This menu is only available to users who have a certain level of privi-
leges on the site, and allows access to Create, Edit Page, and Site Settings options.
It is important for a future Windows SharePoint Services 3.0 administrator to understand
these basic elements and features of the standard team site, so these will be reviewed in
more detail in the following sections.
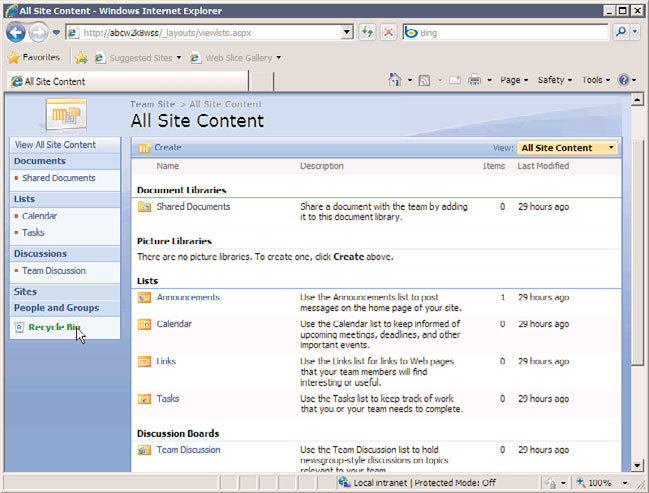
By clicking on the View All Site Content link at the top of the Quick Launch area on the
left side of the screen, the full contents of the current site that the logged-in user has
access to will be revealed. An example of this is shown in Figure 35.8. The libraries, lists,
35
and subsites, if any, are shown in this view. This is a great place to check when visiting a
new site to see which lists, libraries and subsites are available for the current user to access.
ptg
As shown in Figure 35.8, the name of the list or library is shown, along with a description
of the purpose and/or content of the list or library, how many items are stored in it, and
the last modified date. With this information, it is very easy to tell how active the site is,
the number of documents or list items available, and the most recently modified list and
libraries. Clicking on the title of the list or library will open it so the contents can be
viewed, and if your account has the appropriate privileges, new items can be added or
existing items can be modified.
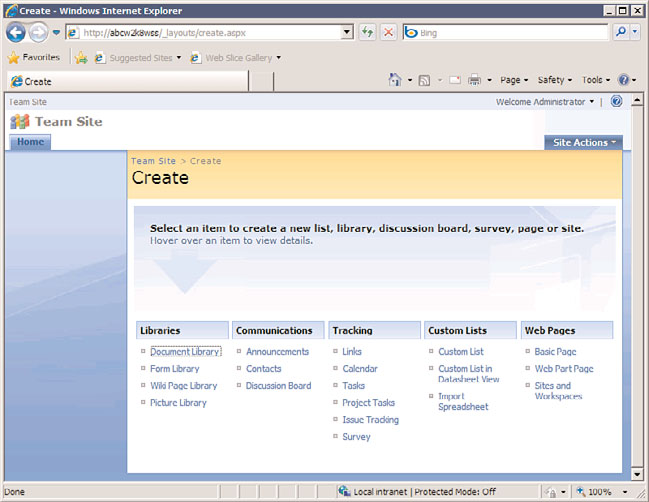
The Create link is provided for users with appropriate privileges on the site, and it gives
access to the create.aspx page, as shown in Figure 35.9. The items that can be created are
divided into the following groups: Libraries, Communications, Tracking, Custom Lists, and
Web Pages. Note that the very last item under the Web Pages header is Sites and Workspaces,
which allows you to pick a site or workspace template from the available templates.
Lists and Libraries in Windows SharePoint
Lists and libraries are two key components of the Windows SharePoint Services 3.0 envi-
ronment. They allow users to manage documents by uploading them to libraries or to
manage rows and columns of information in a list, which is similar to a spreadsheet in
many ways. This section reviews the basic features of Windows SharePoint Services 3.0
document libraries and lists. As the name suggests, a document library is designed to store
documents, and each document can have metadata attached to it. This metadata allows a
visitor to the library to get a sense for when the document was added or modified, by
whom, and to better understand the purpose or content of the document in question. A
Windows SharePoint Services 3.0 list is essentially a “spreadsheet on steroids” and is


