Windows Server 2008 R2 Unleashed (301 page)
Read Windows Server 2008 R2 Unleashed Online
Authors: Noel Morimoto

.
Expand—
This option enables you grow the size of a dynamic disk image. For exam-
ple, you might have initially created the disk image to only be 8GB maximum in
size, and now that you’ve added a lot of applications to the guest image, you are
ptg
running out of space in the VHD file. By expanding the image file, you effectively
have the ability to add more applications and data to the guest session without hav-
ing to re-create the guest session all over again.
Inspect Disk
The Inspect Disk option in the Virtual Network Manager action item menu enables you to
view the settings of an existing virtual image file. For the example shown in Figure 37.4,
the disk image is currently 4MB in size, can dynamically grow up to the maximum limit
of 2040GB, and is located on the local hard drive in the directory C:\vpcs.
FIGURE 37.4
Virtual Hard Disk Properties shown in the Inspect Disk option.
Stop Service
The Stop Service option in the Hyper-V Manager Actions pane provides for the ability to
stop the Hyper-V Virtual Machine Management on the Hyper-V host machine being
Installing a Guest Operating System Session
1529
managed. You might choose to stop the service if you needed to perform maintenance or
begin the shutdown process of an administered system.
New Configuration Wizard
One of the wizards listed in the Hyper-V Manager Actions pane allows for the creation of
new virtual machines, hard disks, and floppy disks. Specifics of this configuration option
are as follows:
.
New – Virtual Machine—
This option enables you to create a new virtual guest
session. The whole purpose of running Windows virtualization is to run virtual guest
sessions, and this option is the one that enables you to create new guest sessions.
.
New – Hard Disk—
This option enables you to create a new virtual hard disk (VHD)
image. When you create a new virtual machine in the first option, this includes
creating a hard disk image for the operating system; however, some servers will need
additional virtual hard disks. This wizard walks you through the configuration of a
new virtual hard disk image.
.
New – Floppy Disk—
This option enables you to take an existing floppy disk and
create a virtual floppy disk image from the physical disk. This might be used to cre-
ate an image of a bootable floppy disk that would later be used in configuring or
ptg
managing a guest image, or used to create a floppy disk image of a disk that has dri-
vers or utilities on it that will be used in a virtual guest session.
Installing a Guest Operating System Session
37
One of the key tasks noted in the previous section is to begin the installation of a new
guest operating system session. The guest operating system installation is wizard driven
and provides the administrator with the ability to configure settings for the guest session,
and to begin the installation of the guest operating system software itself. A guest session
could be a server-based session running Windows Server 2003 or Windows Server 2008 R2,
a client-based session running Windows 7, Windows XP, or Windows Vista, or a guest
session running a non-Windows operating system.
Gathering the Components Needed for a Guest Session
When creating a guest operating system, the administrator needs to make sure they have all
of the components needed to begin the installation. The components needed are as follows:
.
Operating system media—
A copy of the operating system installation media is
required for the installation of the guest image. The media could be either a DVD or
an ISO image of the media disc itself.
.
License key—
During the installation of the operating system software, if you are
normally prompted to enter in the license key for the operating system, you should
have a copy of the license key available.
1530
CHAPTER 37
Deploying and Using Windows Virtualization
Other things you should do before starting to install a guest operating system on the
virtual server system:
.
Guest session configuration settings—
You will be prompted to answer several
core guest session configuration setting options, such as how much RAM you want
to allocate for the guest session, how much disk space you want to allocate for the
guest image, and so on. Either jump ahead to the next section on “Beginning the
Installation of the Guest Session” so you can gather up the information you’ll need
to answer the questions you’ll be asked, or be prepared to answer the questions
during the installation process.
.
Host server readiness—
If you will be preplanning the answers to the questions
that you’ll be asked, make sure that the host system has enough RAM, disk space,
and so on to support the addition of your guest session to the virtual server system.
If your requirements exceed the physical capacity of the server, stop and add more
resources (memory, disk space, and so on) to the server before beginning the installa-
tion of the guest operating system.
Beginning the Installation of the Guest Session
After you are ready to begin the installation of the guest operating system, launch the
ptg
guest operating system installation wizard. This is done by doing the following:
1. From the Actions pane, choose New, Virtual Machine. The New Virtual Machine
Wizard will launch.
2. Click Next to continue past the initial Welcome screen.
3. Give your virtual machine a name that will be descriptive of the virtual guest session
you are creating, such as AD Global Catalog Server, or Exchange 2010 Client Access
Server 1, or ISA Proxy Server.
4. If you had set the default virtual machine folder location where guest images are
stored, the new image for this virtual machine will be placed in a subfolder of that
default folder. However, if you need to select a different location where the image
files should be stored, click Store the Virtual Machine in a Different Location, and
select Browse to choose an existing disk directory or to create a new directory where
the image file for this guest session should be stored. Click Next to continue.
5. Enter in the amount of RAM you want to be allocated to this guest image (in
megabytes), and then click Next.
6. Choose the network segment to which you want this guest image to be initially
connected. This would be an external, internal, or private network segment created
in the section “Virtual Network Manager” earlier in this chapter. Click Next.
NOTE
You can also choose Not Connected during this virtual machine creation process and
change the network segment option at a later date.
Installing a Guest Operating System Session
1531
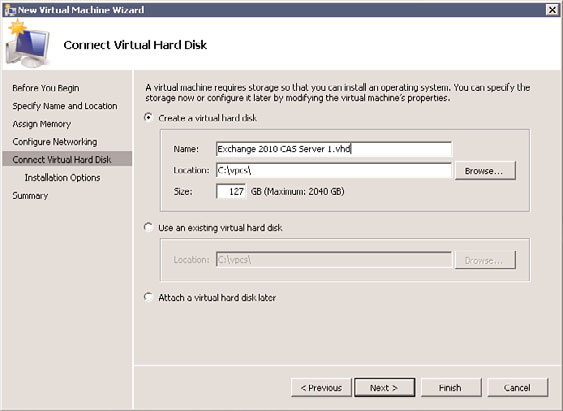
7. The next option enables you to create a new virtual hard disk or use an existing
virtual hard disk for the guest image file. Creating a new virtual hard disk creates a
VHD disk image in the directory you choose. By default, a dynamic virtual disk
image size setting is set to 127GB. The actual file itself will only be the size of the
data in the image (potentially 4GB or 8GB to start, depending on the operating
system) and will dynamically grow up to the size indicated in this setting.
Alternately, you can choose an existing hard disk image you might have already
created (including an older image you might have created in Windows Server 2008
Hyper-V or Microsoft Virtual Server 2005), or you can choose to select a hard disk
image later. To use a fixed-size disk, select the last option and create the virtual disk
later from the Virtual Machine Settings window. The options for this configuration
are shown in Figure 37.5. Click Next to continue.
ptg
37
FIGURE 37.5
Creating a new virtual hard disk.
NOTE
Dynamic VHD performance in Windows Server 2008 R2 has been greatly enhanced,
essentially equaling that of fixed disks. This means you can now seriously consider
using dynamic disks instead of fixed disks in production environments.
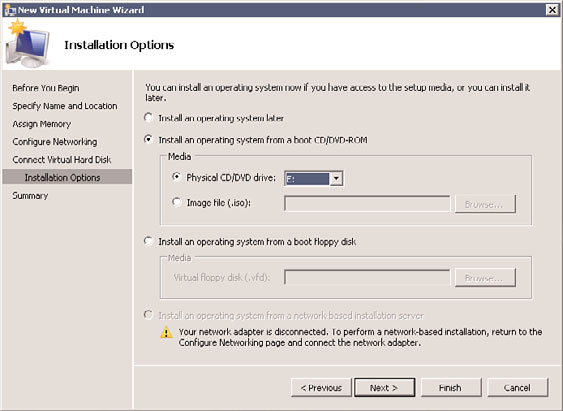
8. The next option, shown in Figure 37.6, allows for the installation of an operating
system on the disk image you created in the previous step. You can choose to install
an operating system at a later time, install an operating system from a bootable
CD/DVD or ISO image file, install an operating system from a floppy disk image, or
install an operating system from a network-based installation server (such as
1532
CHAPTER 37
Deploying and Using Windows Virtualization
Windows Deployment Services). Typically, operating system source discs are on
either a physical disc or ISO image file, and choosing a CD or DVD or an associated
ISO image file will allow for the operating system to be installed on the guest image.
Select your option, and then click Next to continue.
ptg
FIGURE 37.6
Selecting the operating system installation options.
9. Review the summary of the options you have selected and either click Finish if the
settings you’ve chosen are fine, or click Previous to go back and make changes. Click
Finish to create the new virtual machine.
Completing the Installation of the Guest Session
When the new virtual machine is started, the guest operating system installation will
proceed to install just like the process of installing the operating system on a physical
system. Typically, at the end of an operating system installation, the guest session will
restart and bring the session to a logon prompt. Log on to the guest operating system and
configure the guest operating system as you would any other server system. This typically
has you do things such as the following:
1. Change the system name to a name that you want the virtual server to be. For many
versions of operating systems, you will be prompted to enter the name of the system
during the installation process.
2. Configure the guest session with an appropriate IP address. This might be DHCP
issued; however, if you are building a server system, a static IP address is typically
recommended.
3. Join the system to an Active Directory domain (assuming the system will be part
of a managed Active Directory Domain Services environment with centralized
administration).
Modifying Guest Session Configuration Settings
1533
4. Download and apply the latest patches and updates on the guest session to confirm
that all patches and updates have been installed and applied to the system.
The installation of the guest operating system typically requires yet another reboot, and
the operating system will be installed and operational.
Modifying Guest Session Configuration Settings
After a guest session has been installed, whether it is a Microsoft Windows server guest
session, a Microsoft Windows client guest session, or a guest session running a non-
Windows operating system, the host configuration settings for the guest session can be
changed. Common changes to a guest session include things such as the following:
. Adding or limiting the RAM of the guest session
. Changing network settings of the guest session
. Mounting a CD/DVD image or mounting a physical CD/DVD disc
Adding or Limiting the RAM of the Guest Session
A common configuration change that is made of a guest session is to increase or decrease