Happy Endings: Finishing the Edges of Your Quilt (11 page)
Read Happy Endings: Finishing the Edges of Your Quilt Online
Authors: Mimi Dietrich
Tags: #Crafts & Hobbies, #Quilts & Quilting

Use a darker color to frame your quilt and accent the design.
In addition to color and pattern, you’ll need to make some other decisions about the type of binding you’re going to use. Let’s review the pros and cons of single-fold versus double-fold bindings, and straight-grain versus bias binding. Once you decide what type of binding you want to add, you can easily calculate how much fabric you need and how to cut it.
Single-Fold versus Double-Fold Binding
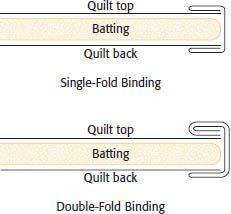
Single-fold binding, which is sometimes referred to as traditional binding, covers the edges of the quilt with one layer of fabric. Double-fold, or French, binding, covers the edges of the quilt with two layers of fabric, making it more durable. Most quilt-pattern instructions call for double-fold binding because of its durability; however, there are occasions when you might want the flexibility of using a single-fold binding. For instance, when you bind irregular edges, such as on a Grandmother’s Flower Garden quilt, you’ll find it easier to maneuver all the angles if you’re using just a single layer of binding fabric. For most other situations, however, double-fold binding is more desirable. The illustrations below show the difference in how the fabric covers the quilt edges with the two types of bindings.
Straight-Grain versus Bias Binding
In addition to determining how many layers of fabric you want in your binding, you’ll also need to decide if you want or need to use bias or straight-grain binding. Cutting your binding strips on the straight of grain is quick and easy to do, and it requires less fabric than bias binding. It works very nicely for quilts with straight edges and square corners.
However, if your quilt has curved edges, rounded corners, or unusual shaped angles, bias binding is the best option. Cutting the fabric on the bias (at a 45º angle to the selvage edge) gives your strips a built-in stretch that helps your binding round the curves and still lie smoothly. Bias binding also miters quite nicely at the corners. When applied to the edge of your quilt, the bias threads cross the edge, creating a durable finish.
Of course, you can also use bias binding on a quilt with straight edges to take advantage of the binding-fabric design. Stripes and plaids look great made into bias binding because the design lines fall on the diagonal, creating a wraparound effect at the edges. Even some print fabrics that have a linear design create a nicer binding when cut on the bias.

Determining Yardage for Binding
Armed with your decision about what type of binding you’ll make, whether it’s single-fold bias binding or straight-grain double-fold binding, and the size quilt you’re making, you can now use that information to help you determine how much binding you’ll need and ultimately how much fabric you’ll need to buy.
How Many Binding Strips Are Needed?
Start by calculating how many inches of binding you’ll need to go around the perimeter of your quilt. Many project directions may provide this information for you, but it’s easy enough to calculate yourself, especially if you have a calculator handy! Simply measure around the outside edges of your quilt and add about 10" extra for seam allowances and turning the corners. (If your quilt has scalloped or sculpted edges, measure around the curved edges using a flexible tape measure.)
Instead of measuring all the way around your quilt, you can measure the length and the width, add the two measurements together, and multiply the answer by two. Then add 10" extra. For instance, if you’re making a crib quilt that measures 45" x 65", add 45 + 65 = 110; 110 x 2 = 220; 220 + 10 = 230. You’ll need 230" of binding.
If you are planning straight-grain binding, divide 230" by the width of your fabric. I use 42" fabric, but to allow for seam allowances and shrinkage, I divide the total inches needed by 40". In this example, 230 ÷ 40 = 5.75. Round that up to the next whole number, and you’ll see that you need to cut six binding strips for your quilt.
For bias binding, each strip is a different length, so you’ll have to measure the strips as you cut them to see how many total strips you’ll need to make 230" of binding.
How Wide Will Your Strips Be?
The second piece of information you’ll need to determine how much fabric it will take to bind your quilt is how wide you will cut your strips. The answer to that question again depends on what type of binding you’ve decided to make.
Single-fold binding.
This option covers the edge with a single layer of fabric and finishes approximately one-quarter of the width of the cut-size strip.
Traditional binding cut 2" wide allows for two ½" seam allowances, with ½" showing on the front of the quilt and ½" showing on the back. (I like to use ½" seams on single-fold binding because it’s easier to control the fabric while stitching—especially with bias strips.) If you cut 2½"-wide binding strips, you will have a finished size of ⅝"; 3"-wide strips finish at ¾". If you are using thick batting, add ¼" to the cut size to allow the binding to turn over the thickness of the batting.
Note that this technique works fine on quilts with wide borders, but if patchwork blocks or pieced borders go right to the edges of the quilt, the wide seam allowance will bite into the patchwork design, cutting off any points.
Double-fold binding.
This option applies a double layer of fabric around the quilt edges and finishes to approximately one-sixth the width of the cut-strip size. For example, double-fold binding cut 2" wide allows for two ¼" seam allowances and ⅜" showing on the front and back of the quilt, with ⅜" for the front and back of the quilt on the inside layer. If you’d like a wider binding, you can cut 2½"-wide strips, and the finished size will be ½", using ¼" seam allowances. If you use a thick batting in your quilt, it’s a good idea to add ¼" to the cut size to allow for the batting thickness.
M
IMI
’
S
F
AVORITE
I like to cut binding strips 2" wide for double-fold binding. This started with my first rotary ruler, which was only 2" wide. But seriously, I like this size because finished double-fold binding sews on smoothly with a ¼" seam allowance, hugs the edge of the quilt, makes a neat miter fold, and covers all stitching when it is turned over the edge of the quilt. I usually use thin batting. For a thicker quilt, I cut the binding 2¼" wide.
Some quilters, however, do prefer wider bindings. You might like a wider frame for your design, or you may feel more comfortable applying a wider strip. Cut wider fabric strips to create wider binding; just remember to account for seam allowances, the binding width on the front and back of your quilt, and the thickness of the quilt.
How Much Fabric Is Needed?
After measuring the distance around your quilt and deciding how wide you want your binding, you can now calculate the amount of fabric you need to make binding. Whether you have full-width yardage or only a square of fabric, the information on
page 32
can help you figure out just how much fabric you’ll need.
Using a rectangle.
Use a rectangle of fabric to easily cut binding strips along the straight grain of the fabric or to cut continuous straight binding (see
page 35
). You can also use a rectangle of fabric to cut bias strips or continuous bias binding for larger quilts.
Multiply the number of strips needed (see
page 30
) by the width you want to cut your strips (see
page 31
). In our crib quilt example, we needed six binding strips. If we want to cut them 2" wide for double-fold binding, we would need 12" of fabric (6 x 2" = 12"). When you buy fabric, allow a little extra for shrinkage or uneven edges. I generally allow ⅛ yard extra when the amount I need is less than a yard. I allow ¼ yard extra when I need more than a yard.