Happy Endings: Finishing the Edges of Your Quilt (6 page)
Read Happy Endings: Finishing the Edges of Your Quilt Online
Authors: Mimi Dietrich
Tags: #Crafts & Hobbies, #Quilts & Quilting


Choosing Batting
Quilt shops carry a variety of battings. They come in different fibers: cotton, polyester, wool, blends, and even silk. And you can choose from different thicknesses that will give your quilt a puffy loft or a thinner, old-fashioned charm.
As you make small quilts, try different battings for your projects. You will soon find a batting that appeals to you. You might like the way it looks when it’s finished, how it feels as you hand quilt, how it works with your machine, or the way it handles when you apply the binding. I use light-colored background fabrics for appliquéd quilts, so I always use bleached cotton batting. Natural or unbleached batting may contain darker cotton pieces that can show through light fabrics.
Make sure you read the product information on the batting labels regarding the amount of quilting required and instructions for laundering. You will soon find your personal preference.
M
IMI
’
S
F
AVORITE
I like the old-fashioned look of a thin cotton batting. I also like the way it feels when I hand quilt, and it makes it easy to control the quilt layers when I apply the binding. If you want even more of an antique look to your quilt, wash it when it’s complete and the cotton batting will shrink a little, giving your quilt a slightly crinkled effect.
Cutting Batting to Size
As with quilt backing, cut your batting larger than the quilt top. Otherwise, as you quilt, the batting could slip under the quilt top and end up being too small. You can always trim it to size later.
For a small wall quilt or baby quilt, the batting should be at least 1" to 2" larger on all sides of the quilt. For a large quilt, the batting should be 4" to 6" larger on all sides.
If necessary, stitch together two pieces of batting to make one large enough to fit your quilt. Lay the pieces on a flat surface so that their edges overlap slightly. With scissors, cut through the overlapped section and remove the two narrow trimmings. Now the batting edges are butted exactly together. Simply whipstitch them together by hand with light-colored thread. Don’t pull too tightly or the butted edges will pucker.
Layering and Basting a Quilt
1.
Press the quilt backing so that it is smooth. Make sure that the backing is larger than the quilt top all the way around.
2.
If the batting is wrinkled from being in a package, let it relax overnight or fluff it in your clothes dryer for about 15 minutes on the lowest setting before using it.
3.
Press the quilt top so that all the seams are flat.
4.
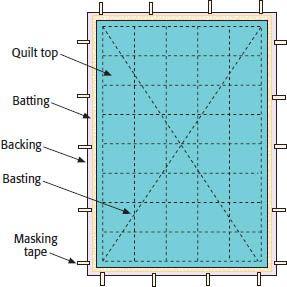
Place the backing on a smooth surface, right side down. Use masking tape to fasten the corners and sides of the fabric to the surface.
5.
Place the batting on the backing, smoothing out any wrinkles but taking care not to stretch it out of shape.
6.
Lay the quilt top, right side up, on top of the batting. Pin the three layers together in several places.
7.
If you plan to hand quilt, use a long needle and light-colored thread for basting. Start in the center and baste a large X in the center of the quilt. Then baste lines parallel to the quilt edges in both directions to hold the layers together. Space the basting lines 4" to 6" apart. The more rows of basting you use, the better your layers will stay together. Baste around the outside edges about ⅛" from the edge.
If you plan to machine quilt, use safety pins to baste the layers together at 4" to 6" intervals. You can take a pin out of the quilt as you approach it with your machine, whereas stitching over thread basting can prove frustrating when it’s time to pull out the basting threads.
Quilting Tips for a Happy Ending
When it comes to quilting your project, you can choose hand quilting or machine quilting, or you can hire a professional long-arm machine quilter to do the quilting for you.
To achieve a happy ending with your quilt, it is important to quilt your project with an even amount of quilting. Whether it’s hand or machine quilted, you can end up with puckered edges if some areas of the quilt are heavily quilted (such as with tiny stippling) while other areas are sparsely quilted. That’s not to say that you have to do the same type of quilting across the entire surface of the quilt. Just try to balance the amount of quilting from area to area.
Finishing Edges
without Binding
Some quilts are finished without binding. Simply sew the front and back of the quilt together by hand or machine to encase the batting and all raw edges of the fabric. Use this fast-and-easy technique when you do not want a row of binding on the edge of your quilt or when you do not have binding fabric to match your quilt
.
This method is often used to finish comforters or quilts that will be tied or scantily quilted. A row of hand or machine quilting near the edge can give the illusion of binding. This edge treatment is called an “envelope edge.”
Finishing by Hand
If the quilting is already completed on your quilt, sew the front and back of the quilt together by hand. It is important, however, that no quilting stitches are within ½" of the quilt edges to allow space to turn under the edges.
1.
Trim the back of the quilt so that the cut edges of both the quilt top and backing are ¼" larger than the finished size of the quilt. Carefully trim the batting ⅛" smaller than the finished size of the quilt. Fold the front of the quilt over the batting, turning under the ¼" seam.
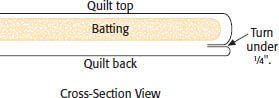
2.
Turn the back of the quilt under ¼" and pin the folded edge to match the front of the quilt.
3.
Stitch the front and back folded edges together using a slip stitch.
Finishing by Machine
If you want to finish your unbound quilt by machine, you’ll need to sew the edges together before you quilt your project. This method works best when you are planning to tie the quilt or quilt it sparingly. It is difficult to quilt a large area closely after the edges have been stitched because the layers can shift. This is a good method to use for a child’s fluffy quilt or a comforter.
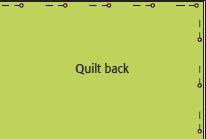
1.
Place the quilt top and backing right sides together. Pin the edges. If necessary, trim the back even with the front.
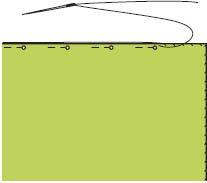
2.
Sew a ¼"-wide seam around the four sides of the quilt, leaving an opening on one side. The opening should not be near the corner. Backstitch at the starting and stopping points to secure the stitching so that it won’t come undone when you turn the quilt right side out.
