Happy Endings: Finishing the Edges of Your Quilt (3 page)
Read Happy Endings: Finishing the Edges of Your Quilt Online
Authors: Mimi Dietrich
Tags: #Crafts & Hobbies, #Quilts & Quilting

BOOK: Happy Endings: Finishing the Edges of Your Quilt
13.5Mb size Format: txt, pdf, ePub
If your border length is more than 40", cut two borders at a time along the length of a double layer of fabric.

Happy Ending Hint
When making larger quilts, you may find it difficult to cut long borders. So why not tear it instead? To “cut” long borders, just make a small clip at the edge of the fabric and tear along the straight grain. You can tear borders on the lengthwise grain, but be careful on the crosswise grain—the edges may stretch.


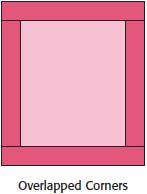
Adding Borders with Overlapped Corners
These are the easiest borders to apply to your quilt. Two side borders are stitched to the quilt first, and then the top and bottom borders are added. No mitering or fussing is needed!
1.
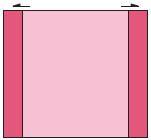
Measure the length of the quilt top, from top to bottom, through the center. Cut two side border strips to this measurement. Fold each side border in half to find the center and mark with a straight pin or by pinching a crease at the fold. Fold each quilt edge in half and also mark the centers.

2.
With right sides together and raw edges aligned, pin the side borders to the quilt top, matching the center pins and the ends. If necessary, ease each half of the quilt to fit the borders. Sew the border to the quilt using a ¼" seam allowance. Press the seam allowances toward the borders.
3.
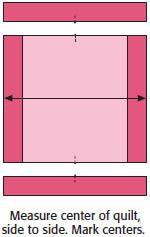
Measure the width of the quilt top, from side to side, through the center, including the borders you just attached. Cut the top and bottom border strips to this measurement. Mark the center points of the border strips and quilt top, and pin the borders to the quilt top as you did for the side borders. Stitch the borders to the quilt and press as before.

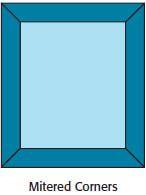
Adding Borders with Mitered Corners
Mitered borders have a diagonal seam where two border strips meet in the corners, extending from the corner of the pieced or appliquéd section of the quilt to the outer corner. This corner treatment is a little more formal than overlapped corners.
Other books
Washington Square by Henry James
Warriors of Ryon: Bayden by S.K. Yule
A Darkling Sea by James Cambias
Biowar by Stephen Coonts
Lockwood & Co.: The Creeping Shadow by Jonathan Stroud
Stolen by Rebecca Muddiman
Ultraviolet by Lewis, Joseph Robert
The Avengers Battle the Earth-Wrecker by Otto Binder
The Confidential Agent by Graham Greene
Hard Knocks by Zoe Sharp