iOS Programming: The Big Nerd Ranch Guide, 3/e (Big Nerd Ranch Guides) (56 page)
Read iOS Programming: The Big Nerd Ranch Guide, 3/e (Big Nerd Ranch Guides) Online
Authors: Aaron Hillegass,Joe Conway
Tags: #COM051370, #Big Nerd Ranch Guides, #iPhone / iPad Programming

Subclassing UITableViewCell
A
UITableView
displays a list of
UITableViewCell
s. For many applications, the basic cell with its
textLabel
,
detailTextLabel
, and
imageView
is sufficient. However, when you need a cell with more detail or a different layout, you subclass
UITableViewCell
.
In this chapter, you will create a custom subclass of
UITableViewCell
named
HomepwnerItemCell
that will display
BNRItem
instances more eloquently. Each of these cells will show a
BNRItem
’s name, its value in dollars, its serial number, and a thumbnail of its image (
Figure 15.1
).
Figure 15.1 Homepwner with subclassed UITableViewCells

UITableViewCell
is a
UIView
subclass. When subclassing
UIView
(or any of its subclasses), you typically override its
drawRect:
method to customize the view’s appearance. However, when subclassing
UITableViewCell
, you don’t change the cell’s appearance directly.
Each cell has a subview named
contentView
, which is a container for the view objects that make up the layout of a cell subclass (
Figure 15.2
). You subclass
UITableViewCell
by changing the view objects in a cell’s
contentView
. For instance, you could create instances of the classes
UITextField
,
UILabel
, and
UIButton
and add them to the
contentView
. (If you wanted something even more daring, you could create a
UIView
subclass, override its
drawRect:
, and add an instance of it to the
contentView
.)
Figure 15.2 HomepwnerItemCell hierarchy

Adding subviews to the
contentView
instead of directly to the
UITableViewCell
subclass is important because the cell will resize the
contentView
at certain times. For example, when a table view enters editing mode, the
contentView
resizes itself to make room for the editing controls (
Figure 15.3
). If you were to add subviews directly to the
UITableViewCell
, these editing controls would obscure the subviews. The cell can’t adjust its size when entering edit mode, but the
contentView
can and does.
Figure 15.3 Table view cell layout in standard and editing mode

Open
Homepwner.xcodeproj
. Create a new
NSObject
subclass and name it
HomepwnerItemCell
. In
HomepwnerItemCell.h
, change the superclass to
UITableViewCell
.
UITableViewCell
Deciding how to lay out a cell’s interface is just like deciding how to lay out any other interface: if there is more than one view, you do it in a XIB file. Create a new
Empty
XIB file and name this file
HomepwnerItemCell.xib
. (The
Device Family
is irrelevant for this file.)
Open
HomepwnerItemCell.xib
and drag a
UITableViewCell
instance from the library to the canvas. (Make sure you choose
UITableViewCell
, not
UITableView
or
UITableViewController
.)
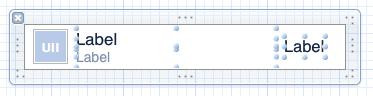
This cell needs to display three text elements and an image, so drag three
UILabel
s and one
UIImageView
onto the cell. Configure them as shown in
Figure 15.4
. Make the text of the bottom label a little smaller and a dark shade of gray.
Figure 15.4 HomepwnerItemCell’s layout
While this cell has a specified width and height in the XIB file, we don’t know what the actual width and height will be in the application. Since our application will run on the iPhone and on the iPad (in both portrait and landscape orientations), the cell will need to adjust horizontally to fit the window it is on. Thus, you must set the autoresizing mask for each subview. In the size inspector, change the subviews’ autoresizing masks to what is shown in
Figure 15.5
.
Figure 15.5 Autoresizing masks for HomepwnerItemCell

When the cell resizes horizontally (which it will depending on the orientation and the device), the label on the righthand side will stay fixed to the righthand side. The rest of the subviews will stay fixed to the lefthand side, and the two labels in the center will grow wider.
Figure 15.6 Changing the cell class

Finally, click on the cell in the outline view and select the identity inspector. Change the
Class
to
HomepwnerItemCell
(
Figure 15.6
).
This cell looks nice, and it is almost ready to use in
Homepwner
, but there is one problem. When an instance of
HomepwnerItemCell
is created in
tableView:cellForRowAtIndexPath:
, you will need to set the
text
of each of these labels and the
image
of the
UIImageView
. (A cell that you can’t configure would be pretty useless.) Thus,
HomepwnerItemCell
needs properties to access each of the subviews that makes up its interface.
The next step, then, is to create and connect outlets on
HomepwnerItemCell
for each of its subviews. You will use the same technique you have been using the last few chapters of Control-dragging into the source file to create the outlets. However, there will be a small difference for
HomepwnerItemCell
’s outlets: they will be properties instead of simply instance variables.
In
DetailViewController
, none of the outlets to the
UITextField
s were exposed as properties because no other object was supposed to have access to them. In this case, the table view’s data source must configure each subview. By exposing the subviews as properties, the data source (
ItemsViewController
) will have the access it needs to do this.
Option-click on
HomepwnerItemCell.h
while
HomepwnerItemCell.xib
is open. Control-drag from each subview to the method declaration area in
HomepwnerItemCell.h
. (If there is an instance variable area defined in your file, you want to drag to the area after the closing bracket.) Name each outlet and configure the other attributes of the connection, as shown in
Figure 15.7
. (Pay attention to the
Connection
,
Storage
, and
Object
fields.)
Figure 15.7 HomepwnerItemCell connections

Double-check that
HomepwnerItemCell.h
looks like this:
@property (weak, nonatomic) IBOutlet UIImageView *thumbnailView;
@property (weak, nonatomic) IBOutlet UILabel *nameLabel;
@property (weak, nonatomic) IBOutlet UILabel *serialNumberLabel;
@property (weak, nonatomic) IBOutlet UILabel *valueLabel;
@end
You can also see in
HomepwnerItemCell.m
that making a property outlet connection automatically adds a
@synthesize
statement for the property.
Finally, note that you did not specify the
File's Owner
class or make any connections with it. In the case of
UITableViewCell
XIBs, the
File's Owner
is not used.