Mac Hacks (3 page)

. Partition that Drive Nondestructively
At
some point you’ll want partitions on your hard drive, but
partitioning a drive usually means erasing the data on it first. This hack
reveals how to partition your drives without losing any data.
When you get a new Mac, you’re understandably excited and you want
to start using that thing right away. You create some data, transfer some
pics onto it, and now the Mac is yours. A few weeks later you realize
you’d really like to have some partitions on your Mac. The problem is
there’s no obvious way to partition the hard drive without losing the data
you’ve created.
The most obvious workaround is to back up your disk with Time
Machine or clone it, and then boot from some other disk and partition your
disk. But that involves a lot of time and hassle. What you want is a
method to partition your existing disk
without
a lot
of work.
When
you partition a drive in OS X, the operating system will
treat that single drive physical drive as multiple drives. The
partitions will look like completely separate disks in the Finder and
you can treat them as different disks for everyday computing.
Partitioning your drive is useful for a variety of reasons.
Partitions can help with organization, troubleshooting, and backup
planning. But there’s one big caveat: partitions won’t help you if the
hard drive dies—all the partitions go down with it.
The
coolest hacks use tools in unintended ways. This one uses
Boot Camp Assistant and a Windows install disk to create a new partition
without having to erase your data. Boot Camp Assistant is an application
published by Apple that helps you install Windows on your Mac. If you’re
wondering how installing Windows on a Mac relates to partitioning your
drive without losing data, the answer is simple: one of the steps Boot
Camp performs is partitioning your drive.
Note: This hack requires a Windows install disk. But it
doesn’t
require a never-used install disk. I used
an old Vista install disk, but you can get away with using any disk
someone has laying around. You won’t be running Windows anyway!
The good news is that Boot Camp Assistant is already on your Mac
(you’ll find it the Utilities folder), so the only thing you need to hunt
down is that Windows install disk. Once you find one, launch Boot Camp and
get ready for some ominous warnings. The first screen of Boot Camp
Assistant warns you to back up your computer.
Heed this
advice!
Your drive is about to be messed with and, without a
good backup, you could suffer major data loss. (See
[Hack #1]
for advice on backing up.)
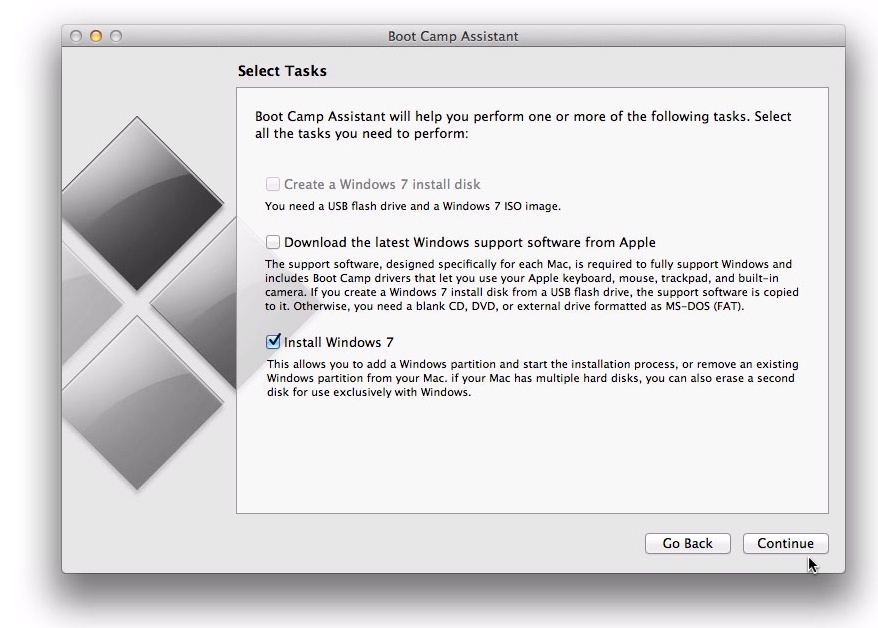
Click Continue and you’ll see a few checkboxes offering to get some
Windows support files from Apple’s servers and install Windows (
Figure 1-5
). You’re not here to
install Windows, you just want Boot Camp Assistant to take care of a
little drudgery. But if you uncheck all the boxes, then Boot Camp
Assistant won’t run. If you read the fine print, you’ll note that the
Install Windows option states that it will add a partition for Windows,
which is exactly what you want, so turn off all the checkboxes
except
that
one.
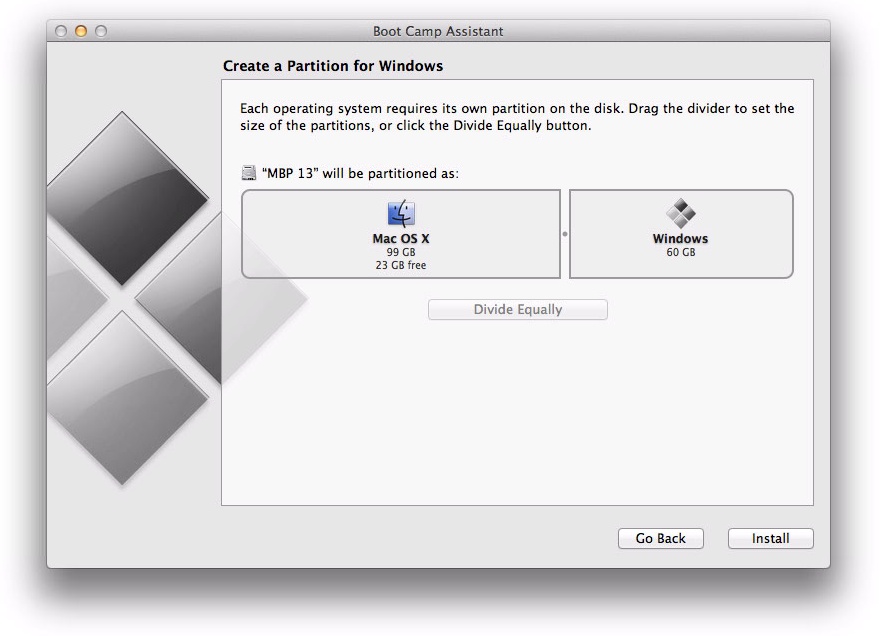
Once you click Continue, you’ll find the path to happy partitioning.
You’ll have an option to set partition sizes (
Figure 1-6
). What partition
scheme you use is up to you, but the larger the partition you select the
more flexibility you’ll have in the future.
Once you’ve made your decision, insert your Windows install disk and
then click Install. Your Mac will restart and attempt to install Windows.
But you aren’t after Windows, so don’t waste time installing Windows; stop
the install process by pressing the Eject key while the Mac is rebooting
to force it to use its internal drive. Your Mac will go through the normal
startup process and when it’s done, the new partition will just be sitting
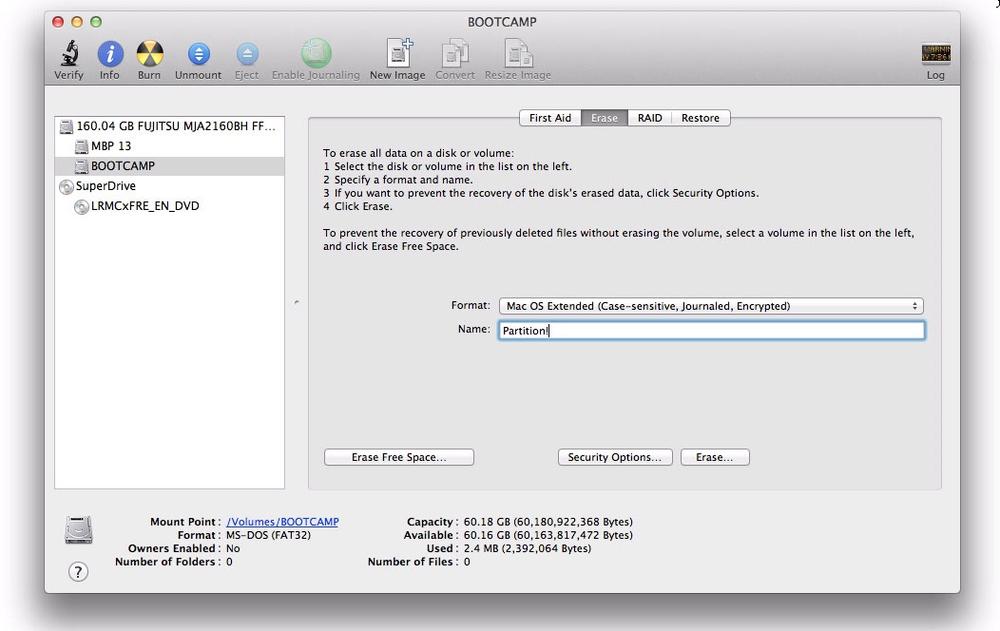
there! Back to Disk Utility to format your brand-new partition in any
manner you wish (
Figure 1-7
).

different. But for the purposes of partitioning, only check the Install
Windows box.

partitions or you could opt to use the Divide Equally button. It’s your
partition—do what you want!

MS-DOS FAT to a more Mac-friendly partition. Sure, your Mac can use
disks formatted in MS-DOS FAT, but it prefers HJFS+ made specifically
with Macs in mind.
It
will likely occur to you that tricking Boot Camp Assistant
is one way to partition your hard drive, but probably an unnecessary
way. After all, if Boot Camp Assistant can nondestructively partition
your disk, you can probably do it yourself. You’re right—you can do it
without Boot Camp Assistant, though you’ll need to spend some time
with Terminal.
Note: From the department of “It can’t be said enough,” you
really should back up your drive before you try this. Is your data
backed up? Good, let’s get going!
Fire up Terminal (it’s in your Utilities folder) and you’ll see a
window that looks remarkably like an old-style computer terminal. If you
feel a little intimidated by Terminal, check out
Chapter 6
before you start; if not, it’s time to start
typing. Take
a deep breath and type:
diskutil list
Not too hard, right? What
that command does is tell your Mac to reveal all the
partitions on the drives mounted on your Mac (“mounted” doesn’t
necessarily mean physically mounted—it just means currently available to
your machine; you can have disks plugged in that aren’t mounted). The
output will vary from machine to machine, but it’s generally almost
humanly understandable. When I randiskutil liston
my iMac in Knoxville, Tennessee, I got an output that looked like
this:
| | | |
|
|
|
|
|
|
|
|
|
|
|
|
|
|
|
|
|
|
|
|
|
|
|
|
|
|
|
|
|
|
|
|
|
|
|
|
What can we learn from this output? SIZE, as you’ve guessed is the
size of the disk. IDENTIFIER is how the computer tells one disk from
another, and TYPE NAME is how you can tell what each disk is. In this
particular case, we have a 1.0 TB disk (disk0) that has been divided
into seven partitions. The first partition is EFI (disk0s1), which
contains some device drivers and other necessary things for your Mac to
boot; you won’t need to mess with that partition for the purposes of
this hack. I created the second partition (disk0s2) for storing movies,
so we’ll leave that one alone, too. The next one (disk0s3) is a recovery
disk generated during the install of Lion or Mountain Lion. We won’t be
altering that partition in this hack either, so we can skip Apple_Boot
Recovery HD.
This brings us to the disk we want to repartition: Apple_HFS the
300 (a.k.a. disk0s4). Before we partition the disk, we should decide
what size partitions we want. To figure that out, we need to know how
much of the disk’s space is already in use (we don’t want to lose any
data, now do we?). To find that out, at the Terminal prompt,
type:
df -h
Thedfcommand tells your
Mac to list information based on file systems, and the–hflag tells Terminal to list the data in
human-readable form. The output will tell you more than you really want
to know so, in this case, we’ll just pay attention to the disk we’re
going to partition. Here’s the relevant information:
|
|
|
|
|
|
|
|
|
|
|
|
|
|
|
|
|
|
Well that is
almost
humanly understandable!
If you look closely, you can tell that the disk known as “the 300” is
272 GB in size and that 68 GB have been used, leaving us with 204 GB
available. That’s certainly enough space to make it worth our while to
create a new partition.
Let’s
see what the limits of our partitions will be using thediskutilcommand:
diskutil resizeVolume disk0s4 limits
Which tells us:
For device disk0s4 the 300:
Current size: 292.2 GB (292227104768 Bytes)
Minimum size: 78.3 GB (78349324288 Bytes)
Maximum size: 292.2 GB (292227104768 Bytes)
Those are the limits of what we can do; we’re free to choose any
value within those limits. In this case we’ll use 100 GB for the old
disk (“the 300”) and 190 for the new disk (which will be named,
unimaginatively, “NEWPART”). To get the new partition made, we need to
usediskutilto tell the program exactly what we want
to do. To do all that, type:
diskutil resizevolume /dev/disk0s4 100G JHFS+ "NEWPART" 190G
That doesn’t make a much sense if you just look at it. Here’s what
each part of that command represents:
diskutilis the program
that will be doing the work; it’s built into OS X.resizevolumeexplains what
you want diskutil to do./dev/disk0s4tells diskutil
which disk you want it to resize.100Gtells diskutil that
you want the old partition reduced to 100 GBs.JHFS+tells diskutil that
you want the new partition to be a
Journaled Hierarchical
File System Plus
, which is the type of partition your Mac
prefers (though you can choose other systems if you like)."NEWPART"tells diskutil
what to name the new partition.190Gtells diskutil you
want the disk partition to be 190 GBs.
You’ll need to adjust the command to your specific desires. Once
you get all that typed into Terminal (careful—spelling and spacing
matters), hit Return anddiskutilwill start the
process. You won’t see the nifty OS X progress bar that you’re familiar
with; instead you’ll see the Terminal version of a progress bar. (What
does a progress bar look like in the Terminal? It looks like[***----], with*representing the completed parts.) The
process can take some time (don’t close that Terminal window!), but once
it’s done you’ll have all your data
and
a new
partition! When it’s finished,diskutilwill print
out a list of the disks on your Mac, which includes the new
partition:
|
|
|
|
|
|
|
|
|
|
|
|
|
|
|
|
|
|
|
|
|
|
|
|
|
|
|
|
|
|
|
|
|
|
|
|
|
|
|
|
You’re probably wondering why the partition came out as 192.1 GB
instead of 190 GB. The reason is actually kind of interesting: the
maximum partition is 292.2 GB but the partitions requested by the
Terminal command add up to 290 GB. So instead of wasting that space,diskutiladds it on to the larger partition. (What
happened to the missing .1 GB? The world may never
know.)
