Make: Electronics (76 page)
Authors: Charles Platt

Experiment 32: A Little Robot Cart
Robotics is another application of electronics that deserves a book in itself—or several books. So, once again, I’m going to give you an introduction followed by some points that you can follow if you want to go further. As always, I will start with the simplest possible device, which in the world of robotics is a cart that finds its way around your living room.
You will need:
- SPST or SPDT microswitches requiring minimal pressure to activate them. A force between 0.02 and 0.1 newtons would be ideal. Quantity: 2. See Figure 5-74.
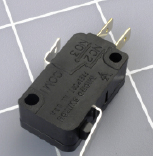
Figure 5-74.
A microswitch has a small button (at the front, righthand side in this picture) that is often actuated by a pivoted metal lever. The switch can respond to a very light pressure, but can handle relatively high currents. - DC gear-motor, rated for any voltage between 5 and 12, drawing a maximum of 100mA in its free-running state, output shaft turning between 30 and 60 RPM. Quantity: 1. A motor is shown in Figure 5-75.
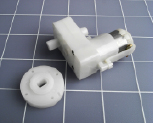
Figure 5-75.
For the Little Robot Cart, I found this 5-volt motor, which is supplied with a disc that fits its output shaft. The combination cost less than $10. - Disc or arm that fits securely onto your motor shaft. Quantity: 1.
- 555 timer. Quantity: 1.
- DPDT nonlatching relay rated for the same voltage as your motor. Quantity: 1.
- 1/4-inch plywood or plastic, one piece about 2 feet square.
- #4 sheet-metal screws, 5/8 inch or 3/4 inch long. Quantity: 2 dozen.
- #6 bolts, 3/4 inch long, with nylon-insert lock nuts. Quantity: 2 dozen.
- 1/4-inch bolts, 1 inch long, with nuts, to mount the wheels. Quantity: 4.
I’m not specifying one particular motor, because if I did, it might not be available by the time you read this. Motors aren’t like logic chips, which have retained their basic function throughout various improvements over a period of several decades. Motors come and go, and many that you may run across will be surplus parts that will never been seen again. Search online for “gear-motor” or “gearhead motor” and find one as close as possible to the specification that I have provided. The mechanical power output of the motor shouldn’t be important, because we won’t be requiring it to do much work.
The important consideration when you buy your motor is that you should also obtain something that fits onto its output shaft. Typically, this will be a disk or arm that can be screwed into place. To this you can then add a larger wheel of your own, which you can cut with a hole saw or make from the screw-on lid of a jar, or anything else circular that you may find in the house.
A larger wheel will make your cart move faster than a smaller wheel, but will reduce its torque, thus limiting its power to overcome obstacles.
This brings me to my next topic: fabrication. Although this is an electronics book, motors are electromechanical devices, and you have to be able to install them in some kind of a machine to get any interesting results. You can use plywood to complete the two little robotics projects here (ideally, the kind of thin, high-quality plywood sold by hobby stores) but I recommend something that looks better and is easier to work with: ABS plastic. Before you start on the robotic cart, you may want to check the section “Fundamentals: All about ABS.”
Fundamentals
All about ABS
Unless you think the steampunk movement isn’t going back far enough, you probably don’t want your autonomous robot cart to resemble a relic from before the 1800s. Therefore, wood may not be the best construction material. Metal can look nice, but is not easy to work with. For quick results that have a twentieth-century look (maybe even a 21st-century look), plastic is the obvious choice, and I feel that ABS is the best type of plastic to use, because it provides such quick, easy results. ABS stands for “acrylonitrile butadiene styrene.” Lego® blocks are made of ABS. Car-stereo installers and model-railroad buffs use it. You can use it, too. You can saw it, drill it, sand it, whittle it, and drive screws into it, and it won’t warp, split, or splinter. It’s washable, doesn’t need to be painted, and will last almost forever.
Delrin is another type of plastic, but tends to cost more and is a little tougher to drill and cut. It’s a matter of personal preference. ABS machines fairly well, but when you drill it, for example, it can “catch” on the bit and the piece will spin with the bit due to the way that plastic chips off with the bit. Delrin is self-lubricating and has better melting properties under the heat of machining, so it drills and cuts much more cleanly and easily than ABS.
Where to find ABS
Pieces of ABS a couple of feet square are available from online sources such as
http://hobbylinc.com
or estreetplastics (an eBay store), but you’ll save money if you can truck on down to your nearest plastic supply house and buy it like plywood, in sheets measuring 4 by 8 feet. To discover whether you have a nearby plastic supply house, search for “plastic supply” in your yellow pages or Google Local.
Piedmont Regal Plastics has many supply centers around the nation, but you’ll have to collect it yourself, and they may not be willing to cut small pieces. You can check online at
http://www.piedmontplastics.com
for their locations.
Stock colors of ABS include black, white, and “natural,” which is beige. Sheets usually are textured on one side, which is the side that should face outward, as it is more scratch-resistant than the smooth side.
Because you won’t be adding paint or other finishes, you’ll have to be careful not to scuff the plastic or scratch it while working. Clean your bench thoroughly before you begin, taking special care to remove any metal particles, which tend to become embedded in the plastic. Use wooden shims in the jaws of your vise, and avoid resting the plastic accidentally on any sharp tools or screws. Working with ABS requires a clean environment and a very gentle touch.
 Cut with Care
You can saw ABS, but if you use a table saw, the plastic will tend to melt and stick to the blade. These smears will get warm and sticky when you feed the next piece of plastic into the saw, and the result will be extremely unpleasant. The whirling blade will grab the plastic and hurl it at you powerfully enough to break bones. This is known as “kickback” and is a very serious risk when sawing plastic.
If you have extensive experience using a table saw, you are actually more vulnerable, because the reflexes and cautions you have developed while dealing with wood will not be adequate for working with plastic. Please take this warning seriously!
Your first and most obvious precaution is to use a plastic-cutting blade, which has a larger number of thicker teeth to absorb the heat. The blade I have used is a Freud 80T, but there are others. If you use a blade that is not suitable, you will see it starting to accumulate sticky smears. This is the only warning you will get. Clean that blade with a solvent such as acetone, and never use it for ABS again.
Regardless of other precautions, always wear gloves and eye protection when using a table saw, and stand to one side when feeding materials into it. Personally, after one episode of kickback that I thought had broken my arm, I prefer not to use a table saw on plastic at all.
For long, straight cuts, the alternatives include:
- Panel saw (big and expensive, but safe and accurate).
- Miniature handheld circular saw with a blade around 4 inches in diameter, guided with a straight edge clamped to the sheet.
- Hand saw. This is my old-school preference. My favorite is a Japanese pull-to-cut saw, which makes very clean cuts: the Vaughan Extra-Fine Cross-Cut Bear Saw, 9-1/2 inches, 17 tpi (teeth per inch). If you use one of these, be careful to keep your free hand out of the way, as the saw can easily jump out of the cut. Because it is designed to cut hard materials such as wood, it has no difficulty cutting soft flesh. Gloves are strongly recommended.

Figure 5-76.
The perils of kickback. Plastic easily sticks to the blade of a table saw, which will hurl it at you unexpectedly. Use other tools to cut plastic.
Curving Cuts
Curving cuts involve relatively little danger, although eye protection and gloves are still advisable. My preferred tools:
- Band saw with a 3/8- or 1/4-inch blade designed for thin wood or plywood.
- Jigsaw. I have a special liking for the DeWalt XRP using Bosch blades that are designed for hardwood or plastic. This will cut complex curves in ABS as easily as scissors cutting paper.
No matter what type of saw you use, you’ll have to clean ragged bits of plastic off the cut afterward, and the absolutely necessary item for this purpose is a deburring tool, available from
http://www.mcmaster.com
and most other online hardware sources. A belt sander or disc sander is ideal for rounding corners, and a metal file can be used to remove bumps from edges that are supposed to be straight.
Figures 5-77 through 5-80 show various cutting tools. Figure 5-81 shows a deburring tool, and Figure 5-82 shows a disc sander.

Figure 5-77.
A band saw is an ideal tool for cutting complex shapes out of ABS plastic. You can often find them secondhand for under $200.
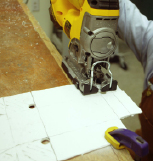
Figure 5-80.
This DeWalt jigsaw can run at very slow speeds, enabling precise and careful work with plastic.
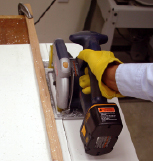
Figure 5-78.
A handheld circular saw, running along a straight-edge, is much safer than a table saw for cutting plastic, and can produce comparable results.
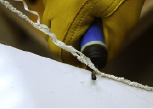
Figure 5-81.
A deburring tool will clean and bevel the sawn edge of a piece of plastic in just a couple of quick strokes.
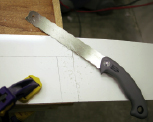
Figure 5-79.
This Japanese-style saw cuts when you pull it, rather than when you push it. After some practice, you can use it to make very accurate cuts. Because ABS is so soft, minimal muscle-power is required.
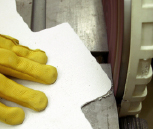
Figure 5-82.
A belt sander or disc sander is the ideal tool for rounding corners when working with ABS plastic.