Microsoft Visual C# 2005 Express Edition: Build a Program Now! (26 page)
Read Microsoft Visual C# 2005 Express Edition: Build a Program Now! Online
Authors: Patrice Pelland
Tags: #General, #Computers, #C♯ (Computer program language), #Programming Languages, #C#, #Microsoft .NET Framework, #Computer Books: Languages, #Computer Graphics, #Application software, #C# (Computer program language), #Programming, #Microsoft Visual C# .NET, #Microsoft Visual C♯ .NET, #Electronic books, #Game Programming & Design, #Computing: Professional & Programming, #C (Computer program language), #Computers - Languages, #Programming Languages - C#, #Programming & scripting languages: general

Chapter 6: Modify Your Web Browser Now!
109
C06622132.indd 109
C06622132.indd 109
10/24/05 3:37:31 PM
10/24/05 3:37:31 PM
C06622132.indd 110
C06622132.indd 110
10/24/05 3:37:31 PM
10/24/05 3:37:31 PM

Fixing the
Broken Blocks
Debugging an
As you’ll discover more and more, when you develop an application, you
Application, 112
rarely succeed on your first attempt. Most of the time (and especially when you start developing applications), the process goes like this: brainstorm on paper, look at the users' needs (often yours), perform some analysis, prototype, design, develop, test, fix bugs, test the product again, and finally release it to people. This is a high-level view of the process; it can be much more complicated or simplified. It all depends on the complexity of the projC07622299.indd
7
ect, the number of people involved, and so on. One thing is certain: you always need to debug your applications, and Microsoft® Visual C#® 2005
provides many tools to help you fix your bugs faster.
111
111
C07622299.indd 111
10/24/05 7:13:45 PM
10/24/05 7:13:45 PM
Debugging an Application
To learn the tools and techniques to debug your applications, I’ve created a sample application that you’ll use for this chapter. If you installed the companion content at the default location, it should be at the following location on your hard drive: My Documents\Microsoft Press\VCS 2005 Express\Chapter7\. Look for a folder named DebuggerStart under the Chapter 7 folder. Double-click the DebuggerStart.sln solution.
This solution contains new items that you have not seen yet, with the first one being a solution with more than one project. This is a common practice while developing applications. In this case, the solution (named
DebuggerStart
) contains two projects: a Microsoft Windows® Forms application named
Debugger
and a managed library named
MyLibrary
(managed
DLL
). The acronym DLL stands for Dynamic Link Library. A DLL is
a library of functions that are called dynamically and as needed by an application. A DLL
The program is exclusively for
doesn’t contain a main entry point and cannot be executed by itself. Also, a DLL can be used
educational purposes of this chap-
ter. It doesn't do anything interest-
by multiple applications at the same time.
ing except teach debugging.
The second new thing is that the project Debugger has a type of file that you haven’t seen yet: a text file. You can have multiple different files in your projects, and a text file is not uncommon. In this case, the text file is used by one of the methods called by the debugger.exe application. The text file will be used by this application, so to have it in the output folder, you need to select it in the Solution Explorer and then change the Copy To Output Directory property to Copy If Newer.
Using a DLL in an Application
When you design an application, you usually have more than one component. In many cases, the components are new classes (types). It is good practice to have those types in a separate source code file instead of keeping them with the user interface code. Often, the classes are grouped in a single library or DLL.
When you want to use a type from a library, you need to make your application aware of all the types and methods contained in that library by adding a
reference
to it in the application.
112
Microsoft Visual C# 2005 Express Edition: Build a Program Now!
C07622299.indd 112
C07622299.indd 112
10/24/05 7:13:52 PM
10/24/05 7:13:52 PM


Adding a Reference to Your Application
To add new references to your application, follow the steps here.
TO ADD A REFERENCE TO YOUR APPLICATION
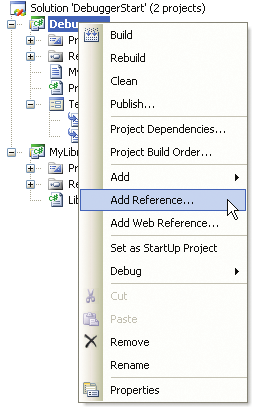
1 Select the project where you want to add the reference; in this case, select
Debugger
. Right-click the project name (i.e., Debugger) and then select
Add Reference...
. Look at Figure 7-1 to 2 make sure you’re at the right place.
As you can see from the tabs on the dialog box that appears, the
references can come from multiple sources.
Select the
Projects
tab and then select the
MyLibrary
3 project, which contains the managed DLL. Press
OK
to
add the reference to your project.
Figure 7-1
Because the DLL is in the same solution and you
Add Reference. . . menu choice from the
Debugger project
just added a reference of that DLL to your application, Microsoft Visual Studio® now knows there is a dependency between the two and will always build
the DLL first so that your application builds the exec
utable with the most up-to-date DLL possible.
You can verify that the reference has been
inserted using the following technique.
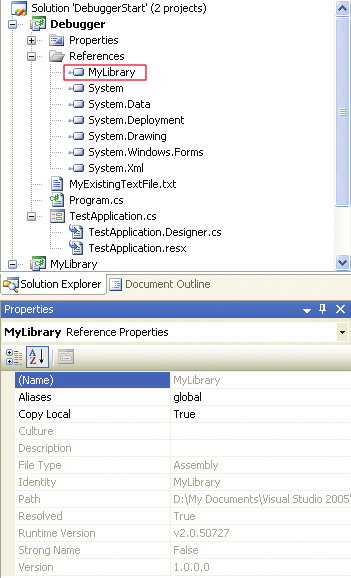
In the Solution Explorer expand the References
node and look for the MyLibrary reference. Click on
it to see the details in the Property window. By
default, when you create a Windows Form project
plenty of references are automatically added to the
project during its creation. Figure 7-2 shows the references and Property window for information pertinent to MyLibrary.
Figure 7-2
All references for this project.
Chapter 7: Fixing the Broken Blocks
113
C07622299.indd 113
C07622299.indd 113
10/24/05 7:13:53 PM
10/24/05 7:13:53 PM

When you're done adding the reference, your application can create instances of the new types that are built in the DLL and use them appropriately. The build process (compiler and linker) will now accept the use of those new types, but for Visual Studio to have those new types available via IntelliSense® and for the compiler to know about those new types, one more step is required. You might already have seen the first line of code in the TestApplication.cs file. The line reads
using MyLibrary;
.
You create a
using
directive to use the types in a namespace without having to specify
the fully qualified namespace name. For instance, Console.WriteLine() comes from the
A
using
directive does not give
you access to any namespaces that
System namespace; by adding it on top, you don’t have to type System.Console.WriteLine().
are nested in the namespace you
specify.
It saves time and it’s easier to read. By adding this line of code, you’re telling Visual Studio to look into that assembly for the metadata that will enable IntelliSense to be populated with the /files/01/97/16/f019716/public/protected elements. After adding this line, you’ll have access to those items whenever you have an instance of one of the types built in the library.
Breakpoints, Locals, Edit and Continue, and Visualizers
There is no better way to dive into this subject than by looking at and going through the
code. If the TestApplication.cs source code file is not already open, open it by right-clicking
If the breakpoints don't appear,
on the TestApplication.cs file and selecting View Code. You should see red dots on the left
you can add them by clicking in
the left margin.
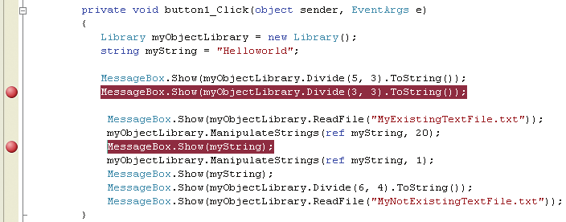
hand side of the screen; those red dots are
breakpoints
. Figure 7-3 shows the source code and the breakpoints.
Figure 7-3
Source code and breakpoints from the
TestApplication Windows form
114
Microsoft Visual C# 2005 Express Edition: Build a Program Now!
C07622299.indd 114
C07622299.indd 114
10/24/05 7:13:54 PM
10/24/05 7:13:54 PM

