Microsoft Visual C# 2005 Express Edition: Build a Program Now! (24 page)
Read Microsoft Visual C# 2005 Express Edition: Build a Program Now! Online
Authors: Patrice Pelland
Tags: #General, #Computers, #C♯ (Computer program language), #Programming Languages, #C#, #Microsoft .NET Framework, #Computer Books: Languages, #Computer Graphics, #Application software, #C# (Computer program language), #Programming, #Microsoft Visual C# .NET, #Microsoft Visual C♯ .NET, #Electronic books, #Game Programming & Design, #Computing: Professional & Programming, #C (Computer program language), #Computers - Languages, #Programming Languages - C#, #Programming & scripting languages: general

Figure 6-11
Tool Strip Container example in Outlook
96
Microsoft Visual C# 2005 Express Edition: Build a Program Now!
C06622132.indd 96
C06622132.indd 96
10/24/05 3:37:23 PM
10/24/05 3:37:23 PM

TO ADD A TOOL STRIP CONTAINER
1 Drag a tool strip container onto the Browser Form design surface.
2 Rename toolstripcontainer1 to
mainFormToolStripContainer
.
3 Use the smart tag from the tool strip container to select
Dock Fill In Form
. Wait a minute . . . where is the Web Browser control? Don’t worry, it didn’t disappear.
The control’s z-order has changed. The Web Browser control is visually under the tool strip
The z-order is the control’s posi-
tion relative to the other windows
container, and its parent is not the tool strip container but the browser form.
or controls on the screen; think
of it as the third dimension or
The Document Outline view is a valuable tool that can help you solve this problem and
being on top of or beneath other
save you a lot of time. For those of you familiar with previous versions of Visual Studio, this
controls.
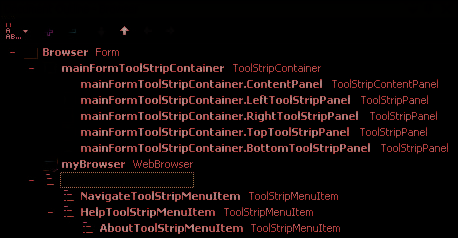
view existed before for HTML and ASPX documents only. With Visual Studio 2005, it has been extended to Windows Forms. To have the Document Outline view in your IDE, simply go to View/Other Windows/Document Outline or press Ctrl+Alt+T. This view lets you manage all controls on your form. It shows how the controls are arranged on the screen and which control(s) belongs to another control. For instance, right now you cannot see the Web Browser control, but if you enable Document Outline view, you'll see that the Web Browser control is at the same level as the newly added tool strip container (see Figure 6-12). To rearrange the order and change how the controls are displayed, follow the next steps.
Figure 6-12
The Document Outline window for the My Own Browser project
Chapter 6: Modify Your Web Browser Now!
97
C06622132.indd 97
C06622132.indd 97
10/24/05 3:37:23 PM
10/24/05 3:37:23 PM
TO REARRANGE THE ORDER OF CONTROLS
In the Document Outline window, select the Web Browser control called
myBrowser
and drag it just 1 below the tool strip container content panel called mainFormToolStripContainer.ContentPanel. (When you drag the Web Browser control, a black line indicates where the control will be dropped if you release the mouse button.)
Now display the form again. The Web Browser control is in the middle of the form. But as you can see, 2 the Menu Strip control is not in the tool strip container. Repeat step 1 for the Menu Strip control, but
instead of dropping it in the content panel, drop it in the top panel of the tool strip container (mainForm
If your application design
ToolStripContainer.TopToolStripPanel).
demands it and if you want to
constrain the user in any way, you
can also hide panels and prevent
users from docking any tool strip
Now the only thing missing from the new menu strip is a dotted grip like the one in the
or menu strip in a panel. Let’s
Outlook figure. Without this grip, a user is unable to select the menu strip at all; it is fixed in
use the current application as an
example. If you want to do this,
the top panel.
select the tool strip container con-
trol named mainFormToolStrip-
Container. You can either select it
TO ADD A DOTTED GRIP TO THE MENU STRIP
from the Properties window or the
Document Outline. Then modify
the visible property of the panel
From the Document Outline window, select the menu strip called
msBrowser
, go to the Properties 1
you want to hide. For instance, if
window, and set the GripStyle property to
Visible
.
you would like to hide the bottom
panel, set the BottomToolStripPan-
elVisible property to false.
Run the application by pressing
F5
. Move the menu strip from one panel to the other. You now have 2 an application as cool as Outlook.
Adding a Status Bar to Your Browser
Your application is becoming rich in features, but to get it closer to most Windows applications, you need a status bar to report information about what’s going on at any moment during the execution. To accomplish this in your browser, you’ll add a Status Strip control and, within this status strip, you’ll add a progress bar.
98
Microsoft Visual C# 2005 Express Edition: Build a Program Now!
C06622132.indd 98
C06622132.indd 98
10/24/05 3:37:24 PM
10/24/05 3:37:24 PM
TO ADD A STATUS STRIP CONTROL AND A PROGRESS BAR
On the tool strip container, click the bottom panel handle to expand it. (Note that the glyph arrow 1 direction reverses when you click it.) The tool strip container’s bottom panel appears as a blue strip. Drag a Status Strip control to the tool strip container’s bottom panel. After you drop it onto the 2 bottom panel, it should expand to cover the whole panel surface.
3 Rename the Status Strip control from StatusStrip1 to
sscBrowser
. Change the
RenderMode
property of the Status Strip control to
Professional
. This will allow the 4 application to present a status bar to the user using the operating system colors. For instance, if the themes in Windows XP are blue, then the status bar will be blue as well. Add a Label control to the status strip by clicking on the down arrow of the Status Strip Add control 5 button and then selecting StatusLabel.
6 Rename the control from ToolStripStatusLabel1 to
lblApplicationStatus
. 7 Add a progress bar to your status strip just as you did for the Label control. 8 Rename the control from ToolStripProgressBar1 to
pbStatus
.
When the status strip and the progress bar are displayed to the user, they usually bring important information about events that are occurring during execution. Think of it like a letter arriving at your house. You hear the mail truck and realize the mail has arrived. This is the event that is raised. You open your mailbox and the envelope to learn that it’s your credit card bill. The bill is one of the pieces of information that comes along with the event. To analagously populate the controls in the status strip, you’ll have to configure your application to extract this information from all controls (i.e., envelope) when events are happening (i.e., mail truck arriving). And you'll do that programmatically by writing code in event handlers.
Chapter 6: Modify Your Web Browser Now!
99
C06622132.indd 99
C06622132.indd 99
10/24/05 3:37:24 PM
10/24/05 3:37:24 PM
TO POPULATE CONTROLS WITH INFORMATION
On the design surface, select the
My Own Browser
form by clicking its title bar. Look in the 1 Properties window to make sure the Browser form is selected and click the
Event
button (yellow lightning) in the Properties window. Find the
Load
event and double-click it to bring up the default event handler: Browser_Load. (The form Load event is raised just before the form displays to the user. So, it’s a good place to change properties that affect the visual aspects of a form.)
Add the following code to the event (Browser_Load) to modify the status message label (lblApplica2 tionStatus) in the status strip.
this.lblApplicationStatus.Text = “Ready”;
You’ll now attach some code to the progress bar and modify the label on the status strip to indicate where the user is navigating to. When the page is fully downloaded to the client PC, you’ll reset the label content in the status strip to the word "Ready". You’ll also modify the browser title to include the URL where the user navigated to. Whenever the OK button is clicked in the Navigate form, the Web Browser control named myBrowser raises the Navigating event. That’s where you’ll start writing code. Select the
myBrowser
control and then go to the Events list in the Properties window. Double-click 3 the
Navigating
event and enter the following code:
//Modifying the label in the status strip with the URL entered by the user this.lblApplicationStatus.Text = “Navigating to: “ + e.Url.Host.ToString(); Once the user enters a URL and the document is being downloaded the progress bar will need to update. Periodically, the Web Browser control raises the ProgressChanged event. That’s where you’ll update the progress bar in the status strip.
Make sure you have the
myBrowser
control selected in the Properties window and then go to the 4 Event list. Double-click the
ProgressChanged
event. Enter the following code (
look at the comments
to understand the source code
):
/* The CurrentProgress variable from the raised event
* gives you the current number of bytes already downloaded
* while the MaximumProgress is the total number of bytes
* to be downloaded */
if (e.CurrentProgress < e.MaximumProgress)
{
// Check if the current progress in the progress bar
// is >= to the maximum if yes reset it with the min
100
Microsoft Visual C# 2005 Express Edition: Build a Program Now!
C06622132.indd 100
C06622132.indd 100
10/24/05 3:37:25 PM
10/24/05 3:37:25 PM
if (pbStatus.Value >= pbStatus.Maximum)
pbStatus.Value = pbStatus.Minimum;
else
// Just increase the progress bar
pbStatus.PerformStep();
}
else
// When the document is fully downloaded
// reset the progress bar to the min (0)
pbStatus.Value = pbStatus.Minimum;
When the user's document is fully downloaded, the browser will raise the DocumentCompleted event. When this event is raised, the application title needs to be updated to the current URL and the application status label in the status strip will need to change to the “Ready” state. In the myBrowser event list, double-click the
DocumentCompleted
event. Then add the following 5 code to it:
// The about box is retrieving this information in a nice clean method so let’s reuse it
// If you don’t have an about box you can just create this method using the code from
// the about box. We don’t need to validate if the title is empty the method is doing it.
// if it’s empty it will use the .exe name
this.Text = myAboutBox.AssemblyTitle + “ - “ + e.Url.Host.ToString();
this.lblApplicationStatus.Text = “Ready”;
As you can see, in this code you’ve just reused similar source code used in the About box and the splash screen dialog sections.
Save all files and run the application now. You should have a working progress bar, and all new infor6 mation should be displayed: modified title window and status strip label.
Chapter 6: Modify Your Web Browser Now!
101
C06622132.indd 101
C06622132.indd 101
10/24/05 3:37:26 PM
10/24/05 3:37:26 PM

Personalize Your Application with Windows Icons
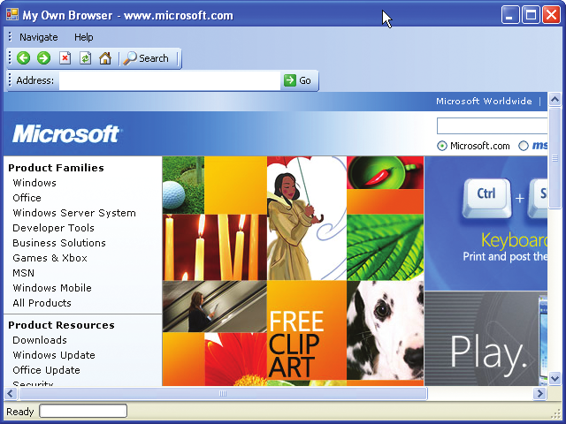
In this section, you’ll continue to personalize your browser by adding some icons that come from known Microsoft applications. After this section, you’ll have a working Internet browser with most navigational features fully implemented—maybe not with all the functionality of Internet Explorer, but you should be proud of yourself. Look at Figure 6-13 to see what you will have accomplished after this section.
Figure 6-13
Your browser at the end of this section
102
Microsoft Visual C# 2005 Express Edition: Build a Program Now!
