Microsoft Visual C# 2005 Express Edition: Build a Program Now! (44 page)
Read Microsoft Visual C# 2005 Express Edition: Build a Program Now! Online
Authors: Patrice Pelland
Tags: #General, #Computers, #C♯ (Computer program language), #Programming Languages, #C#, #Microsoft .NET Framework, #Computer Books: Languages, #Computer Graphics, #Application software, #C# (Computer program language), #Programming, #Microsoft Visual C# .NET, #Microsoft Visual C♯ .NET, #Electronic books, #Game Programming & Design, #Computing: Professional & Programming, #C (Computer program language), #Computers - Languages, #Programming Languages - C#, #Programming & scripting languages: general

In the Solution Explorer, right-click the
Images
folder, select
Add
, and then
Existing Item
. The Add 3 Existing Item dialog box appears.
4 In the Files Of Type drop-down list, select
Image Files
.
Make sure you are looking in the Images folder and select all of the .gif files. To select all the files, you 5 can press
Ctrl+A
or you can use
Shift+click
.
When all of the .gif files are selected, click the
Add
button to add the images to the Weather Tracker 6 project.
Chapter 9: Build Your Own Weather Tracker Application Now!
197
CSX_Chapter 9.indd 197
CSX_Chapter 9.indd 197
10/24/05 6:59:37 PM
10/24/05 6:59:37 PM

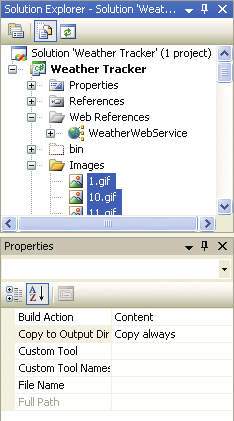
In the Solution Explorer, select all of the .gif files. First, select
1.gif
and then, while pressing the
Shift
7 key, select the last .gif file.
With all the .gif files selected, in the Properties window, set the Copy To Output Directory property to 8
Copy Always
, as shown in Figure 9-10. Make sure the Build Action property is set to
Content
.
Testing Weather Tracker
Before running the Weather Tracker application, verify that you have successfully completed the following:
■ You have an Internet connection.
■ You have registered for the free weather Web service.
■ You have specified your username and password in the application settings.
Figure 9-10
Now you will see if your application works. Press F5 to run Weather Tracker. If you
Weather icons added to the project
have any build errors, review the errors in the Error List window and fix them. If necessary, you can review the completed application in the Complete folder. When you run the application, you should see your splash screen and then see a red NA in the notification area indicating that the current temperature has not been retrieved. Right-click the NA icon in the notification area and select Refresh Weather Info in the context menu. If the weather Web service is available, you should see the current temperature for the Redmond, Washington, area in the notification area. (Be patient, depending on the current Web service load you might have to wait a few moments.) When you double-click the temperature in the notification area, you should see detailed weather information as shown in Figure 9-11. Right-click the temperature to see the context menu. When finished, exit the application.
198
Microsoft Visual C# 2005 Express Edition: Build a Program Now!
CSX_Chapter 9.indd 198
CSX_Chapter 9.indd 198
10/24/05 6:59:38 PM
10/24/05 6:59:38 PM

Figure 9-11
The Weather Tracker application
displaying weather data from a
Web service
Working with the Options Dialog Box
Currently, the ZIP code is set to a particular value and that really isn’t our intent. Therefore, you will use the Options dialog box and let the user enter the ZIP code they want to monitor. The ZIP code will be persisted to disk so that, whenever the user restarts the application, it will be restored to the last ZIP code they specified. Remembering the user’s settings from one execution to another will provide the user with a better experience. You will also perform some checking to verify the ZIP code entered by the user. You will verify that the ZIP code is a number and within a specific range. You will use the error provider control to display appropriate text if the ZIP code is empty or not within range. The error provider control is used to display error information to the user. For example, if the user enters invalid information in a text box, an error icon is displayed next to the control indicating that an error has occurred. By default, the error icon is a small red circle with an exclamation point. When the user clicks the error icon, an error description is displayed to explain what is wrong to the user. You can change how the error is presented. For example, you can use a different error icon and you can make the error icon blink. Once a user addresses the error, you set the error description to an empty string to make the error icon disappear.
Chapter 9: Build Your Own Weather Tracker Application Now!
199
CSX_Chapter 9.indd 199
CSX_Chapter 9.indd 199
10/24/05 6:59:38 PM
10/24/05 6:59:38 PM
TO VALIDATE USER INPUT
1 Open the
Options
form in Design view.
From the Toolbox in the Components group, add an
ErrorProvider
control to the form. The control 2 will appear in the component tray.
3 Name the control
ErrorProviderCurrentZipCode
.
4 Double-click the
OK
button.
5 Add the following code to the btnOk_Click event handler.
1 private void btnOk_Click(object sender, EventArgs e)
2 {
3 if (ValidateZip())
4 {
5 UpdateCurrentInfo();
6 this.DialogResult = System.Windows.Forms.DialogResult.OK;
7 this.Close();
8 }
9 }
6 Add the following ValidateZip method.
10 private bool ValidateZip()
11 {
12 int zipNumber;
13 bool ValidZipCode = true;
14 if (txtCurrentZipCode.Text != String.Empty)
15 {
16 zipNumber = int.Parse(txtCurrentZipCode.Text);
17 if (!(zipNumber > 999) && (zipNumber <= 99950)) 18 {
19 ErrorProviderCurrentZipCode.SetError(
20 this.txtCurrentZipCode,
21 “Invalid Zip Code, enter a valid US zip code “ +
22 “(Between 1000 and 99950)”);
200
Microsoft Visual C# 2005 Express Edition: Build a Program Now!
CSX_Chapter 9.indd 200
CSX_Chapter 9.indd 200
10/24/05 6:59:39 PM
10/24/05 6:59:39 PM
23 ValidZipCode = false;
24 }
25 else
26 {
27 ErrorProviderCurrentZipCode.SetError(
28 this.txtCurrentZipCode, “”);
29 }
30 }
31 else
32 {
33 ErrorProviderCurrentZipCode.SetError(
34 this.txtCurrentZipCode,
35 “Invalid Zip Code, enter a valid US zip code “ +
36 “(Between 1000 and 99950)”);
37 ValidZipCode = false;
38 }
39 return ValidZipCode;
40 }
The ValidateZip method ensures that the ZIP code text box is not empty and checks that the ZIP code is greater than 999 and less than or equal to 99950. If not, an error is displayed using the SetError method of error provider control. In the call to SetError, the txtCurrentZipCode text box is specified, which indicates that the error is associated with the txtCurrentZipCode control. If the ZIP code appears to be valid, the ValidZip method returns True; otherwise, it returns False.
7 Switch back to the
Options
form in Design view.
8 Select the
txtCurrentZipCode
text box.
9 In the Properties window, click the
events
icon (yellow lightning) to display the events list. 10 Double-click the
KeyDown
event.
11 Add the following code to the txtCurrenZipCode_KeyDown event handler. 41 private void txtCurrentZipCode_KeyDown(object sender, KeyEventArgs e) 42 {
43 if ((e.KeyCode < Keys.D0) || (e.KeyCode > Keys.D9))
44 {
Chapter 9: Build Your Own Weather Tracker Application Now!
201
CSX_Chapter 9.indd 201
CSX_Chapter 9.indd 201
10/24/05 6:59:40 PM
10/24/05 6:59:40 PM
45 // Determine whether the keystroke is a number from the keypad. 46 if ((e.KeyCode < Keys.NumPad0) || (e.KeyCode > Keys.NumPad9)) 47 {
48 // Determine whether the keystroke is a backspace.
49 if ((e.KeyCode != Keys.Back))
50 {
51 if ((e.KeyCode != Keys.Enter))
52 {
53 MessageBox.Show(“Only numeric characters please!”); 54 }
55 }
56 }
57 }
58 }
This code checks the user’s keystrokes as they type in the ZIP code. If the keystroke is not a number, a message box is displayed.
TO SAVE SETTINGS
1 In Options.cs, add the following UpdateCurrentInfo method.
1 private void UpdateCurrentInfo()
2 {
3 if (this.txtCurrentZipCode.Text != Settings.Default.CurrentZipCode) 4 {
5 Settings.Default.CurrentZipCode = this.txtCurrentZipCode.Text; 6 Main.currentZipCode = this.txtCurrentZipCode.Text;
7 Settings.Default.Save();
8 }
9 }
Place your cursor within the “Settings” text. You should see a familiar yellow and red smart tag. This 2 smart tag is there to let you know that the Settings class isn’t listed in your using directives at the top of Options.cs. Move your mouse over the smart tag, click the down arrow, and then select
using
Weather_
Tracker.Properties
; to add it to your list of using directives. The UpdateCurrrentInfo method saves the user’s ZIP code back to the application settings.
202
Microsoft Visual C# 2005 Express Edition: Build a Program Now!
CSX_Chapter 9.indd 202
CSX_Chapter 9.indd 202
10/24/05 6:59:41 PM
10/24/05 6:59:41 PM

Testing Weather Tracker
Now you will test the Options dialog box. Press F5 to run
Weather Tracker. Once the splash screen disappears,
right-click the icon in the notification area and click
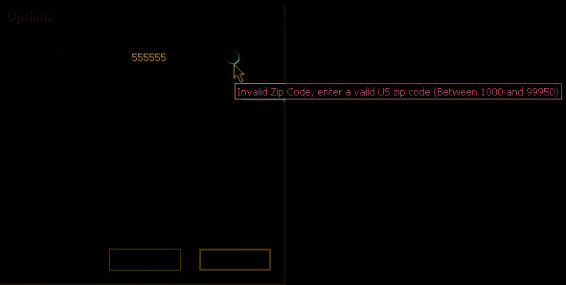
Options. In the Options dialog box, test the ZIP validation code. For example, try to type alphabetic characters and try to type an invalid ZIP code. Figure 9-12 shows
the error provider control when an out-of-range ZIP
code is entered.
When finished, type in a valid ZIP code and click OK.
Figure 9-12
Right-click the notify icon and select Refresh Weather
The error provider control indicating
Info. Wait for a few moments and open the main form.
an error
You should see weather data for the new ZIP code.
You should be proud of yourself. You’ve developed an application with numerous complex features, and it works! The Weather Tracker application accomplishes the basic features established at the beginning of the chapter. There is plenty of room for enhancement. In fact, if you look in the Chapter9 folder of the companion content, you will find an enhanced version. If you want, check out this enhanced version and maybe step through the code to see how it works. The enhanced version includes the following capabilities:
