Microsoft Visual C# 2005 Express Edition: Build a Program Now! (41 page)
Read Microsoft Visual C# 2005 Express Edition: Build a Program Now! Online
Authors: Patrice Pelland
Tags: #General, #Computers, #C♯ (Computer program language), #Programming Languages, #C#, #Microsoft .NET Framework, #Computer Books: Languages, #Computer Graphics, #Application software, #C# (Computer program language), #Programming, #Microsoft Visual C# .NET, #Microsoft Visual C♯ .NET, #Electronic books, #Game Programming & Design, #Computing: Professional & Programming, #C (Computer program language), #Computers - Languages, #Programming Languages - C#, #Programming & scripting languages: general

can find many Web services by
buying movie tickets, looking for information on search engines such as MSN or Google,
using your favorite search engine,
and accessing weather information like your application will soon do. In the .NET world,
but here are a few Web sites that
list Web services:
http://www.
there are classes and wizards available to help you consume Web services.
xmethods.com
and
http://www.
Web services use XML to send messages and return results. All objects are serialized
webservicex.net/WS/default.aspx.
(the messages are sent as a series of bits and pieces over the Internet) and are then deserialized on the other side back into objects. The beauty of XML Web services is that they can be hosted and consumed on any operating system and developed in any language.
Because they use a series of standardized protocols and rules, XML Web services promote
You will need to be connected to
the Internet for the entire chapter.
interoperability and efficiency. The future of the transacted world over the Internet lies in big
Otherwise, nothing will work from
this point on, especially in the next
part with the success of Web services.
section because that’s where
In this project, you will use a weather data Web service. You will need to tell Visual
you’re communicating with the
Web service.
Studio where this Web service is located so that it can add a Web reference to your project that points to this service. Follow the steps below to accomplish this task.
TO ADD WEB SERVICES TO YOUR PROJECT USING VISUAL STUDIO
You’ll need to register for the free weather Web service to obtain a username and password to 1 authenticate yourself. In fact, you’ll use that information to retrieve the weather data. Otherwise your experience will be limited. Go to
http://www.ejse.com/WeatherSignup/Signup.aspx
to register and receive your login information.
In the Solution Explorer, right-click on the project name and then select
Add Web Reference . . .
The 2 Add Web Reference dialog box appears.
Chapter 9: Build Your Own Weather Tracker Application Now!
181
CSX_Chapter 9.indd 181
CSX_Chapter 9.indd 181
10/24/05 6:59:24 PM
10/24/05 6:59:24 PM


In the URL
text box, enter the URL of the
3 weather Web service,
http://www.ejse.com/
WeatherService/Service.asmx
, and click the
Go
button.
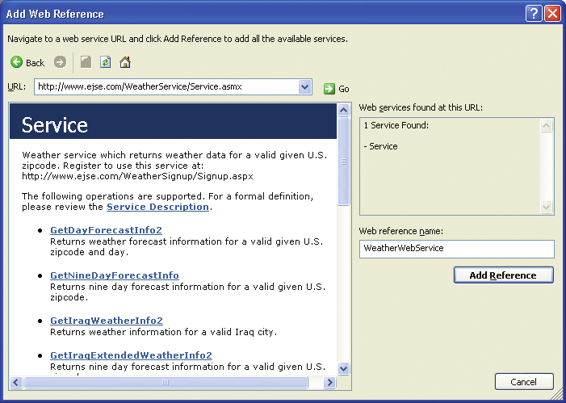
If you are connected to the Internet and the
4 weather Web service is available, you will see
a list of methods that are exposed to you, the programmer. Refer to Figure 9-5 to view the results. Change the Web Reference name to
5
WeatherWebService
and click the
Add
Reference
button. It will take some time as Visual
Studio creates all of the necessary files for you to
consume that Web service.
Under the Web References folder, you should
6 now have a small globe icon with the name
you just gave to that Web service. This is a Web
reference that points to the weather Web service
discovered at that URL. You can now connect and
Figure 9-5
execute the methods on this Web service.
List of exposed methods from the weather Web service
Click on
Show All files
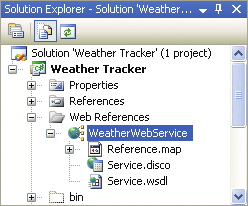
in the Solution Explorer toolbar and expand the weather Web service refer7 ence. You’ll find that three items were created by Visual Studio: a file called Reference.map, a file called Service.wsdl, and another called Service.disco. Refer to Figure 9-6 to see what Solution Explorer should look like. The weather Web service is the heart and soul of this application, without which you simply have a nice shell without content.
Reference.map is an XML file that contains the URL of that Web service. It is produced by a tool called wsdl. exe. WSDL stands for Web Services Description Language. The reference.map file is linked to a proxy file called reference.vb. The proxy file is a local representation of the Web service on the Internet that enables you to call methods in your projects without having compilation error or run time problems. It also enables
Figure 9-6
you to have IntelliSense in Visual Studio when using Web services. The proxy file is a copy of a class on the
The weather Web service added to
the project
Web server where the Web service is hosted. The .wsdl file is an XML file describing the Web service and what it has to offer. Finally, the .disco file is an optional file for discovering the Web service.
182
Microsoft Visual C# 2005 Express Edition: Build a Program Now!
CSX_Chapter 9.indd 182
CSX_Chapter 9.indd 182
10/24/05 6:59:24 PM
10/24/05 6:59:24 PM

In Chapter 8, “Managing the Data,” you learned that you could create data sources from a Web service, a database, or an object. In this section, that’s exactly what you’ll benefit
Your regular Web browser
from. You will see how re-using tools and components allows you to be more productive.
can be used to try a Web ser-
You will use the same techniques used in the previous database sections except that this
vice without writing a line of
time you will be binding data coming across the wire from all parts of the globe.
code. You can usually point your
You will now call the public Web methods and obtain the information you need. This is
Web browser to the Web service
where the fun begins. As you have previously done with the database and with databinding,
address and invoke its methods.
you will now execute the same procedures for the Web service. Go to the Data Sources win
This is an excellent way to learn
what a Web method needs and
dow by selecting Show Data Sources on the Data menu. You’ll notice that you already have
what its output looks like. Please
a weather Web service data source. It will therefore be easy to drop the weather information
note that it’s not possible to talk
you will need to see on your form.
to all of them in this way. As
an example, try a regions Web
service that returns a list of all
TO ADD WEATHER INFORMATION TO YOUR FORM
states in the U.S.:
http://www.
synapticdigital.com/web service/
First, make sure you are viewing the Main
check boxes representing a list of associated controls,
1
/files/01/97/16/f019716/public/regions.asmx.
Click on
form on the designer surface.
which means a list of controls with which an integer
can be associated. If you scroll down, you should see
the listByCountry method, type
the PictureBox control. Click in the check box beside
in USA in the yellow text box,
In the Data Sources window, expand the
PictureBox and then click
OK
. Now for IconIndex,
and click Invoke. In a separate
2
WeatherWebService
node, and you’ll see
select the
PictureBox
type from drop-down list.
browser, you will obtain the list
that there are five different types of data that the
of states in the U.S.
Web site can retrieve. They are all datasets.
In the Data Sources window, select the
5
WeatherInfo
node and change the data
Expand the
WeatherInfo
node and change
3
representation from a DataGridView to
Details
by
all element types (except IconIndex) in that
selecting it in the drop-down list. When finished, the
dataset from TextBox to Label by clicking the down
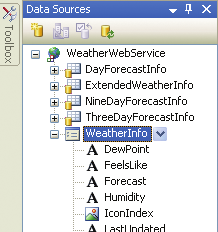
Data Sources window should look like Figure 9-7.
arrow on each element and selecting
Label
from
the drop-down list.
Set IconIndex to
PictureBox
. If the picture box
4 type is not available, you can add it. In the
drop-down list, click the
Customize
choice. In the
Options dialog box, you’ll see a drop-down list with
possible data types. Integer should be selected by
default because Visual Studio recognizes that the field
returned by the Web method is an integer; if not,
Figure 9-7
select
Integer
. Just below you should have a series of
The WeatherInfo data in the weather
Web service
Chapter 9: Build Your Own Weather Tracker Application Now!
183
CSX_Chapter 9.indd 183
CSX_Chapter 9.indd 183
10/24/05 6:59:25 PM
10/24/05 6:59:25 PM

Drag and drop
WeatherInfo
onto the Main form
6
10 Delete the
Icon Index
label.
designer surface. A WeatherInfoBindingSource
and a WeatherInfoBindingNavigator is added to the
component tray.
11 Add a Label control and set the Text property
to
“Current Temperature”
.
Select
WeatherInfoBindingNavigator
in the
7 component tray and change its Visible property to
false
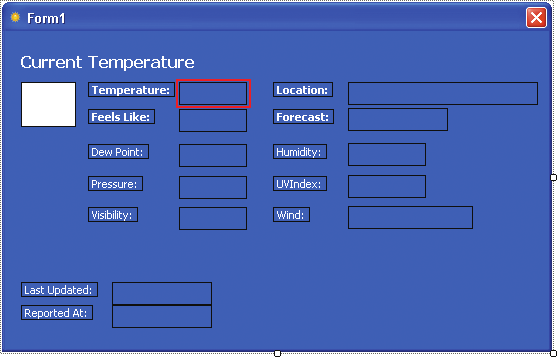
. (You might need to click on the 12 Change the text of the “Temprature:” label to
Properties
button at the top of the Properties win
“Temperature:”
. dow to see the list of properties.)
You can’t see the boundaries of all the con13 Change the name of the label to the right of 8
“Temperature:” to
lblTemperatureCurrent
.
trols on the form. To help with layout, select
The label is identified with a red box in Figure 9-8.
