Microsoft Visual C# 2005 Express Edition: Build a Program Now! (36 page)
Read Microsoft Visual C# 2005 Express Edition: Build a Program Now! Online
Authors: Patrice Pelland
Tags: #General, #Computers, #C♯ (Computer program language), #Programming Languages, #C#, #Microsoft .NET Framework, #Computer Books: Languages, #Computer Graphics, #Application software, #C# (Computer program language), #Programming, #Microsoft Visual C# .NET, #Microsoft Visual C♯ .NET, #Electronic books, #Game Programming & Design, #Computing: Professional & Programming, #C (Computer program language), #Computers - Languages, #Programming Languages - C#, #Programming & scripting languages: general

18 Using Windows Explorer, go into your project directory (it should be located at My Documents\Visual Studio 2005\Projects\CarTracker\CarTracker\) and copy the
.mdf
and
.ldf
files into the bin\debug directory under CarTracker.
19 In Visual C# Express, press
F5
to build and run your application again. You should see the two records that you’ve inserted manually into the Listing table. You should be able to navigate using the tool strip and also modify, insert, and delete a record. See Figure 8-20 for a snapshot of your Car Tracker application at run time. 20 Change the URL of the row at position 1 to end with
.net
instead
.com
. 21 After changing the URL for the record, press the
disk icon
to commit the changes to the database.
22 Close the Car Tracker application and restart it by pressing
F5
. You should now see the first row with the modified URL ending in .net. Close the application again. 23 To verify that you are working with a design time and a run time version of the CarTracker database, open the
Listing
table and select
Show Table Data
from within the Database Explorer. The first row should contain a URL column ending in .com and
not
in .net. Point proven! The database file in Visual Studio is now de-coupled with the one your application is using at run time. Read the More Info note on the next page to learn how to make the data the same in both the design and run time.
Figure 8-20
Execution of the Car Tracker
Component Tray
application
When you dragged the Listing dataset table onto the designer surface, you probably saw that four items were added in the gray area below the designer surface. This section of the designer surface is called the component tray. This is the section that Visual Studio uses for nonvisual controls. In your case, it added an instance of the CarTracker dataset, a Listing table adapter, a Listing binding source, and finally a Listing binding navigator. Let’s describe them individually.
■
Binding Source
You can think of a binding source as a “broker” or a layer of indirection.
Chapter 8: Managing the Data
155
C08622299.indd 155
C08622299.indd 155
10/24/05 4:02:47 PM
10/24/05 4:02:47 PM
It can also be viewed as an intermediary between a data-bound control on your form
If you want the same data in
and a data source, such a a dataset. A binding source provides currency management
Visual Studio as you have when
executing the application in
and notifications services (events). The binding source has many methods to facilitate,
debug mode, then you must close
such as sorting, filtering, navigating, and editing of data from its data-bound controls to
your project completely. Using
Windows Explorer, copy the .mdf
the data source. It’s also linked tightly to the next component: the binding navigator.
and .ldf files from the bin\debug
When you see a binding navigator, you’re assured of getting a binding source.
folder to the project folder. When
you reopen your project, the data-
■
Binding Navigator
The binding navigator is a means to enable navigation and data
base will now contain the same
content.
manipulation. It has a UI component or, more specifically, a tool strip with buttons to
Suppose you then want to
facilitate the functionalities provided by the binding source.
modify the structure of your data-
base, such as adding a column to a
table. If you don’t want to lose the
■
Typed Dataset
Although you know what a dataset is, you may not know that it’s a
data within the bin\debug data-
strongly typed object. It contains data tables of the DataTable type that constitute the in
base files, you must copy them
back to the project folder before
memory representation of your database tables. These data tables also have a special
you modify the table structure.
data adapter called the table adapter. There is a table adapter for each data table.
When done with the modifica-
tions, you simply copy both the
■
Table Adapter
A table adapter is a data access object. It connects to the database (e.g.,
.mdf and .ldf files back to the
bin\debug folder. Of course, if
SQL Server 2005 Express Edition), executes the queries, and fills a data table with data
your application needs those new
when it returns from SQL Server. Therefore, it’s the central point for all data access on an
database changes, you would also
have to modify the dataset, but
individual table. There is one table adapter per table in your data source. A table adapter
that process is beyond the scope
can have more than one SELECT query.
of this book.
How Do I Get More Meaningful Information on My Form?
Let’s return to our CarTracker project. As you can see, the ColorID, MakeID, and CarTypeID
combo boxes are there, but they are displaying the ID and not the name associated with the ID. This is not helpful for the user because an ID doesn't have any meaning to the user and he/she might not be able to easily add or modify rows without having a human-readable format for those columns. Consequently, you need to make sure the data is displayed in a humanly readable way and that the ID is stored in the row whenever the user modifies the information.
There’s an easy way to accomplish this, which you will do now for your three combo boxes.
156
Microsoft Visual C# 2005 Express Edition: Build a Program Now!
C08622299.indd 156
C08622299.indd 156
10/24/05 4:02:48 PM
10/24/05 4:02:48 PM

TO DATABIND WITH DOMAIN TABLES
In the Data Sources window, select the
Color
table from the dataset, drag it onto the form’s designer 1 surface over the ColorID combo box, and drop it.
You’ll see that another table adapter (
colorTableAdapter
) and another binding source (
colorBinding-
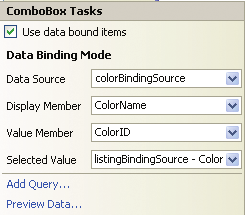
Figure 8-21
Source
) were added to the component tray. If you go to the ColorID combo box and click on the smart tag
ColorID combo box smart tag infor-
mation showing Data Binding Mode
triangle, you’ll see the Data Binding Mode information box appear, as shown in Figure 8-21. You’ll notice that your drag-and-drop action bound the combo box control with the ColorBindingSource. Because of this action, whenever the combo box displays, it will display the color names instead of ColorID. When the user picks a color from the combo box, the associated value member that will be used in the row will still be the ColorID, specifically, the ColorID associated with the ColorName. Wonderful, isn’t it? And no lines of code were used.
Repeat the same process for the Make and CarType dataset tables and the corresponding MakeID
2 and CarTypeID combo boxes.
Build and run your application and then look at each combo box. You now have real color names and 3
not merely ColorIDs; the same is true for CarType and Make. The combo boxes are also populated
This intelligent databinding is a
with all of the values coming from those tables and not simply the value for that specific row. Click on the
new Visual Studio feature called
drop-down arrow and you’ll see all other potential values. Close the application.
Smart Defaults. Smart Defaults
looks in the dataset table to see
whether there’s a column of type
string by either the ID or the pri-
4 On the form, remove the “ID” part from the
Color
ID
,
Make ID
, and
Car Type ID
labels.
mary key. If so, it tries to use this
one for the databinding.
You will now enlarge the Notes field by making it a multi-line text box. Select the
Notes
text box and 5 change the Multiline property to
true
. Also change the
MaxLength
to
250
, the
Size:Height
to
50
, and the
Size:Width
to
250
.
6 Delete the
ListingID
text box and its label.
Chapter 8: Managing the Data
157
C08622299.indd 157
C08622299.indd 157
10/24/05 4:02:49 PM
10/24/05 4:02:49 PM

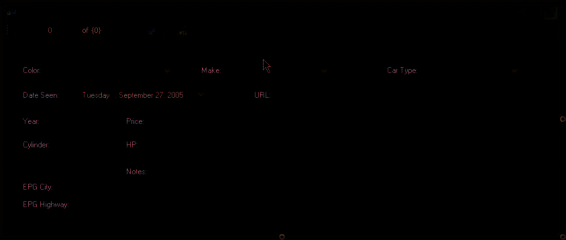
Size and reposition the controls on the form so that it resembles the form shown in Figure 8-22; it 7 does not need to be an exact duplicate. It will be good practice to bring back UI design concepts from Chapter 5 and also good preparation for Chapter 9. Change the Text property of the form to “Car Tracker”.
Figure 8-22
New visual aspects of the Car Tracker
application
In the Solution Explorer, rename form1.cs to
Main.cs
. When asked if you want to rename all references 8 in this project, click
Yes
.
9 Select the form and change the BackColor property to
Highlight
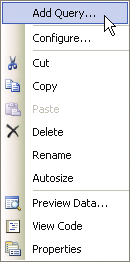
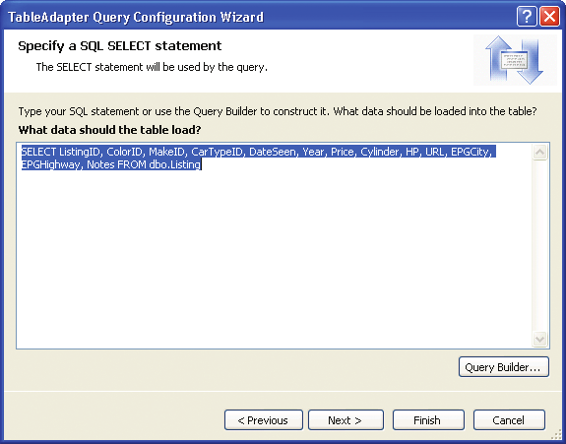
. Everything is nearly complete for this application, but the research capabilities are lacking. Currently, the only way to search is to scan through all of the rows until you find the correct one. This is not difficult now because you have only two rows in your Car Tracker database. Yet, if you had 500 rows, the Scan method would not be effective at all! Therefore, you’ll implement search capabilities by adding queries to your application by using the Dataset Designer.
10 In the Data Sources window, select
CarTrackerDataSet
. Right-click and select
Edit DataSet with
Designer
.
Select the
Listing
data table, and then select the
ListingTableAdapter
section at the bottom of the 11 data table.
158
Microsoft Visual C# 2005 Express Edition: Build a Program Now!
C08622299.indd 158
C08622299.indd 158
10/24/05 4:02:49 PM
10/24/05 4:02:49 PM


