Microsoft Visual C# 2005 Express Edition: Build a Program Now! (31 page)
Read Microsoft Visual C# 2005 Express Edition: Build a Program Now! Online
Authors: Patrice Pelland
Tags: #General, #Computers, #C♯ (Computer program language), #Programming Languages, #C#, #Microsoft .NET Framework, #Computer Books: Languages, #Computer Graphics, #Application software, #C# (Computer program language), #Programming, #Microsoft Visual C# .NET, #Microsoft Visual C♯ .NET, #Electronic books, #Game Programming & Design, #Computing: Professional & Programming, #C (Computer program language), #Computers - Languages, #Programming Languages - C#, #Programming & scripting languages: general

TO CREATE A DATABASE USING VISUAL C# 2005 EXPRESS EDITION
The .mdf file extension is used
by the SQL Server family of prod-
ucts. The .mdf contains the entire
In the Add New Item dialog box, select
SQL
1 Start
Visual C# 2005 Express Edition
.
4
database; this means all tables and
Database
from the Visual Studio Installed
other elements that can exist in
Templates. Type in the filename
CarTracker.mdf
the database are located in that
Create a new Windows application and name
and click the
Add
button. By doing so, you’ll create
one file. The only thing that is
2
not part of the .mdf file is the log
it
CarTracker
.
a database and attach the database file (
CarTracker.
information, which is in a .ldf file.
mdf
) to your CarTracker project.
It is created whenever you create
the database. The file has an .ldf
You will now create the database that will hold
3
extension and is used to store the
all the tables for the application. In the
You will then see a Data Source Configuration
5
database log information. You
Solution Explorer, right-click the
CarTracker
project,
Wizard. Don’t pay attention to this dialog box
can see this file by clicking the
select
Add
, and then select
New Item
.
just yet; you’ll learn about it soon. Just click
Cancel
Show All Files icon in the Solution
Explore
r
.
for now.
Chapter 8: Managing the Data
137
C08622299.indd 137
C08622299.indd 137
10/24/05 4:02:32 PM
10/24/05 4:02:32 PM
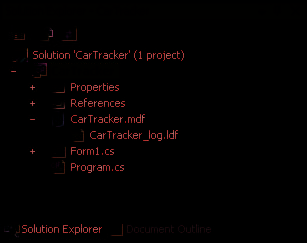
The Solution Explorer should now contain a new item within
6 your project: the new database file called
CarTracker.mdf
as
shown in Figure 8-3.
You will now start to add tables to your database. To do this,
7 you can either double-click the
CarTracker.mdf
file or rightclick
CarTracker.mdf
and then select
Open
. This will cause Visual Studio to connect to the SQL Server 2005 Express instance
installed on your machine.
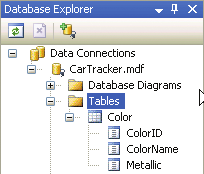
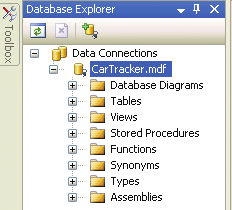
The Database Explorer should appear on the left side of the
screen where the toolbox usually opens up, as shown in Figure 8-4.
Figure 8-3
Solution Explorer with the newly cre-
If you do not see the Database Explorer, go to the View menu, Other
ated CarTracker.mdf database file
Windows, Database Explorer.
Under the database name, you should see a list of database elements represented by folder icons. Although you will not recognize most of them, you will see two elements that are already familiar to you: the database diagram and the tables. You will use both of these elements shortly. You’ll know that you’re connected to the database when you see the database icon with an electric cord
Figure 8-4
Database Explorer with the CarTracker
look-alike. When you’re disconnected, you will see the database icon with a red X. However, seeing a red X
database connected
does not necessarily mean that you’re disconnected. You might have been disconnected earlier, but the Database Explorer was never refreshed. To verify the state of the connection to your database, you should click the
Refresh
button in the Database Explorer toolbar.
Right-click on your database named
CarTracker.mdf
in
8 the Database Explorer and select
Close Connection
. You
should now see the red X near your database name.
You’re now disconnected. To reconnect, you can do three different things. You can double-click your database name (e.g.,
CarTracker.mdf
) in the Database Explorer, you can click the
Refresh button, or you can right-click on the filename in the
Database Explorer and select
Modify Connection. . .
. If you
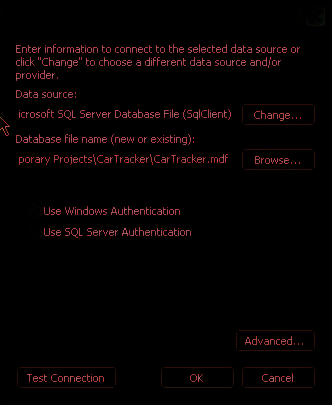
select the Modify Connection route, you will see a dialog box
like the one shown in Figure 8-5.
Figure 8-5
The Modify Connection dialog box will let you
reconnect to your CarTracker database
138
Microsoft Visual C# 2005 Express Edition: Build a Program Now!
C08622299.indd 138
C08622299.indd 138
10/24/05 4:02:33 PM
10/24/05 4:02:33 PM
Because it’s a good practice to test your connection, you can click the Test Connection button and it 9 will verify the connection currently specified. It’s also verifying that SQL Server 2005 Express Edition is ready and able to receive connections from your
One thing you should pay
applications.
Currently, you have only one database in your projects,
attention to in this dialog box
but it’s not unusual to need to connect to and get
is the Database Filename.
information from two or more databases. That’s why
Because you didn’t save any
10 Click
OK
to reconnect to your database.
Database Connections in the Database Explorer is there
as a tree, for it’s representing each database as a node
files, everything is still located
in that tree. You have only one node in the tree, which
in a temporary folder identified
is your CarTracker database.
by the content of the text box.
As soon as you save all of the
Creating Tables in Your Database
files in your project, the data-
base will be saved along with
Now you’ll create all tables and relationships needed for the CarTracker application. Using
the other project files, wherever
the information found in Figure 8-2, you’ll create tables, primary keys, identities, and
they are located. You can later
foreign key relationships in the CarTracker database, and you’ll do all of this without leaving
verify that location by going
Visual Studio.
to the Tools menu, selecting
Options. . . , and then looking
at the Projects and Solutions
TO CREATE TABLES IN A DATABASE
node in the tree. On the right
panel in this dialog box, you
Let’s start with the Color table. In the Database Explorer, right-click on the table’s folder icon and 1
can determine where your proj-
select
Add New Table
. You should now see an empty grid on the designer surface, which is called
ects are stored by looking at
the Table Designer. You will also see that a new toolbar has appeared, which is called the Table Designer toolbar. This toolbar has all the tools necessary to help you create a table without writing a single SQL
the first text box called Visual
query.
Studio Project Locations.
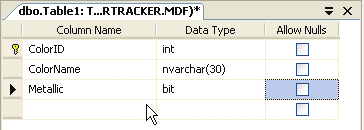
You’ll now add a column to the Color table. Type
ColorID
in the Column Name field of the Table 2 Designer. Select
int
as the Data Type and uncheck the
Allow Nulls
check box because this column will be the primary key in this table. A primary key cannot be null since it is part of the uniqueness of a row in the table.
Before you add the second column in the Color table, you’ll set this column as the primary key. To do
3 so, you need to click the
Set Primary Key
icon in the Table Designer toolbar.
From this point onward, for every
tree control and every control that
is a group (i.e., has a + sign), the
The database diagram shown in Figure 8-2 illustrates that you also need this column to be an identity;
word
expand
will be used instead
therefore, you need to modify that property in the Column Properties window right below the Table
of repeating the words
click on the
Designer. Scroll down until you see the Identity Specification group. Click on the
plus sign
(+) located to
+ sign
.
the left of the words
Identity Specification
to expand this group. Now click in the
(Is Identity)
field and set it to
Yes
. Leave both the Identity Seed and Identity Increment set at 1 for now.
Chapter 8: Managing the Data
139
C08622299.indd 139
C08622299.indd 139
10/24/05 4:02:34 PM
10/24/05 4:02:34 PM
