The Baking Answer Book (30 page)
Read The Baking Answer Book Online
Authors: Lauren Chattman
Tags: #Cooking, #Methods, #Baking, #Reference

5.
With the mixer on low speed, add one-third of the flour mixture and beat until incorporated. Add one-half of the milk mixture. Repeat, alternating flour and milk mixtures and ending with the flour mixture, scraping down the sides of the bowl between additions. Turn the mixer to medium-high and beat for 1 minute.
6.
Scrape the batter into the prepared pan. Bake until a toothpick inserted in the center comes out clean, 40 to 45 minutes. Let cool in the pan for 5 minutes; transfer to a wire rack to cool completely.
Q
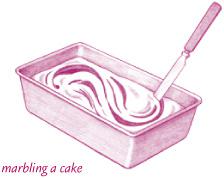
What is the best way to create a marbled effect in a chocolate-and-vanilla cake?
A
Successful marbling depends on keeping two batters that are swirled together distinct from each other. To do this, make sure that you have proportionately more of the lighter batter, which would be the vanilla in this case, than the heavier chocolate. I like to have two parts vanilla to one part chocolate. Spread one-half of the vanilla batter across the bottom of the pan in an even layer. Spoon one-half the chocolate batter on top of the vanilla in large dollops. Repeat with the remaining vanilla and chocolate. Then, insert a butter knife into the batter perpendicularly and use it to cut a wide figure-eight pattern through the batter. If you are baking your cake in a loaf pan, one large figure eight will be sufficient. If you are using a Bundt or tube pan, several smaller figure eights will do the trick.
Q
What makes red velvet cake red?
A
Red velvet cake is a chocolate cake made with natural cocoa powder, buttermilk, and vinegar. The chemical reaction that occurs when these ingredients are mixed makes the red undertones in the cocoa powder more red. But this redness is augmented considerably in most recipes by the addition of beets, jars of beet baby food, or red food coloring. Compared to devil’s food cake, red velvet cake has a milder
chocolate flavor because it contains relatively little cocoa powder, and a softer, more open and moist crumb from the buttermilk.
Q
What is the difference between chocolate butter cake and devil’s food cake?
A
Chocolate butter cake is simply a chocolate version of yellow cake, made with butter, eggs, and milk, and with cocoa powder replacing some of the flour. Devil’s food cake is darker in color and more intensely chocolaty, because it uses water rather than milk (milk tempers the flavor of cocoa powder in chocolate butter cake).
Q
Any advice about unmolding an upside-down cake so the fruit topping doesn’t stick to the pan?
A
Timing is important. Let the cake cool in the pan for a couple of minutes, so that the topping begins to set, before inverting the pan onto a wire rack. This way, the brown sugar and butter mixture won’t be so melty that it will slide down the sides of the cake. But don’t let the cake sit so long that the caramelized topping starts to bond with the pan, or you will never get the fruit out. If I’m really worried about sticking, I’ll line my pan with a parchment circle and then butter the parchment, and carefully peel the parchment away after I’ve unmolded the cake and it’s cooled a little bit. If a few
pieces of fruit stick to the pan bottom or parchment paper, it isn’t a tragedy. You will easily see by the impressions left by the fruit in the top of the cake where each piece belongs, so you can carefully replace it.
Q
I don’t have a springform pan for my cheesecake. Can I substitute a regular cake pan?
A
Yes, but be sure to line the bottom of the pan with a circle of parchment paper for an easy release, because cheesecake crusts, especially those made with graham cracker and other cookie crumbs, tend to stick.
Another consideration: Softer cheesecakes may suffer some surface damage when you invert them and re-invert them. Frozen cakes won’t dent and break the way soft cakes will. Before unmolding, wrap the cheesecake, still in the pan, in plastic wrap and place it in the freezer for at least 6 hours or up to 2 weeks. A few hours before serving it, remove the plastic and run the bottom of the pan over a gas burner for several seconds to loosen the cake from the pan. If you don’t have a gas burner, dip the bottom inch or so of the pan in a bowl of hot tap water for 1 minute. Run a sharp paring knife around the edges of the pan, invert it onto a platter and peel away the parchment paper, and then re-invert onto a serving platter so the cake is right side up.
Q
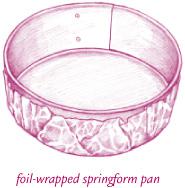
I baked my cheesecake in a water bath as directed, and some water leaked into the pan, making the edges of the crust soggy. How could I have prevented this?
A
This is a common problem with springform pans, especially as they get older and the sides don’t fit as tightly against the bottom as they used to. To prevent water from leaking into your pan, wrap the bottom and sides of the pan with a sheet of heavy-duty aluminum foil, trimming the foil so that when pressed and molded tightly to the pan it comes almost to the top edge. Remove the foil before releasing the pan sides when directed.
Q
What are the secrets to a smooth cheesecake?
A
If the texture of your cheesecake is lumpy, then you probably didn’t allow your cream cheese to soften enough or you didn’t beat it enough before adding the other ingredients. It is also possible that you didn’t scrape down bits of cream cheese stuck to the sides of the bowl until it was too late in the mixing process for them to be incorporated.
New York Cheesecake
Here is a simple recipe for a cheesecake that doesn’t require a water bath. Baking it in an oven that cools over time will prevent the custard from curdling and prevent the top from cracking. To further ensure against cracking, run a sharp paring knife around the edge of the cake as soon as you remove it from the oven so that as it cools and shrinks slightly it won’t crack from surface tension. Crush the graham crackers by giving them a whirl in a food processor or by placing them in a resealable plastic bag and rolling over them with a rolling pin.
SERVES 8 TO 10
FOR THE CRUST:
1 cups graham cracker crumbs (from about 20 whole graham crackers)
5 tablespoons unsalted butter, melted and cooled
¼ teaspoon salt
FOR THE CAKE:
Four 8-ounce packages cream cheese, softened
1¼ cups sugar
¼ cup sour cream
4 large eggs, at room temperature
1 teaspoon grated lemon zest
1.
To make the crust, preheat the oven to 350°F (180°C). Coat the inside of a 10-inch springform pan with cooking spray.
2.
Combine the graham cracker crumbs, butter, sugar, and salt in a medium mixing bowl and stir until the crumbs are evenly moistened. Press the graham cracker mixture evenly across the bottom and 1 inch up the sides of the pan, packing it tightly with your fingertips. Bake until just firm, about 7 minutes. Remove from the oven and let cool completely.
3.
To make the cake, increase the oven temperature to 500°F (260°C). Combine the cream cheese, sugar, and flour in a large mixing bowl and beat with an electric mixer on high speed until very smooth, scraping down the sides of the bowl once or twice as necessary. Add the sour cream and mix until smooth. Add the eggs, one at a time, and mix on low speed until combined, scraping down the sides of the bowl after each addition. Stir in the lemon zest and vanilla.
4.
Put the pan containing the crust on a baking sheet and pour the filling into the crust. Transfer the baking sheet holding the springform pan to the oven and bake for 10 minutes; without opening the oven door, reduce the oven temperature to 200°F (95°C) and bake the cheesecake until the perimeter is set but the center is still a little jiggly, about 1 hour and 10 minutes longer. The cheesecake should read about 150°F (66°C) on an instant-read thermometer inserted into the center.
5.
As soon as the cake is out of the oven, run a sharp paring knife around the edge of the pan to separate the cheesecake from the sides of the pan. Transfer to a wire rack and let cool completely. Wrap cheesecake in plastic, and refrigerate it for at least 6 hours or overnight before unmolding and serving. It will keep, wrapped in plastic and refrigerated, for up to 1 week.
Q
Why do I have to bake my cheesecake or flourless chocolate cake in a water bath?
A
Both cheesecakes and flourless chocolate cakes are baked custards, thickened with eggs. Successful custards are silky smooth. The best way to ensure this texture is to bake custards in a water bath.
The silky texture of custards depends on proper thickening of eggs, so that the web of proteins they form as they cook remains elastic and smooth. When eggs are heated too quickly and at too high a temperature, this web loses its elasticity, hardens, shrinks, and squeezes out the liquid it holds. The resulting custard becomes lumpy and weeps water. With only a few degrees of difference between thickened and curdled, it’s important to control the rate of heating so that your custard doesn’t cross the line before you have a chance to pull it from the oven. Baking it in a pan of water that comes halfway up the sides of your cake pan will slow the rate at which a custard heats up, allowing you to monitor its progress.
A water bath insulates the delicate mixture from the direct heat of the oven, letting it thicken without getting too hot and curdling. Even if your oven is set at 325°F (160°C), the portion of your cake that is below the water line will never rise above 212°F (100°C), the boiling point of water. It’s highly unlikely, unless you completely forget about your cake, that its internal temperature will go above the curdling point, which is around 190°F (88°C), depending on how much sugar is in your cake (sugar raises the curdling point of eggs, safeguarding them a little longer).
Recipes for New York–style cheesecake use an alternate method for bringing the cake batter slowly up to temperature without curdling. The oven is preheated to a very high heat — about 500°F (260°C). The cake is baked in this hot oven for just 10 minutes, and then the temperature is turned way down to 200°F (95°C). The initial blast of heat allows the surface of the cake to brown nicely. Then the slow decrease in oven temperature to below the boiling point ensures that the custard will thicken but never to the curdling point.