Windows Server 2008 R2 Unleashed (128 page)
Read Windows Server 2008 R2 Unleashed Online
Authors: Noel Morimoto

11. Review the GPO restore progress, and click OK when it completes.
628
CHAPTER 19
Windows Server 2008 R2 Group Policies and Policy Management
Disabling Starter GPO Functionality
An organization may determine that starter GPO functionality should be removed. In
those situations, it is quite easy to disable starter GPO functionality. If starter GPO func-
tionality needs to be removed from a domain, perform the following steps:
1. Log on to a designated Windows Server 2008 R2 administrative system.
2. Open the Group Policy Management Console.
3. Expand the domain to expose the Starter GPOs container and select it.
4. Verify that the starter GPO functionality is enabled by viewing the right pane.
5. If the functionality is enabled, close the GPMC.
6. Click Start and in the search field, type
\\companyabc.com\sysvol\companyabc.com\ and press Enter. This example is for
the companyabc.com domain; you should substitute your Active Directory DNS
domain name.
7. When the explorer window opens, one of the folders shown is the StarterGPOs
folder. Right-click and delete that entire folder.
8. Close the explorer windows.
9. Open the Group Policy Management Console again.
10.
ptg
Expand the domain to expose the Starter GPO container and select it.
11. Verify that the starter GPO functionality is now disabled by viewing the right
pane. If starter GPOs are now disabled, there will be a button labeled Create Starter
GPO Folder.
12. The task is now complete; close the GPMC.
Removing starter GPO functionality will not affect any domain group policies that were
previously creating using any starter GPOs.
Creating New Domain Group Policies
To create a new domain Group Policy Object, perform the following steps:
1. Log on to a designated Windows Server 2008 R2 administrative system.
2. Open the Group Policy Management Console.
3. Expand the domain to expose the Group Policy Objects container and select it.
4. Right-click the Group Policy Objects container and select New.
5. Type in a name for the new GPO.
6. If the starter GPO functionality in the domain is enabled and if a suitable starter
GPO exists, click the Source Starter GPO menu and select either (None) or the
desired starter GPO.
7. Click OK to create the GPO.
8. As necessary, edit the security filtering, configure delegation, configure the GPO
status, and edit the settings. These steps are detailed in the section “Managing GPO
Security Filtering.”
GPO Administrative Tasks
629
9. After the GPO is configured, back up the GPO.
10. Create GPO links and configure advanced link options, as required.
11. Close the GPMC tool.
Creating and Configuring GPO Links
After a GPO is created and configured, the next step is to link the GPOs to the desired
Active Directory containers. To link an existing GPO to an Active Directory container,
perform the following steps:
1. Log on to a designated Windows Server 2008 R2 administrative system.
2. Open the Group Policy Management Console.
3. Add the necessary domains or sites to the GPMC, as required.
4. Expand the Domains or Sites node to expose the container to which the GPO will be
linked.
5. Right-click the desired site, domain, or organizational unit, and select Link an
Existing GPO.
6. In the Select GPO window, select the desired GPO or select multiple GPOs and click
OK to link.
ptg
Advanced GPO Link Configuration
After a GPO link is created, it is enabled by default. Each link has its own configuration
options, which include link enforcement and the ability to enable and disable the link. To
change the default configuration of a GPO link, perform the following steps:
1. Log on to a designated Windows Server 2008 R2 administrative system.
2. Open the Group Policy Management Console.
3. Add the necessary domains or sites to the GPMC, as required.
4. Expand the Domains or Sites node to expose the GPO-linked container.
5. If the GPO link is to be enforced, right-click on the desired GPO link, and select
Enforced to enforce the link.
6. If the GPO link will be changed from enabled to disabled, right-click on the desired
GPO link and select Link Enabled to check the link (enabled) or uncheck the link
19
(disabled).
Managing GPO Status
GPO status controls whether the entire GPO is enabled, disabled, or if only the Computer
Configuration or User Configuration node is enabled. GPO status is applied to the GPO
itself, so all links will be affected by any changes to the GPO status. To view or modify the
status of a GPO, perform the following steps:
1. Log on to a designated Windows Server 2008 R2 administrative system.
2. Open the Group Policy Management Console.
3. Expand the domain to expose the Group Policy Objects container and expand it.
630
CHAPTER 19
Windows Server 2008 R2 Group Policies and Policy Management
4. Select the desired GPO and select the Details tab in the right pane.
5. On the Details tab, in the GPO Status drop-down menu, note the current status of
the GPO.
6. If the GPO status needs to be changed, click the drop-down list arrow and select one
of the following options:
. Enabled
. User Configuration Settings Disabled
. Computer Configuration Settings Disabled
. All Settings Disabled
7. After you select the desired GPO status, a confirmation window opens; click OK to
complete the status change.
Creating and Linking WMI Filters to GPOs
When applying security filtering to a GPO is not granular enough to target a specific set of
computers, a WMI filter can be linked to the GPO. For this example, we will create a WMI
filter that includes a computer with an operating system name of Windows 7. To create
the example WMI filter, perform the following steps:
ptg
1. Log on to a designated Windows Server 2008 R2 administrative system.
2. Open the Group Policy Management Console.
3. Expand the domain and select the WMI Filters container.
4. Right-click on the WMI Filters container and select New.
5. In the Name section, type in Windows 7 WMI Filter.
6. In the Description section, type in WMI filter to include only Windows 7
workstations.
7. Click the Add button to create the WMI filter query.
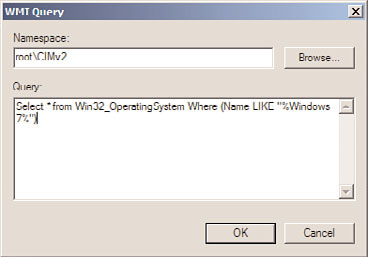
8. In the Query section, type Select * from Win32_OperatingSystem Where (Name
LIKE “%Windows 7%”) to show a GPO WMI filter similar to the one shown in
Figure 19.19.
FIGURE 19.19
Examining a GPO WMI filter.
GPO Administrative Tasks
631
9. Click OK to save the query and return to the WMI Filter window.
10. Click Save to create the WMI filter in the domain.
To link an existing WMI filter to a GPO, perform the following steps:
1. Log on to a designated Windows Server 2008 R2 administrative workstation.
2. Open the Group Policy Management Console.
3. Expand the domain to expose the Group Policy Objects container and expand it.
4. Select the desired GPO and select the Scope tab in the right pane.
5. At the bottom of the Scope tab, in the WMI Filter section, click the WMI Filter drop-
down list arrow, and select the desired filter.
6. A confirmation dialog box will open; click Yes to apply the WMI filter to this GPO.
Managing GPO Security Filtering
Managing security filtering is one of the best ways to target a specific group of users and
computers for GPO application. Security filtering can be set to a specific user, computer, or
security group object or a combination of all three object types. To change the security
filtering of a GPO from the default of Authenticated Users, perform the following steps:
1. Log on to a designated Windows Server 2008 R2 administrative system.
ptg
2. Open the Group Policy Management Console.
3. Expand the domain to expose the Group Policy Objects container and expand it.
4. Select the desired GPO and select the Scope tab in the right pane.
5. In the Security Filtering section of the Scope tab, select the Authenticated Users
group, and click the Remove button.
6. Click OK in the confirmation dialog box to remove the security group from the GPO
security filtering.
7. In the Security Filtering section of the Scope tab, click the Add button to add an
Active Directory object to the security filter for the GPO.
8. Type in the name of the user or security group that will be applied to the GPO secu-
rity filtering, and click OK.
9. If multiple objects need to be added, repeat this process until all of the objects are
19
added to the security filter.
10. If a specific computer object needs to be added, in the Select Users and Group win-
dow, click the Object Types button, check the Computers object, and click OK. Type
the computer object name or browse for the object, and then click OK.
Managing GPO Link Order of Processing
When an Active Directory container has multiple GPOs linked to it, a specific order of
processing will occur. In many instances, the set of linked GPOs will have some conflict-
ing settings and the order of GPO processing must be modified to produce the desired
result. When reviewing both the Linked Group Policy Objects Link order on a container or
the Group Policy Inheritance Precedence order, the Group Policies will be applied in a
632
CHAPTER 19
Windows Server 2008 R2 Group Policies and Policy Management
countdown sequence ending with the number 1 policy being applied last. Group Policy
Link Order is inherited down from any parent or domain container and can only be
adjusted on the actual domain or container the GPO is linked to. To change the GPO link
order of processing, perform the following steps:
1. Log on to a designated Windows Server 2008 R2 administrative system.
2. Open the Group Policy Management Console.
3. Add the necessary domains or sites to the GPMC, as required.
4. Expand the Domains or Sites node to expose the container with multiple GPOs linked.
5. Select the desired container.
6. In the right pane, select the Linked Group Policy Objects tab.
NOTE
When the order is presented, the policy with the highest numeric value is applied first
and the remainder of the policies are applied sequentially and numerically. The GPO
listed as number 1 in the link order is processed last.
ptg
7. If the placement or order of a particular GPO needs to be changed, select the GPO
and click one of the following buttons on the left:
. Move Link to Top is a double up arrow
. Move Link Up is a single up arrow
. Move Link Down is single down arrow
. Move Link to Bottom is a double down arrow
8. After the GPO links are in the correct order, the task is complete.
Viewing GPO Settings and Creating Reports
One of the great features of the GPMC is the ability to view GPO settings from within the
window, and to save the settings to share with others as HTML files. To view the settings
of a particular GPO, perform the following steps:
1. Log on to a designated Windows Server 2008 R2 administrative system.
2. Open the Group Policy Management Console.
3. Expand the domain to expose the Group Policy Objects container and expand it.
4. Select the desired GPO in the tree pane and select the Settings tab in the right pane.
5. Browse the settings by expanding the sections using the Hide and Show hyperlinks.
6. To save the settings to an XML or HTML file, right-click on the desired GPO in the
left pane, and click Save Report.
7. Specify the location in which to save the GPO report, choose Save the File as an
HTML or an XML File, and click Save to save the file.
GPO Administrative Tasks
633
Backing Up and Restoring Domain GPOs
Backing up GPOs is a task that should be performed regularly. This section contains step-
by-step instructions to back up and restore domain group policies.
Backing Up All Domain GPOs
To back up all of the domain GPOs, perform the following steps:
1. Log on to a designated Windows Server 2008 R2 administrative system.
2. Open the Group Policy Management Console.