Windows Server 2008 R2 Unleashed (196 page)
Read Windows Server 2008 R2 Unleashed Online
Authors: Noel Morimoto

1006
CHAPTER 26
Windows Server 2008 R2 Administration Tools for Desktops
FIGURE 26.5
Creating a discover boot image.
ptg
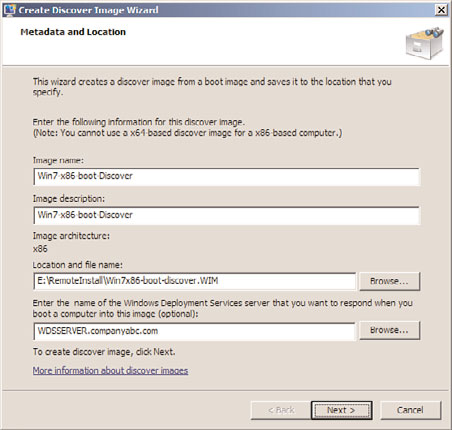
FIGURE 26.6
Sample discover boot image metadata.
Creating Discover Images
1007
but can connect using a discover image. Perhaps it has to do with the fact that the WDS
server is already selected, but this is an out-of-the-ordinary case that is only listed here
because it might add value to a WDS administrator troubleshooting an implementation.
An alternate and more common use of discover images is to create bootable media that can
be used on client or server hardware that does not support PXE boot. To create a bootable
CD or DVD that will use the new discover boot image, the tools included in the Windows
Automated Installation Kit (WAIK) are required. The WAIK for Windows 7 and Windows
Server 2008 R2 is new and includes many updated features and settings. The remainder of
this chapter, when referencing the WAIK, references this newest edition of the kit.
Creating Bootable Media with Discover Boot Images and the
Windows Automated Installation Kit (WAIK)
After a new discover image has been created, it is pretty useless until we can actually boot
a system and connect to a WDS server using it as a WDS boot image or by creating a
bootable removal media. To create bootable media that loads a discover image, the
Windows Automated Installation Kit (WAIK) needs to be downloaded from Microsoft and
installed on a Windows Server 2008 R2 system. The WAIK can be installed on other oper-
ating systems, but several prerequisites must be met before it can be installed.
ptg
The Windows Automated Installation Kit is used primarily to help OEM computer builders
deploy Windows operating systems onto new hardware. It contains deployment tools that
26
are compatible with the latest version of Windows. Download and install the WAIK on a
Windows Server 2008 R2 system. After the WAIK is installed, to create a bootable ISO file
that boots the discover boot image, perform the following steps:
1. Log on to the Windows Server 2008 R2 system with an account with administra-
tive rights.
2. Download and install the latest version of the Windows Automated Installation Kit
that is compatible with Windows Server 2008 R2 and Windows 7.
3. After the WAIK is installed, copy the discover image created previously to a local
drive and folder path. For this example, the file path of our discover image is
E:\RemoteInstall\Win7x86-boot-discover.WIM.
4. Click Start, click All Programs, click Accessories, and select Command Prompt.
5. Type cd \ and press Enter to focus the command prompt to the root of the C: drive.
6. Type cd “Program Files\Windows AIK\Tools\PETools\” and press Enter to change
the command prompt focus to the PETools folder.
7. Type CopyPe x86 E:\RemoteInstall\Winpe and press Enter. This creates the WinPE
folder and a copy of the Windows Preinstallation Environment, also known as
Windows PE or WinPE for short, for x86-based systems on the specified destination
on the E: drive. The process copies several files to the destination folder and when
completed returns the cursor back to the command prompt, which is now focused
in the destination folder.
1008
CHAPTER 26
Windows Server 2008 R2 Administration Tools for Desktops
8. Now we have the WinPE files necessary to boot a system and we need to copy the
discover image into the correct folder. Type the following command based on the
folder and files paths presented in the previous steps: Copy /y
E:\RemoteInstall\Win7x86-boot-discover.WIM
E:\RemoteInstall\WinPE\ISO\Sources\Boot.wim and press Enter. This command
copies the created discover boot file and creates or overwrites the default boot.wim
file that is contained in the WinPE installation folder.
9. After the file copy completes successfully, type in C: and press Enter. The focus
should be returned back to c:\program files\Windows AIK\Tools\PETools, but if
not, change to the PETools directory.
10. At this point, we have a WinPE installation ready to create a bootable ISO image
that includes our custom discover image. Type the following command and then
press Enter:
oscdimg –n –bE:\RemoteInstall\Winpe\ISO\Boot\etfsboot.com
➥ E:\RemoteInstall\Winpe\ISO
➥ E:\RemoteInstall\Win7-x86-bootable-Discover-image.ISO
11. The previous command should be entered as a single line and there is no space
between the –b and the path to the etfsboot.com file. The –b option defines the
media used to make the ISO bootable and the –n command allows for the use of
ptg
long filenames. Each of the options is used for ISO image creation but this utility
can be used to create other types of media. After the ISO is created, copy it to a
system that has the necessary CD/RW or DVD/RW drive and the necessary software
to burn a CD using an ISO image.
12. After the bootable CD is created, boot a system using it to verify that it functions
and boots as intended.
This might seem like a tedious process, but it really only needs to be performed once for
every WDS server deployed on the network.
Adding Drivers to Boot and Discover Images
Windows Server 2008 R2 WDS supports adding drivers to Windows Server 2008 R2 and
Window 7 boot images from within the WDS console. This also includes any Windows
Server 2008 R2 or Windows 7 discover and capture images that are loaded as boot images
on a WDS system. For all other boot, discover images, and capture images, drivers will
need to be injected manually to the WIM file using the tools in the Windows Automated
Installation Kit. To add drivers into a Windows Server 2008 R2 WDS infrastructure into a
Windows Server 2008 R2 or Windows 7 boot image, perform the steps detailed in the
following sections.
Adding Drivers to the WDS Server Console
When drivers need to be added to Windows 7 or Windows Server 2008 R2 boot images,
they can be installed using the WDS console by performing the following steps:
1. Log on to the Windows Server 2008 R2 system that has the WDS role installed with
an account with local administrator and domain administrator rights.
Creating Discover Images
1009
2. Download the appropriate drivers and save the drivers to a folder on WDS server or
a network location. Expand the drivers download to reveal the folder that contains
the necessary INF, SYS, and other files that are required for the particular driver and
note the exact location.
3. On the WDS server, click Start, click All Programs, click Administrative Tools, and
select Windows Deployment Services.
4. When the Windows Deployment Services console opens, in the tree pane, select and
expand the WDS server.
5. Right-click the Drivers node and select Add Driver Package.
6. On the Driver Package Location page, select the Select Driver from an .inf File
option button.
7. In the Location Form field, click the Browse button and browse to the folder that
contains the drivers INF, SYS, and other files. Once back on the Driver Package
Location page, click Next to continue.
8. On the Available Driver Packages page, check or uncheck the desired drivers that will
be added to the WDS server and click Next to continue. Many drivers are packaged
together and the driver file may include many different drivers. As a best practice,
limit the drivers added to the WDS server and the boot images to only the necessary
drivers and no more to avoid unnecessary driver conflicts or file size bloat.
ptg
9. Review the selections on the Summary page and click Next to continue.
26
10. On the Task Progress page, once the driver(s) are added, click Next to continue.
11. On the Drivers Group page, if a driver group exists, the driver can be added to the
group; otherwise, a new driver group can be created or the driver can be added to
the root without creating a group. Select the desired option button, enter or select
the driver group, and/or click Next to continue.
12. On the Task Completed page, click Finish to complete the driver addition.
Adding Drivers to Windows 7 and Windows Server 2008 R2 Boot Images Using the WDS Console
If drivers need to be added to existing Windows 7 or Windows Server 2008 R2 boot images
on a Windows Server 2008 R2 WDS server, they can be added using the WDS console. The
drivers will need to be added to the WDS server as detailed in the previous section before
performing the following steps. To add drivers from the WDS server to existing Windows
7 and/or Windows Server 2008 R2 boot images, perform the following steps:
1. Log on to the Windows Server 2008 R2 system that has the WDS role installed with
an account with local administrator and domain administrator rights.
2. On the WDS server, click Start, click All Programs, click Administrative Tools, and
select Windows Deployment Services.
3. When the Windows Deployment Services console opens, in the tree pane, select and
expand the WDS server.
4. Select and expand the Boot Images node and in the tasks pane select the desired
boot image.
1010
CHAPTER 26
Windows Server 2008 R2 Administration Tools for Desktops
5. If you do not have a copy of the existing boot image, it is a good idea to back it up
by right-clicking on the boot image, selecting Export Image, and following the steps
to make a copy/export of the boot image before any drivers are added to the image.
6. Once a backup of the boot image is copied, right-click the desired boot image and
select Add Driver Packages to Image.
7. Click Next on the Before You Begin page if you have a good backup of the boot
image; otherwise, click Cancel.
8. On the Select Driver Packages page, click the Search for Packages button to list all
compatible packages for this boot image. Check any desired drivers listed in the
Search Results section, uncheck any drivers that should not be added to the boot
image, and click Next to continue.
9. On the Selected Driver Packages page, review the list of drivers that will be added to
the boot image, and click Next to continue.
10. On the Operation Complete page, review the results and click Finish to complete the
driver addition to the boot image.
11. Repeat this process for any other Windows Server 2008 R2 or Windows 7 boot
images that need drivers added, close the WDS console, and log off the server
when completed.
ptg
12. Now boot up a WDS client using this boot image and verify that the driver is work-
ing correctly.
Manual Driver Injection for Windows 7 and Windows Server 2008 R2 Boot Images
In situations where a WDS server is not available or not implemented, administrators
might still want to add drivers to boot images to create custom installation media with the
necessary drivers. When this is the case, the Windows Automated Installation Kit should
be used. To inject drivers into a Windows 7 or Windows Server 2008 R2 boot image,
perform the following steps:
1. Download the necessary drivers and the WAIK from the Internet to a local server.
2. Log on to a Windows 7 or Windows Server 2008 R2 system with an account with
administrator group membership and create a folder called C:\MountImage.
Substitute C for a drive letter with ample space to mount the boot image but a few
gigabytes of free space should suffice.
3. Install the WAIK on the system in the default folder location.
4. Copy the desired drivers to the system. Make sure the driver files have been
expanded and the folder containing the INF, SYS, and other necessary driver files can
be located through Windows Explorer on the local machine.
5. Copy the Windows 7 or Windows Server 2008 R2 boot.wim from the installation
media to the system on a local drive that can be located through Windows Explorer.
Browse to the file location, right-click on the file, and select Properties. Uncheck the
read-only attribute and click OK to save the setting.
For our example, the Windows 7 x86 boot.wim will be located in the C:\Win7Boot\
folder and the network card driver we will add is located in the
Creating Discover Images
1011
C:\Drivers\NIC\Win7\32\ folder. When viewed, this folder contains an INF, SYS,