Windows Server 2008 R2 Unleashed (195 page)
Read Windows Server 2008 R2 Unleashed Online
Authors: Noel Morimoto

message, press the F12 key to start the WDS imaging process. If PXE boot is getting
an IPv4 address from the DHCP server but the system never prompts to press F12 for
1002
CHAPTER 26
Windows Server 2008 R2 Administration Tools for Desktops
network boot, there is most likely some issue with the DHCP server configuration
and defined options. This needs to be resolved before moving forward or an alterna-
tive is to create and use a discover image to start the imaging process. Creating and
using discover images are detailed in the next section “Creating Discover Images.”
4. If the system is able to connect to the WDS server after the Press F12 for Network
Boot prompt and after the F12 key is pressed, the boot image is downloaded from
the WDS server to the client, and the imaging process starts. If multiple boot images
have been added to the WDS server, pressing F12 will use the network boot to
connect to the WDS server to get the list of boot images, then the boot image
selected will be loaded, including the appropriate network drivers to allow the WDS
client to connect to the WDS server to locate and begin installation of the install
image selected.
5. After the system completes loading the boot image system files, the Windows
Preinstallation Environment is loaded and the WDS client install application is
started. The page name that appears is named Windows Deployment Services. Select
the desired locale and keyboard or input method, and click Next to continue.
6. An authentication window opens. Enter the domain and username of the account
used to install WDS and the password, and click OK. For a domain with a NetBIOS
name of COMPANYABC, the username should be entered as COMPANYABC\username
ptg
along with the correct password for that user account. If the authentication window
never opens or does not connect to the WDS server after the correct username and
password combination are entered, this most likely means that the boot image does
not contain suitable network drivers for the client hardware and network drivers will
need to be added to the boot image and this process should be started over.
7. On the Install Windows page, each of the install images loaded in the WDS server
that match the boot image architecture, x86 or x64, will be listed as available selec-
tions. Select the desired operating system install image, and click Next to continue.
8. The next page lists the available or detected disks that can be used for the image
installation. If no disks are listed, this is a red flag for WDS imaging and requires
adding disk controller driver files to a boot image for WDS imaging to work on this
particular hardware platform. Select the disk to install the operating system on, click
Next to allow the imaging process to create the volume, format it, and install
Windows 7 on the WDS client system.
NOTE
When selecting hardware for server and desktops that will be deployed using WDS
images, ensure that the hardware is certified to work with Windows Server 2008,
Windows 7, Windows Vista SP1, and/or Windows Server 2008 R2 and verify that all of
the drivers are certified and signed by the Windows Hardware Quality lab to simplify
operating system deployment to these systems.
9. After the disk selection is made and the Next button is clicked, the disk volume is
created and formatted and the operating system installation begins by expanding
Installing Windows Deployment Services (WDS)
1003
and copying the necessary files and installing the default operating system selec-
tions. When this phase of the installation completes, Windows Setup begins.
10. On the Set Up Windows page, select the correct country, time & currency and
keyboard layout, and click Next to continue.
11. Depending on the install image selected and if any unattended files have been
created the next few pages will ask for input to set the PC name, product key, accept-
ing the end-user licensing agreement, Windows Update settings, date and time, and
network zone settings. These pages will appear in a different order depending on the
install image, and some pages might not appear at all if Windows XP or Windows
Server 2003 images are being deployed. Follow the necessary steps to complete the
installation of this image to the WDS client.
12. Most install images will be able to join the domain automatically, but some might
not and, most likely, the default name of the PC will need to be updated using the
WDS server property pages or custom unattended file.
This completes the installation process of a default WDS image.
WDS Boot and Install Image Troubleshooting
Getting a WDS system to work the first time will either work without issue or it can be a
ptg
real hassle. This section provides a short list of issues and troubleshooting steps that might
26
help make the implementation of WDS more successful.
Issue 1
: WDS clients never prompt to boot from network by pressing F12.
When this occurs, the issue might be related to the boot order on the client. Go into the
BIOS on the client and first verify that the network interface card has network boot func-
tionality enabled. Next set the boot order to make the network interface card first in the
boot list or boot priority and try again.
If the PXE boot option starts, the administrator should see the IP address that is leased
from the DHCP server. If no IP address is leased, check to see that the WDS server is listed
as an authorized DHCP server using the Microsoft Windows Server 2008 R2 DHCP
console. If it is not listed, add it by changing the DHCP server advanced property page
settings. If DHCP is on the same server as WDS, check the WDS server DHCP property
page settings to ensure that both check boxes are checked. Also verify normal DHCP server
operation by checking that a client on the same network can acquire a DHCP IP address.
Issue 2
: WDS clients can press F12 and get the list of boot images. After the boot image is
loaded and the locale and keyboard layout are chosen, they are never prompted for
credentials or cannot proceed any further even after entering the correct credentials.
When this occurs, the most likely issue is that the boot image selected does not contain a
suitable network card driver for that workstation or server network interface card. To
determine if this is the case, after the boot image is loaded at the Windows Deployment
Services page, press Shift and F10 to drop to a command prompt. Type in Ipconfig and
press Enter. If an IP address is listed, run Ipconfig /all to check the DNS server settings
as the DHCP server might not be giving the correct scope options. If no IP address is
1004
CHAPTER 26
Windows Server 2008 R2 Administration Tools for Desktops
listed, the network interface card drivers for this hardware will need to be manually
injected or the drivers can be added using the Windows Server 2008 R2 WDS console,
which is detailed later in this chapter.
Another issue that can cause this is if the NTFS and share permissions of the deployment
share on the WDS server are not configured correctly. The share and NTFS permissions
should allow all desired user groups to read and execute. These groups might be limited
based on the delegation of administration desired to control who can deploy WDS images.
Issue 3
: After entering credentials, the list of install images only shows x64 images.
This issue is by design if the boot image selected is an x64-based boot image. Selecting an
x86 boot image, for example from Windows 7 Ultimate, allows the WDS client to show
both x86- and x64-based images.
Issue 4
: Regardless of whether the x86 boot image or the x64 boot image is selected from
an x64-compatible WDS client, some install images still are not listed.
This issue can be caused by architecture discovery being disabled on the WDS server.
Before changing this setting, however, it is a good idea to restart the WDS server after any
new boot or install images are loaded as the first step in troubleshooting. If after restarting
the WDS server, if some install images are still not showing, toggle the architecture discov-
ery settings, restart the server, and check the client. Toggle the setting back, restart the
ptg
server, and check again to see if all the install images are listed. To check and, if necessary,
modify the architecture discovery and other WDS server settings, perform the following
steps from the WDS server:
1. Log on to the desired WDS server with an account that has local administrator
membership.
2. Open a command prompt and type the command WDSUTIL /get-server
/show:config |more and press Enter. This shows the WDS configuration in the
Command Prompt window one page at a time.
3. On the second or third page look for architecture discovery and note whether it is
enabled or disabled. Change the value and restart the server and check the client. If
there is no effect, change the value back.
4. If the WDS server architecture discovery is shown as disabled, type in the command
in the Command Prompt window WDSUTIL /Set-Server
/architecturediscovery:Yes and press Enter.
5. If the WDS server architecture discovery is shown as enabled, type in the command
in the Command Prompt window WDSUTIL /Set-Server
/architecturediscovery:No and press Enter.
6. After changing the architecture discovery setting, restart the WDS server in the
Command Prompt window by typing in Net Stop Wdsserver and press Enter to
stop the service. Then type the command Net Start Wdsserver and press Enter to
start the service.
Issue 5
: The WDS client can boot into the boot image and select the install image, but no
disks are listed as options to install the WDS image on to.
Creating Discover Images
1005
This issue is most likely caused by a missing storage controller driver in the boot image.
The resolution to this issue is to add storage controller drivers to the boot image the same
way network card drivers are added.
Issue 6
: After selecting the install image and the destination disk, the installation starts
but after the install completes, many devices are listed as unknown in Device Manager.
This issue indicates that the drivers for these unknown devices are not included in the
install image and they should be added to the desired install image the same way drivers
are added to the boot image.
In cases when PXE boot is not supported on the system or on the network, it might be
necessary to use bootable media to start a WDS imaging process. This can be accomplished
with a WDS discover image. A discover image is created from an existing WDS boot image
that contains Windows PE and the WDS client, but can be stored on removable media
making it easier to deploy images to older systems or on heterogeneous networks that
have PXE issues. To create a discover image, perform the following steps:
1. Log on to the Windows Server 2008 R2 system that has the WDS role installed with
an account with local administrator and domain administrator rights.
ptg
2. Click Start, click All Programs, click Administrative Tools, and select Windows
26
Deployment Services.
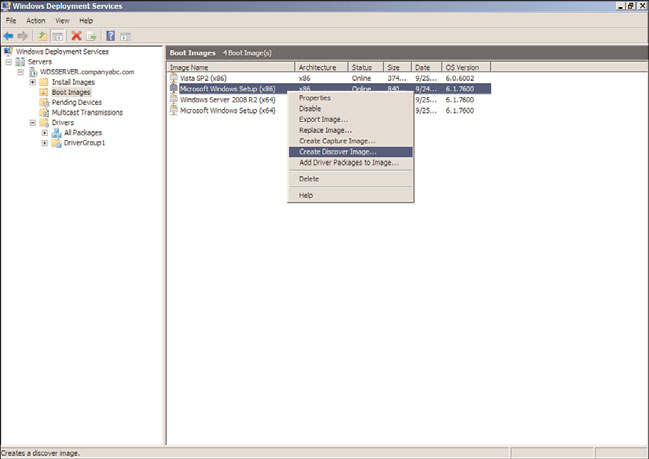
3. When the Windows Deployment Services console opens, in the tree pane, select and
expand the WDS server and select the Boot Images node.
4. In the tasks pane, locate and right-click the desired boot image, and select Create
Discover Image, as shown in Figure 26.5.
5. On the Discover Image Metadata and Location page, enter a name and description
for the new discover boot image. In the Location and File Name section, browse to a
folder on the local system where the new discover boot image can be created, type
in a name for the discover image, and click Open to return to the Discover Image
Metadata and Location page.
6. Enter the fully qualified domain name of the WDS server that the discover image will
connect to after booting into the Windows PE and loading the WDS client. Figure
26.6 shows the discover metadata that will be used for this example; the path to the
file is important as it will be required later. Click Next to create the discover image.
7. When the discover image is created, click Finish to close the window and return to
the WDS console.
At this point, a new discover image has been created, but a few additional steps are
required before it can be used to boot a system and connect to a WDS server.
The discover image can now be added to the WDS server as a boot image, by following
the steps in the previous section on adding boot images to the WDS server. You might ask
why a WDS administrator would want to do this—there have been documented issues
where a WDS client PC cannot connect to the WDS server using a standard boot image