Windows Server 2008 R2 Unleashed (198 page)
Read Windows Server 2008 R2 Unleashed Online
Authors: Noel Morimoto

be selected.
There are three different modes of WDS within Windows Server 2003: Legacy, Mixed, and
Native. Legacy mode is primarily used for RIS image compatibility, Mixed mode is used for
utilizing both RIS and WIM files or images, and Native mode is used primarily for WIM
files. To upgrade to Windows Server 2008 R2 WDS, your Windows Server 2003 WDS server
must be in WDS Native mode.
To upgrade your server from Legacy to Mixed mode, open up the WDS console on the
WDS server, locate and right-click the server, and select Initialize Server. After the process
completes, the server will be in Mixed mode.
1016
CHAPTER 26
Windows Server 2008 R2 Administration Tools for Desktops
To upgrade your server from Mixed mode to Native mode, first decide whether you want
to keep your existing RISETUP and RIPREP images. RISETUP images are the base installa-
tion images created from Windows 2000, 2003, and XP installation media; RIPREP images
are those images created from custom installations that have been pushed up to the RIS
server. If you want to remove these images, simply delete the images. If you want to
convert them, you have two options: offline conversion, which is used for RIPREP images
only, and deploy and recapture, which is used for RIPREP and RISETUP images. Run the
WDSUTIL /SET-Server /ForceNative command to convert the WDS to Native mode. After
the Windows Server 2003 WDS server is running in Native mode, the operating system
might be upgradeable to Windows Server 2008 R2 if no other issues prevent the upgrade
and if the Windows Server 2003 system is running the 64-bit edition.
Upgrading a RIS Image to a Windows Server 2008 R2 WDS Image
If you have a working RIS environment and have images that will need to be maintained,
these images can be manually imported into a Windows Server 2008 R2 WDS server using
a capture image and a detailed process. The following list includes the high-level steps to
support this process for migrating Windows XP and Windows Server 2003 RIS images to a
Windows Server 2008 R2 WDS server:
1. Deploy the image to a system using the legacy RIS server.
ptg
2. Prepare the newly deployed system using the Sysprep utility and, as required, the
Setup Manager utility to prepare the system for imaging.
3. Create a capture boot image on the Windows Server 2008 R2 WDS server. Add the
capture boot image to the WDS boot images.
4. Boot the system that will be imaged, using PXE boot.
5. Select the capture image when the list of available images is presented.
6. Follow the capture imaging prompts to create the new custom install image.
Creating Custom Installations Using Capture Images
When the default install images included with Windows Server 2008, Windows Vista,
Windows 7, or Windows Server 2008 R2 do not meet the deployment requirements for an
organization, custom install images can be created by preparing the system using
Sysprep.exe and then using capture boot images to upload the new image to the WDS
server. To create a new capture image, perform the following steps:
1. Log on to the Windows Server 2008 R2 system that has the WDS role installed with
an account with local administrator and domain administrator rights.
2. Click Start, click All Programs, click Administrative Tools, and select Windows
Deployment Services.
3. When the Windows Deployment Services console opens in the tree pane, select and
expand the WDS server.
4. Select the Boot Images node and in the tasks pane, right-click the desired boot
image, and select Create Capture Image.
Creating Custom Installations Using Capture Images
1017
5. On the Capture Image Metadata and Location page, enter a name and description
for the new capture boot image. In the Location and File Name section, browse to a
folder on the local system where the new capture boot image can be created, type in
a name for the capture image, and click Open to return to the Capture Image
Metadata page. Click Next to continue.
6. When the capture boot image is created, we will add the new capture image to the
WDS boot images. On the Task Progress page, check the Add Image to the Windows
Deployment Server Now check box, and click Finish to close the Create Capture
Image Wizard.
7. In the Add Image Wizard window that opens, on the Image File page, verify that the
file path represents the capture file path and filename and click Next to continue.
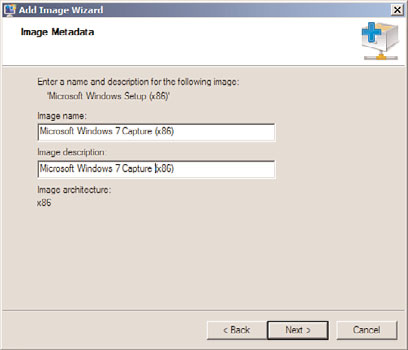
8. On the Image Metadata page, be certain to change the name so that it reflects a
capture image, as shown in Figure 26.11. Click Next to continue.
ptg
26
FIGURE 26.11
Naming the new capture boot image.
9. Review the settings on the Summary page, and click Next to import the capture boot
image to the WDS server.
10. After this process completes, click Finish, and close the WDS console and log off of
the server.
Typically, when organizations decide to use a product to image servers and/or desktops,
the main driving force is to reduce the effort required to deploy the systems. If only base
operating systems were deployed using WDS, the time-savings would not be much, but
when several hours of post operating system software installations and custom configura-
tions are part of this process, creating and deploying customized images can be very valu-
able. To create an image of a preconfigured Windows Server 2008 R2 or a Windows 7
1018
CHAPTER 26
Windows Server 2008 R2 Administration Tools for Desktops
system, the steps are similar to the steps required to upgrade an RIS image to a WDS
image, as follows:
1. Deploy the image to a system using a default boot and install image from the
WDS server.
2. Prepare the newly deployed system for imaging by installing any necessary applica-
tions or drivers and customizing the system based on the organization’s requirements.
3. Run the Sysprep.exe utility from the c:\windows\system32\sysprep folder. In the
System Preparation Tool 3.14 window, select the Enter System Out-of-Box Experience
(OOBE) option in the System Cleanup Action menu. Check the Generalize check
box, select the Shutdown option in the Shutdown Options menu, and click OK.
After this completes, it shuts down the system.
4. On the WDS server, create a capture boot image and add the capture boot image to
the WDS boot images.
5. Boot the system that has been prepared for imaging using PXE boot, press F12 when
required, and when the available boot images are presented, select the previously
created capture image.
6. When the Windows Deployment Services Image Capture Wizard is displayed, click
Next on the Welcome page to continue.
ptg
7. On the Image Capture Source page, select the volume that will be captured from the
drop-down menu, type in a name and description for the new install image, and
click Next to continue.
8. Next, select the check box to upload the image to the server. Enter credentials when
prompted and the image should upload to the server. Complete the capture process
and shut down the system.
9. Log on to the WDS server and from the WDS console, verify that the new install
image that was just created is listed in the designated install image group.
10. Boot a system using PXE into a WDS boot image, and select the new install image to
test the deployment of this image. Customize the image or prepare the system again
and recapture.
Additional customization to captured install images might be required using the System
Image Manager included in the Windows Automated Installation Kit.
Customizing Install Images Using Unattended Answer Files
Using the default install images, or install images created from the WDS capture process,
there are still several options available that allow administrators to interact and manipu-
late how the install image will be deployed. If the imaging process needs to be customized
to remove options from the end-user experience, such as entering the product key, wiping
out any existing partitions on a hard drive, and creating a custom partition size for the
operating system, these can be accomplished by creating a customized unattended answer
file using the Windows Automated Installation Kit (WAIK).
To create an answer file, you need to copy the install image that will be customized. This
can be accomplished by exporting an install image from the WDS console if the install
Creating Custom Installations Using Capture Images
1019
image is custom, or by simply copying the install.wim file from the Windows 7 or
Windows Server 2008 R2 installation media. After the install image is copied to the server,
if the WAIK is not installed, it needs to be downloaded from Microsoft and installed on
the server.
The WAIK programs group contains documentation that can be used to provide all of the
necessary information on how to create and customize an unattended answer file. This is
by no means a quick-and-easy process; it requires several iterations of the file and several
tests until the desired result is achieved. For detailed information on how to create and
configure unattended answer files using the WAIK, install the WAIK and reference the
Unattended Windows Setup reference Help file and the Getting Started for IT Professionals
HTML document included with the WAIK installation.
Creating Multicast Images
A feature of Windows Deployment Services is that images can be deployed to servers and
desktops using multicast transmissions. For multicast imaging to work properly, the
network devices that connect the WDS multicast clients to the WDS server providing the
multicast transmission must support and allow multicast traffic. Creating a multicast
transmission is a very straightforward process and can be created within a few minutes, if
the WDS server already contains tested boot and install images. To create a multicast
ptg
transmission, perform the following steps:
1. Log on to the Windows Server 2008 R2 system that has the WDS role installed with
26
an account with local administrator and domain administrator rights.
2. Click Start, click All Programs, click Administrative Tools, and select Windows
Deployment Services.
3. When the Windows Deployment Services console opens, if the local server is not
listed under the Servers node, it must be added by right-clicking on Servers in the
tree pane and selecting Add Server. Specify the local server and click OK to add it to
the console.
4. In the tree pane, select and expand the WDS server, and select the Multicast
Transmissions node.
5. Right-click Multicast Transmissions and select Create Multicast Transmission.
6. On the Transmission Name page, enter a name for the multicast transmission, and
click Next. For example, enter MC-Win7-Pro. Click Next to continue.
7. On the Image Selection page, select one of the WDS install images that will be trans-
mitted to clients through this multicast transmission, and click Next. If the desired
image is not listed, pull down the image group pull-down menu and select the
correct image group that contains the desired install image.
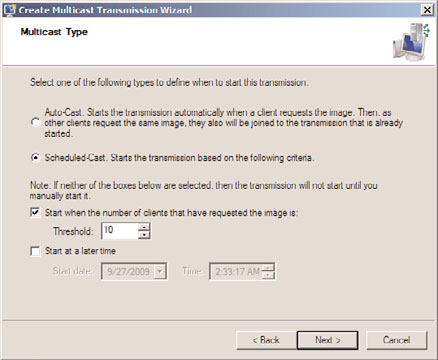
8. On the Multicast Type page, select Auto-Cast, which will start the transmission auto-
matically when a client connects to the WDS server and selects the install image
that is defined within this multicast transmission, and click Next. Alternatively,
select Scheduled-Cast to define a number of clients or a start time that will kick off
the multicast transmission, as shown in Figure 26.12. Click Next after the multicast
type is selected.