Windows Server 2008 R2 Unleashed (245 page)
Read Windows Server 2008 R2 Unleashed Online
Authors: Noel Morimoto

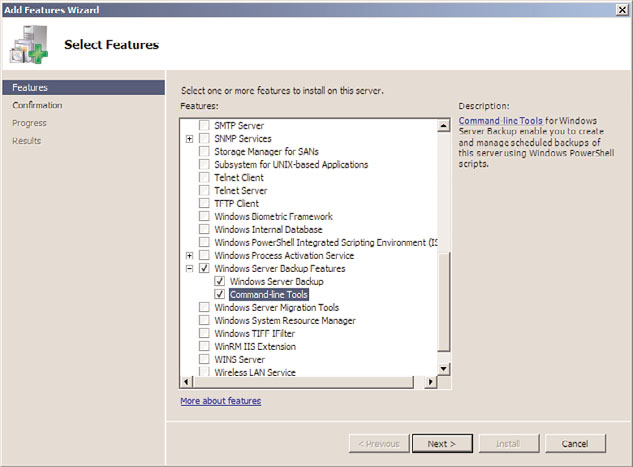
Windows Server Backup Features. Check both boxes to ensure that the command-
line tools are also selected, as shown in Figure 30.1. Click Next to continue.
5. On the Confirm Installation Selections page, review the summary, and click Install
to continue.
6. On the Installation Results page, review the results, and click Close to complete the
installation.
Installing Windows Server Backup Using Windows PowerShell ServerManager Module
In many cases, administrators might choose to use the Windows PowerShell environment
to manage a server and as a preference when installing roles, role services, or features.
When a particular feature or role is installed using the Windows PowerShell
30
ServerManager module, all features, role services, and role dependencies are also added. To
install the Windows Server Backup features, including the Windows Server Backup
PowerShell cmdlets using Windows PowerShell, perform the following steps:
1. Log on to the Windows Server 2008 R2 system with an account with administrator
privileges.
2. Click Start, click All Programs, click Accessories, and click the Windows PowerShell
folder to reveal the application shortcuts.
1240
CHAPTER 30
Backing Up the Windows Server 2008 R2 Environment
FIGURE 30.1
Selecting the Windows Server Backup features.
ptg
3. Right-click Windows PowerShell and select Run As Administrator. If a User Account
Control window opens, click Continue to open the PowerShell window.
4. Type cd \ and press Enter.
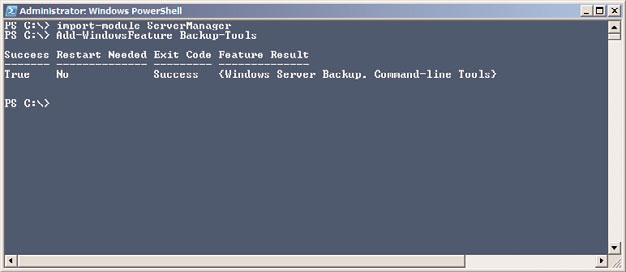
5. Type Import-Module ServerManager and press Enter.
6. Type Add-WindowsFeature Backup-Tools and press Enter. After the installation
completes, the results will be listed in the window, as shown in Figure 30.2.
FIGURE 30.2
Installing Windows Server Backup using Windows PowerShell.
Using Windows Server Backup
1241
7. Type Get-WindowsFeature |More and press Enter to get a list of the installed roles,
role services, and features. Review the list to verify that Windows Server Backup and
Windows Server Backup command-line tools are now installed.
8. Type exit in the PowerShell window and press Enter.
Installing Windows Server Backup on Server Core Installations
On a Windows Server 2008 R2 Server Core deployment, if the Windows Server Backup
feature is not installed, it can be installed by performing the following steps:
1. Log on to the Windows Server 2008 R2 Server Core system with an account with
administrator privileges.
2. In the Command Prompt window, type cd \ and press Enter.
3. Type in Start /w ocsetup.exe WindowsServerBackup and press Enter.
4. Log on to a different Windows Server 2008 R2, Enterprise Edition system with an
account with administrator privileges on the local system as well as the Server Core
system. It is assumed that both systems are part of the same domain and the Server
Core system can access other resources on the network from the Server Core system.
5. Click Start, click All Programs, click Administrative Tools, and select Windows
Server Backup.
ptg
6. In the Actions pane, click the Connect to Another Computer link.
7. In the Computer Chooser window, select the Another Computer option button, type
in the name of the Server Core system, and click OK.
8. If you can connect to the Server Core system, the installation is successful. If the
connection fails, either the Server Core firewall is preventing connectivity or
Windows Server Backup has not been installed. Troubleshoot as necessary.
Scheduling a Backup Using Windows Server Backup and Allocating
Disks
After Windows Server Backup has been installed, no backups will be automatically sched-
uled. The fastest way to get a backup configured and define any dedicated disks for
backups is to run the Backup Schedule Wizard. This wizard enables administrators to not
only select and exclude which backup items will be contained within a backup, but it also
allows the administrator to configure a recurring backup schedule and allocate a dedicated
disk for scheduled backups if used. One thing to keep in mind is that if the configuration
30
will support backing up to multiple dedicated disks, to provide some level of backup
media rotation, it is recommended that all of the disks be available during the running of
the wizard.
When dedicated disks will be used for Windows Server Backup jobs, these disks will be
erased, reformatted, and from there on, assigned and managed by Windows Server

1242
CHAPTER 30
Backing Up the Windows Server 2008 R2 Environment
Backup. The disk allocation process will create a single NTFS formatted volume that spans
the entire disk and will set the disk volume label to include the server name, the date and
time the disk is allocated, and the disk number for each disk. For example, if disk 1 is
assigned to the backup of SERVER10 on October 8, 2009 at 6:10 p.m., the label will be
SERVER10 2009_10_08 18:10 DISK_01. To allocate disks for Windows Server Backup,
perform the following steps:
1. Log on to the Windows Server 2008 R2 system with an account with administrator
privileges.
2. Click Start, click All Programs, click Administrative Tools, and select Windows
Server Backup.
3. In the Actions pane, click on the Backup Schedule link to start the Backup Schedule
Wizard. Selecting the Backup Schedule link is the only way multiple disks can be
allocated to Windows Server Backup in one process.
4. Click Next on the Getting Started page.
5. Select the Full Server (Recommended) option button, and click Next to continue.
6. On the Specify Backup Time page, select the time to run the scheduled backup from
the Once a Day or the More Than Once a Day selections, and click Next to continue.
Figure 30.3 details a backup that will run every day at 9:00 p.m.
ptg
FIGURE 30.3
Setting the scheduled backup to run every day at 9:00 p.m.
7. On the Specify Destination Type page, select the Back Up to a Hard Disk That Is
Dedicated for Backups (Recommended) option button and click Next. On this page,
a backup to a nonsystem volume or a shared network folder could have been
selected. When utilizing volumes for backup, performance might be degraded
severely during an active backup process if the disk hosting the backup volume is
Using Windows Server Backup
1243
also used to store production data. Storing scheduled backups on a shared network
folder results in backups being overwritten during each backup cycle.
8. Because we selected to use dedicated backup disks, the next page is the Select
Destination Disk page. Click the Show All Available Disks button to select the
desired disks.
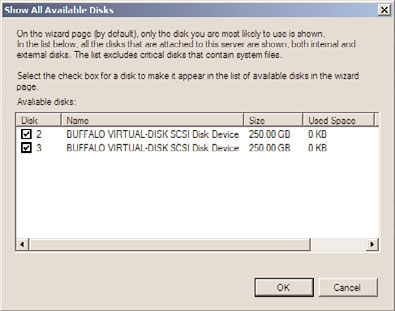
9. In the Show All Available Disks window, check each of the disks that will be dedicated
to the scheduled backup, and click OK to save the settings, as shown in Figure 30.4.
ptg
FIGURE 30.4
Selecting local disks to be used for scheduled backups.
NOTE
When multiple disks are assigned to a single scheduled backup, any of the disks will
be used and that is not in the control of the administrator. If a disk is removed for off-
site storage, the remaining disks will be used for the next scheduled backup.
10. Back on the Select Destination Disk page, check all of the disks that have been
added, and click Next to continue.
11. A Windows Server Backup warning window opens requiring confirmation that the
selected disks will be reformatted and used by Windows Server Backup exclusively;
click Yes to assign the disks for backup.
30
12. On the Confirmation page, verify the settings, and click Finish to save the new
scheduled backup and backup settings and to reformat and label each of the
assigned disks.
13. On the Summary page, review the results, and click Close to complete the process.
Creating a scheduled backup using Windows Server Backup enables an administrator to
automate the backup process, and with the backup and VSS managing the dedicated disks,
the administrator only needs to verify that backups have been run successfully.
1244
CHAPTER 30
Backing Up the Windows Server 2008 R2 Environment
Manually Running a Scheduled Backup
After the scheduled backup is created for a server, an administrator can let the backup run
as scheduled or the backup can be run manually using the Backup Once link. To manually
run a scheduled backup, simply use the Backup Once link and select the Scheduled
Backup Options option button on the Backup Options page. Click Next and click Backup
on the Confirmation page to start the backup. One important point to note is that if
multiple disks are allocated to a scheduled backup, running a manual backup does not
allow the administrator to select which disk to use. The only way to control which disk is
used for scheduled backup is to either remove all the other allocated disks from the system
or mark the disks as offline using Disk Management or Diskpart.exe.
Running a Backup to a Shared Network Folder
Starting with Windows Server 2008 R2, both manual and scheduled backups can use dedi-
cated backup disks, a specific folder on a local volume, or a shared network folder as a
backup destination. When a shared network folder is chosen as the backup destination, a
system administrator can store full backups on alternate locations to allow for different
recovery scenarios. Also, something important to consider is that if a dedicated disk or