Windows Server 2008 R2 Unleashed (254 page)
Read Windows Server 2008 R2 Unleashed Online
Authors: Noel Morimoto

Selecting the correct backup.
7. On the Select Recovery Type page, select the Files and Folders option button, and
click Next to continue.
8. On the Select Items to Recover page, expand the server node; select the disks,
folders, and files to be restored; and click Next to continue.
NOTE
Unlike other backup utilities, Windows Server Backup does not contain check boxes to
select items for recovery. To select an item or multiple items, simply click on the item
to highlight it and use the Shift or Ctrl keys to make multiple sections.
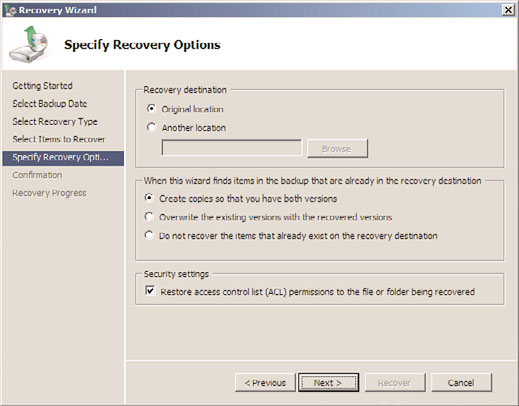
9. On the Specify Recovery Options page, specify whether the files will be restored to
the original location or an alternate location. Do not click Next.
10. On the Specify Recovery Options page, if the restore will be placed in the original
location, specify how to deal with existing files by choosing to either create copies in
the same folder, overwrite the existing data with restore data, or do not recover
items that already exist, as shown in Figure 31.6.
11. On the Confirmation page, verify the restore selections and options. If everything is
correct, click the Recover button to start the recovery process.
Managing and Accessing Windows Server Backup Media
1285
31
FIGURE 31.6
Selecting the restore options.
12. On the Recovery Progress page, verify the success of the recovery or troubleshoot the
ptg
errors if the recovery fails.
13. Click Close to complete the recovery and close Windows Server Backup.
14. Browse to the location of the restore to verify the recovery, and if the create copies
option was selected, notice that there are two copies: the original and the restored,
which is named after the date and time the backup was taken. When you are fin-
ished, log off of the server.
Managing and Accessing Windows Server Backup
Microsoft has completely changed the way backups and backup media are managed with
the release of Windows Server 2008. In previous editions of Windows Server versions, the
NT Backup utility could back up the entire system or just a set of folders and files. The
backup could be stored on tapes or they could be stored in a single .bkf file that is saved
on a local disk or on a network shared folder. Starting with Windows Server Backup for
Windows Server 2008 and Windows Vista, backups can be taken of only the entire system
or volumes but not of granular folders or files. With Windows Server 2008 R2, Windows
Server Backup supports backing up individual files and folders, and exclusions can be
added to backup jobs as well. Windows Server Backup can store backups on dedicated
locally attached disks on a DVD disk or a set of disks, or the backup can be stored on a
network shared folder.
Windows Server Backup can be configured to run a scheduled backup or a manual backup.
Either can be run from the graphical user interface or the command-line utility, but the
1286
CHAPTER 31
Recovering from a Disaster
backup options, including where the backup can be stored and the recovery options avail-
able, are different.
Windows Server Backup Managed Disks
Windows Server Backup can be used to run a manual backup or it can be used to run a
scheduled backup. Scheduled backups can be stored on locally attached disks that are
dedicated to Windows Server Backup, a folder on a local volume, or a network shared
folder. When a scheduled Windows Server Backup job is created, the administrator can
define which locally attached disks, folder, or network share will be used to store the
backups. During the creation of the scheduled job, if dedicated disks are selected, which is
recommended, the allocated disks will each be repartitioned and reformatted. Windows
Server Backup will stamp the disk volume to match the time and date the scheduled job is
created. By default, this disk will only be available on the local system through the
Windows Server Backup program.
A Windows Server Backup disk can have a drive letter added after the initial backup is
created if the disk needs to be accessed from within the operating system, from across the
network, or if the backup data needs to be copied to additional disks or network folders
for offsite storage. Although adding a drive letter to a dedicated Windows Server Backup
disk is not recommended, it might be the only way or the most efficient way to make the
ptg
backup media available to an alternate system if the disk cannot be locally attached to the
alternate system. Getting access to this backup data, however, might prove to be challeng-
ing from Windows Explorer and might need to be accessed through Windows Server
Backup. Backups contained on a Windows Server Backup dedicated disk can be used to
restore an entire system, an entire volume, or a set of specified files and folders.
DVD Media
When Windows Server 2008 R2 systems have a local DVD writer drive, which is highly
recommended, backups of Windows volumes and the complete system can be stored on
DVD media. Backups stored on DVD media will span several DVDs and can be used when
data needs to be restored to offsite servers or systems in an isolated network. Backups stored
on DVD media can only be used to restore the entire Windows system or entire volumes.
Selective restore of files and folders cannot be performed using DVD backup media.
Network Shared Folders
When Windows Server Backup is configured to back up to a network shared folder, backup
administrators need to consider a few things. First, the share and NTFS permissions should
be configured so that only backup administrators and specific service accounts can access
and read this data. Also, if this share contains data that will be replicated by a third-party
Windows Server Backup Volume Recovery
1287
provider, special permissions might need to be added to support this. Another very impor-
tant point to note about network shared folders for Windows Server Backup is that only
31
the most recent copy of the backup will be stored there because each backup overwrites
the previous. This is unlike backup to dedicated disks, which can store multiple versions
and copies of a Windows Server 2008 R2 system backup.
Windows Server Backup Volume Recovery
When an entire disk or disk volume has been corrupted or has failed and needs to be
replaced and recovered, Windows Server Backup can be used to restore the disk or volume.
Local disks, local folder backups, network backups, and DVD backups can be used to
restore an entire volume using Windows Server Backup. When an entire volume needs to
be recovered, unless the volume contains system data, the volume can be restored using
the Windows Server Backup program from within a running operating system. If the
volume contains system folders, the restore needs to be restored using the Repair Your
Computer option when booting the system using the Windows installation media.
Windows Server 2008 R2 Data Volume Recovery
ptg
When a data volume on a Windows Server 2008 R2 system has failed and needs to be
restored using Windows Server Backup, perform the following steps:
1. Log on to the Windows Server 2008 R2 system with an account with administrator
privileges.
2. Click Start, click All Programs, click Administrative Tools, and select Windows
Server Backup.
3. In the Actions pane, select Recover to start the Recovery Wizard.
4. On the Getting Started page, select either to restore data previously backed up from
the local computer or a different computer. For this example, select This Server
(Servername), where
Servername
is the name of the server Windows Server Backup is
connected to, and click Next to continue.
5. On the Select Backup Date page, select the correct date and time of the backup you
will use to restore the data, and click Next to continue. Days with a successful
backup are formatted in boldface.
6. On the Select Recovery Type page, select the Volumes option button, and click Next
to continue.
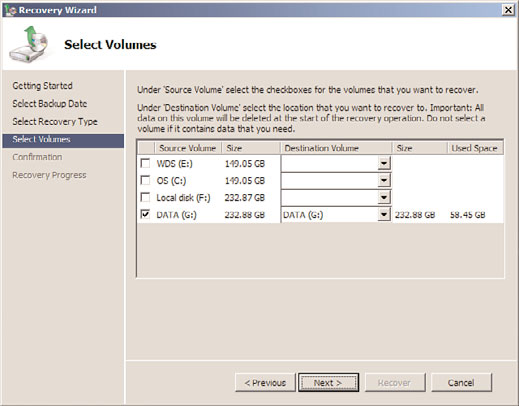
7. On the Select Volumes page, the window displays each of the volumes contained in
the backup that was previously chosen. Check the box next to the desired volume
that will be restored, and select the destination volume to which you will restore the
backed up volume. Figure 31.7 displays that the backed-up G: volume will be restored
to the existing G volume; click Next to continue after the correct selections are made.
1288
CHAPTER 31
Recovering from a Disaster
FIGURE 31.7
Selecting the source and destination volumes for volume recovery.
ptg
8. After clicking Next on the Select Volumes page, a window opens, requesting confir-
mation that the data on the volume(s) will be lost by the recovery process; click Yes
to continue with the volume recovery process.
9. On the Confirmation page, review the selections. If everything looks correct, click
the Recover button to start the volume recovery.
10. On the Recovery Progress page, the recovery status of the volume will be displayed.
After the recovery completes, review the results and click Close if the recovery was
successful; otherwise, select the Errors tab to review the errors.
11. If the volume recovery was successful, the only additional step that might be
required is to reboot the system if the data on the volume is shared or used by any
applications or services. Reboot as required.
Windows Server 2008 R2 System Volume Recovery
Restoring a system volume cannot be performed using Windows Server Backup. System
volumes can only be restored using the Windows recovery environment from the
Windows installation media. System volumes should only be restored separately when the
system volume is corrupted or failed but the system hardware has not changed and data
disks remain intact. Any Windows disk that contains system volumes will be erased and
restored as part of this process. If a single disk contains two volumes including the system
volume and a separate data volume, the data volume will also be erased and restored by
this process. To restore the system volume, perform the following steps:
1. Boot up your system using the Windows Server 2008 R2 installation media. If neces-
sary, configure the BIOS to allow booting from the CD/DVD drive and, if prompted,
press a key to boot from the DVD.
Windows Server Backup Volume Recovery
1289
2. When the Install Windows interface opens, select the correct language, time, and
keyboard settings, and click Next to continue.
31
3. On the next page, click the Repair Your Computer link located in the lower-left
corner of the window.
4. On the System Recovery Options page, the operating system drive that will be recov-
ered should be listed. If not, click the Load Drivers button, and install the necessary
hard drive controller files. If the system is listed, select the Restore Your Computer
Using a System Image That You Created Earlier option button located at the bottom
of the window, and click Next to continue.
5. On the Select a System Image Backup page, if a local disk was used for the backup,
the most recent backup will be listed and the Use the Latest Available System Image
check box will be automatically selected by default. Select the Select a System Image