101 Excel 2013 Tips, Tricks and Timesavers (20 page)
Read 101 Excel 2013 Tips, Tricks and Timesavers Online
Authors: John Walkenbach

Figure 48-1:
The Inquire tab appears when the Inquire add-in is installed.
Workbook analysis
To analyze the active workbook, choose Inquire⇒Report⇒Workbook Analysis to display the Workbook Analysis Report dialog box shown in Figure 48-2. Use the Items list on the left to select an analysis item, and the results (if any) appear in the Results section on the right. To create a report (in a new workbook), select the items to include in the report and choose Excel Export. The report is very detailed and is a good way to document an Excel workbook.
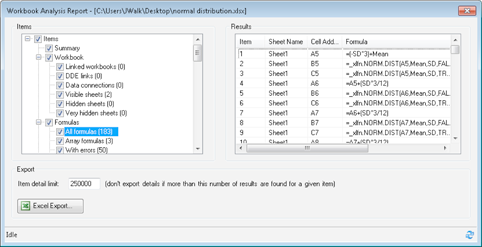
Figure 48-2:
The Workbook Analysis Report dialog box.
Diagram tools
The items in the Inquire⇒Diagram group each display a diagram:
→ Workbook relationships
→ Worksheet relationships
→ Cell relationships
Figure 48-3 shows an example of worksheet relationships in a workbook that has four worksheets. It shows that Sheet3 contains formulas that refer to Sheet1 and Sheet2, and Sheet4 has formulas that refer to Sheet1.
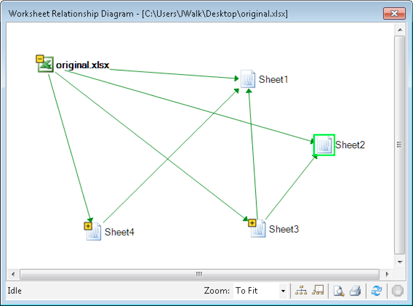
Figure 48-3:
This diagram depicts relationships between worksheets.
Compare files
The Inquire⇒Compare⇒Compare Files command generates a detailed display that shows the differences between two workbooks. Both of the workbooks to be compared must be open.
Figure 48-4 shows an example of the output.
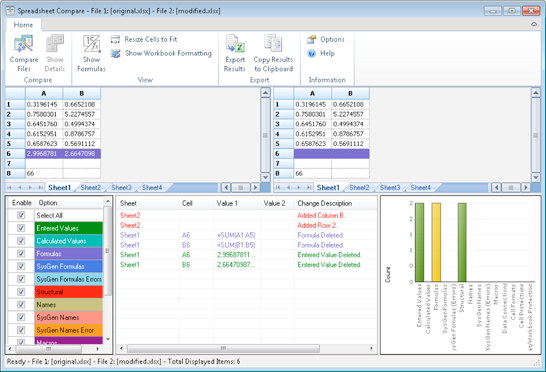
Figure 48-4:
Output from the Compare Files command.
Other options
The Inquire add-in has some additional options in the Inquire⇒Miscellaneous group:
→
Clean Excess Cell Formatting:
Removes unnecessary formatting from cells. For example, the command will remove formatting applied to entire rows or columns.
→
Workbook Passwords:
If you use Inquire to analyze or compare workbooks that are password-protected, you can avoid having to type the password each time those files are opened.
→
Help:
Displays help about the Inquire add-in features.
Tip 49: Hiding and Locking Your Formulas
If you distribute workbooks to other users, you may want to hide your formulas. This tip describes how to do so.
Every cell has two key properties: Locked and Hidden. A locked cell can’t be changed, and the contents of a hidden cell don’t appear in the Formula bar when the cell is selected. By default, every cell is locked and not hidden. But it’s important to remember that these attributes have no effect unless the worksheet itself is protected.
A common scenario is to lock (and possibly hide) formula cells and unlock constant (nonformula cells).
Hiding and locking formula cells
Follow these steps to hide all of the formula cells on the active worksheet:
1.
Select a single cell, and choose Home⇒Editing⇒Find & Select⇒Go To Special. Excel displays the Go To Special dialog box.
2.
In the Go To Special dialog box, choose the Formulas option and make sure all four check boxes are checked (see Figure 49-1).
3.
Click OK, and Excel selects all of the formula cells.
4.
Right-click any of the selected formula cells and choose Format Cells from the shortcut menu.
The Format Cells dialog box appears.
5.
Click the Protection tab to display the Locked and Hidden checkboxes.
6.
Check both the Locked and the Hidden check boxes.
7.
Click OK to close the Format Cells dialog box.
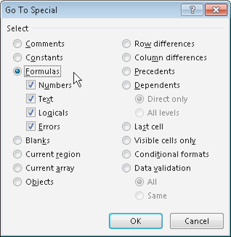
Figure 49-1:
Using the Go To Special dialog box to select all formula cells.
Unlocking nonformula cells
Follow these steps to unlock all of the nonformula cells:
1.
Select a single cell, and choose Home⇒Editing⇒Find & Select⇒Go To Special. Excel displays the Go To Special dialog box.
2.
In the Go To Special dialog box, choose the Constants option and make sure all four check boxes are checked.
3.
Click OK, and Excel selects all of the constant (nonformula) cells.
4.
Right-click any of the selected formula cells and choose Format Cells from the shortcut menu.
The Format Cells dialog box appears.
5.
Click the Protection tab to display the Locked and Hidden check boxes.
6.
Uncheck both the Locked and the Hidden check boxes.
7.
Click OK to close the Format Cells dialog box.
Protecting the worksheet
The steps in the two previous sections have no effect unless the worksheet is protected. Follow these steps to protect the worksheet:
1.
Choose Review⇒Changes⇒Protect Sheet to access the Protect Sheet dialog box (see
Figure 49-2).
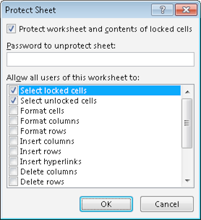
Figure 49-2:
The Protect Sheet dialog box.
2.
In the Protect Sheet dialog box, specify a password (if desired). If you don’t specify a password, anyone can unprotect the sheet and see (or modify) the formulas.
3.
Click OK, and you will be prompted to reenter the password.
When you protect a worksheet, many common actions are disabled. For example, the user cannot insert rows or columns, change column width, or create embedded charts. Use the options in the Protect Sheet dialog box to specify the actions that are allowed when the sheet is protected.
After performing these steps, cells that contain a formula are not displayed in the Formula bar. If the user attempts to edit the cell, the alert box shown in Figure 49-3 appears. Nonformula cells can be edited, as usual.
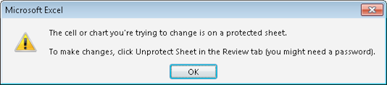
Figure 49-3:
This alert box appears if the user attempts to edit a formula cell.
 Keep in mind that it is very easy to break the password for a protected sheet. If you’re looking for absolute security, hiding and locking formula cells is not the solution.
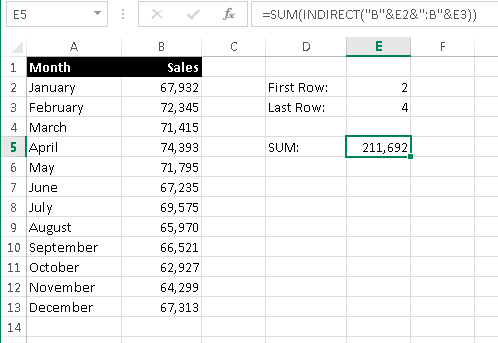
Tip 50: Using the INDIRECT Function
To make a formula more flexible, you can use the Excel INDIRECT function to create a range reference. This rarely used function accepts a text argument that resembles a range reference and then converts the argument to an actual range reference. When you understand how this function works, you can use it to create more powerful interactive spreadsheets.
Specifying rows indirectly
Figure 50-1 shows an example that uses the INDIRECT function. The formula in cell E5 is
=SUM(INDIRECT(“B”&E2&”:B”&E3))