Build Your Own ASP.NET 3.5 Website Using C# & VB (37 page)
Read Build Your Own ASP.NET 3.5 Website Using C# & VB Online
Authors: Cristian Darie,Zak Ruvalcaba,Wyatt Barnett
Tags: #C♯ (Computer program language), #Active server pages, #Programming Languages, #C#, #Web Page Design, #Computers, #Web site development, #internet programming, #General, #C? (Computer program language), #Internet, #Visual BASIC, #Microsoft Visual BASIC, #Application Development, #Microsoft .NET Framework

their output.
Take the Calendar control, for example. Say you use many calendars throughout
your web site, and all of them are supposed to have the same properties as this one:
SelectionMode="DayWeekMonth" SelectWeekText="Select Week"
SelectMonthText="Select Month" TitleFormat="Month"
OnSelectionChanged="SelectionChanged" />
Now, given that you have many calendars, you decide that you’d like to have the
common set of properties saved in a central place. This way, if you decided to
change the format later, you’d need to make changes in one place, rather than all
over your web site.
So, can CSS help us keep our calendars consistent in the same way it can keep our
headings consistent? Unfortunately, it can’t. All the settings in the above calendar
Licensed to [email protected]
200
Build Your Own ASP.NET 3.5 Web Site Using C# & VB
are processed on the server side, and are used to determine the actual HTML that’s
output by the control. CSS can affect the final output by setting the colors or other
details of the resulting HTML code, but it can’t influence the way the Calendar
control works on the server.
So the question remains: how can we keep web server controls consistent?
Skins
,
which were introduced in ASP.NET 2.0, are the answer to this question. They define
default values for server-side controls.
Skin definitions are saved into files with the
.skin
extension. A skin definition looks like the markup for a normal web server control, except that it doesn’t have an ID,
and it can’t set event handlers. This makes sense, since the skin isn’t an actual
control. Here’s an example of a skin for a calendar:
FirstDayOfWeek="Sunday" NextPrevFormat="FullMonth"
SelectionMode="DayWeekMonth" SelectWeekText="Select Week"
SelectMonthText="Select Month" TitleFormat="Month" />
Now, provided this skin is part of the theme that’s applied to the current page, all
Calendar controls will inherit all of these property values automatically. These
values can be overridden for any specific calendar, but the skin provides the default
values.
A skin can also contain a SkinId property, and if it does, it becomes a
named skin
.
A named skin doesn’t apply automatically to all controls of its type: it affects only
those that specify that the skin applies to them. This allows you to define many
skins for the same control (for instance, a SmallCalendar and a BlueCalendar).
Adding a Skin
The truth is, we don’t really need skins for our simple site, but we’ll add one so
that you can get an idea of their functionality. Right-click again on the
Blue
node in Solution Explorer, and select
Add New Item…
. Choose the
Skin File
template, leave its name as
SkinFile.skin
, and click
Add
.
Visual Web Developer adds a comment to the file; this comment contains default
text that briefly describes skins. A theme can contain one or many skin files, and
each skin file can contain one or more skin definitions. ASP.NET will automatically
read all the files with the
.skin
extension.
Licensed to [email protected]
Building Web Applications
201
Let’s say we want all TextBox controls to have the default ForeColor property set
to blue. Without skins, we’d need to set this property manually on all
TextBox
controls in your site. However, you can achieve the same effect by adding this line
to your
SkinFile.skin
file:
Dorknozzle\VB\11_SkinFile.skin
(excerpt)
<%-⋮
--%>
Once the theme containing this skin has been applied, the new skin will give all
TextBox controls on your site the default ForeColor of blue.
Applying the Theme
In order for your CSS—and the skin—to take effect, you’ll need to apply the theme
to your web page. Once the new theme has been created, applying it is a piece of
cake. You can apply a new theme using the
Web.config
configuration file, or through
your code.
For now we’ll use
Web.config
. The theme can be set using the theme attribute of the
pages element, which should be located inside the system.web element.
The pages element already exists in
Web.config
—you just need to add the theme
attribute:
Dorknozzle\VB\12_web.config
(excerpt)
⋮
>
⋮
⋮
Licensed to [email protected]

202
Build Your Own ASP.NET 3.5 Web Site Using C# & VB
Building the Master Page
This is where the real fun begins! All of the pages in Dorknozzle have a common
structure, with the same header on the top, and the same menu on the left, so it
makes sense to build a master page. With this master page in place, we’ll be able to
create pages for the site by writing only the content that makes them different, rather
than writing the header and the menu afresh for each page.
Right-click again on the root node in Solution Explorer and select
Add New Item…
.
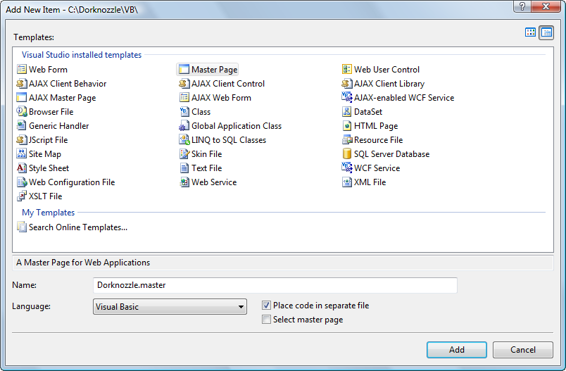
There, select the
Master Page
template from the list of available templates, and name
it
Dorknozzle.master
. Choose the language in which you want to program the master
page from the
Language
drop-down list, and check the
Place code in a separate file
checkbox
, as illustrated in Figure 5.28. This latter option will instruct V
isual Web Developer to generate a code-behind file for the master page.
Figure 5.28. Creating a new master page
After you click the
Add
button, Visual Web Developer creates the new master page,
which will appear immediately in Solution Explorer. (If you expand its node you’ll
see its code-behind file listed as a child node.)
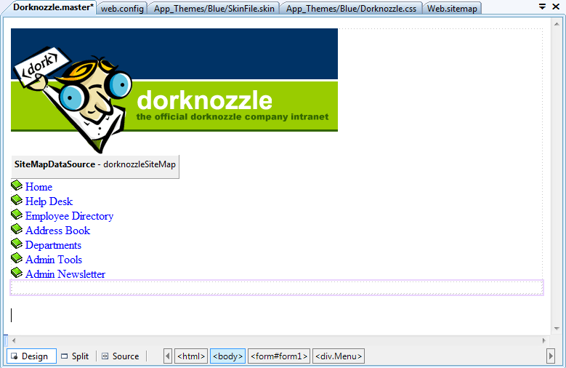
Upon the master page’s creation Visual Web Developer will open the
Dorknozzle.master
file (not its code-behind file) for you to edit. You’ll find that
Licensed to [email protected]
Building Web Applications
203
Visual Web Developer has given you a very simple default master page. Edit the
markup inside the form element as shown below:
Dorknozzle\VB\13_Dorknozzle.master
(excerpt)
⋮
⋮
The code is pretty simple, and it’s identical regardless of whether you’re using VB
or C#: basically, it defines the layout of all the Dorknozzle pages. Each of the three
sections defined here starts with a comment that identifies the section as being the
header, the menu on the left, or the content area. These elements are positioned on
the page using the CSS styles you added earlier to the Dorknozzle.css file, so you
may want to have another look at that file to refresh your memory.
Licensed to [email protected]
204
Build Your Own ASP.NET 3.5 Web Site Using C# & VB
We saw in
Chapter 4
that the TreeView and Menu controls know how to read data from a SiteMapDataSource class, which reads the
Web.sitemap
file located in the
root of your project (unless you specify otherwise). To build the menu on the lefthand side of the page, we create a
Web.sitemap
file, then add a SiteMapDataSource control to our web form or master page:
Dorknozzle\VB\13_Dorknozzle.master
(excerpt)
ShowStartingNode="false" />
You might recall that the
Web.sitemap
file forces us to add a root siteMapNode element, but we can suppress this root element using the SiteMapDataSource: we set its ShowStartingNode property to False.
To have the Menu control simply display the list of nodes, it’s sufficient to set its
DataSourceID to the ID of the SiteMapDataSource. However, the Menu control also
gives us the potential to customize the look of each menu item through
templates
.
Here, we used the StaticItemTemplate to add a little book image to the left of each
menu item:
Dorknozzle\VB\13_Dorknozzle.master
(excerpt)
DataSourceID="dorknozzleSiteMap">

width="16" height="16" style="border-width: 0;" />
<%# Eval("Text") %>
After you write
Dorknozzle.master
, copy the
Images
folder from the code archive to your
Dorknozzle
folder (
C:\Dorknozzle\VB\
or
C:\Dorknozzle\CS
).1 Once this is done, you should have a
Dorknozzle\Images
folder that contains a few image files. To make
1 Remember that all code and images used in building the Dorknozzle project are available in the code archive, which is available for download from sitepoint.com.
Licensed to [email protected]

