Make: Electronics (65 page)
Authors: Charles Platt

The dividers are molded into the boxes, so you don’t have the annoyance associated with removable dividers that slip out of position, allowing components to mix together. The box lids fit tightly, so that even if you drop one of the boxes, it probably won’t open. The lids have metal hinges, and a ridge around the edge that makes the boxes securely stackable.
I keep my little storage boxes on a set of shelves above the desk, with a gap of 3 inches between one shelf and the next, allowing two boxes to be stacked on each shelf. If I want to work with a particular subset of boxes, I shift them onto the desktop and stack them there.
Labeling
No matter which way you choose to store your parts, labeling them is essential. Any ink-jet printer will produce neat-looking labels, and if you use peelable (nonpermanent) labels, you’ll be able to reorganize your parts in the future, as always seems to become necessary. I use color-coded labels for my collection of resistors, so that I can compare the stripes on a resistor with the code on the label, and see immediately if the resistor has been put in the wrong place. See Figure 5-6.
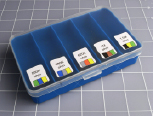
Figure 5-6.
To check that resistors are not placed in the wrong compartments, print the color code on each label.
Even more important: you need to place a second (non-adhesive) label inside each compartment with the components. This label tells you the manufacturer’s part number and the source, so that reordering is easy. I buy a lot of items from Mouser, and whenever I open their little plastic bags of parts, I snip out the section of the bag that has the identifying label on it, and slide it into the compartment of my parts box before I put the parts on top of it. This saves frustration later.
If I were
really
well organized, I would also keep a database on my computer listing everything that I buy, including the date, the source, the type of component, and the quantity. But I’m not that well organized.
On the Bench
Some items are so essential that they should sit on the bench or desktop on a permanent basis. These include your soldering iron(s), helping hands with magnifier, desk lamp, breadboard, power strip, and power supply. For a desk lamp, I prefer the type that has a daylight-spectrum fluorescent bulb, because it spreads a uniform light and helps me to distinguish colors of adjacent stripes on resistors.
The power supply is a matter of personal preference. If you’re serious about electronics, you can buy a unit that delivers properly smoothed current at a variety of properly regulated and calibrated voltages. Your little wall-plug unit from RadioShack cannot do any of these things, and its output may vary depending on how heavily you load it. Still, as you’ve seen, it is sufficient for basic experiments, and when you’re working with logic chips, you need to mount a 5-volt regulator on your breadboard anyway. Overall, I consider a good power supply optional.
Another optional item is an oscilloscope. This will show you, graphically, the electrical fluctuations inside your wires and components, and by applying probes at different points, you can track down errors in your circuit. It’s a neat gadget to own, but it will cost a few hundred dollars, and for our tasks so far, it has not been necessary. If you plan to get seriously into audio circuits, an oscilloscope becomes far more important, because you’ll want to see the shapes of the waveforms that you generate.
You can try to economize on an oscilloscope by buying a unit that plugs into the USB port of your computer and uses your computer monitor to display the signal. I have tried one of these, and was not entirely happy with the results. It worked, but did not seem accurate or reliable for low-frequency signals. Maybe I was unlucky; I decided not to try any other brands.
The surface of your desk or workbench will undoubtedly become scarred by random scuffs, cut marks, and drops of molten solder. I use a piece of half-inch plywood, two feet square, to protect my primary work area, and I clamp a miniature vise to its edge. To reduce the risk of static electricity when working with sensitive components, I cover the plywood with a square of conductive foam. This is not cheap, but offers advantages in addition to protecting chips from being zapped. Instead of scattering stray components, I can stick them into the foam, like plants growing in a garden. And like a garden, I can divide it into sections, with resistors on one side, capacitors on the other, and chips straight ahead.
Inevitably, during your work you’ll create a mess. Little pieces of bent wire, stray screws, fasteners, and fragments of stripped insulation tend to accumulate, and can be a liability. If metal parts or fragments get into a project that you’re building, they can cause short circuits. So you need a trash container. But it has to be easy to use. I use a full-size garbage pail, because it’s so big that I can’t miss it when I throw something toward it, and I can never forget that it’s there.
Last, but most essential: a computer. Now that all data sheets are available online, and all components can be ordered online, and many sample circuits are placed online by hobbyists and educators, I don’t think anyone can work efficiently without quick Internet access. To avoid wasting space, I suggest you use a small, cheap laptop that has a minimal footprint. A possible workbench configuration, using a steel desk, is shown in Figure 5-7.
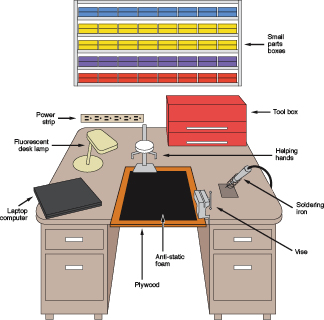
Figure 5-7.
An old steel office desk can be as good as, if not better than, a conventional workbench when building small electronics projects. It provides a large work area and ample storage, and has sufficient mass for you to ground yourself when dealing with components that are sensitive to static electricity.
Reference Sources
Online
My favorite educational and reference site is Doctronics (
http://www.doctronics.co.uk)
. I like the way they draw their schematics, and I like the way they include many illustrations of circuits on breadboards (which most sites don’t bother to do). They also sell kits, if you’re willing to pay and wait for shipping from the UK. Part of a page from the doctronics website is reproduced in Figure 5-8.
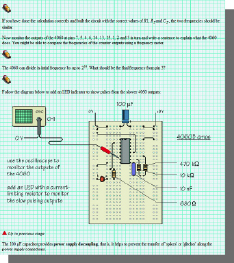
Figure 5-8.
A sample page from http://www.doctronics.co.uk shows their detailed instructional approach. This is a valuable free online resource.
My next favorite hobby site is also British-based: the Electronics Club (
http://www.kpsec.freeuk.com
)
. It’s not as comprehensive as Doctronics, but very friendly and easy to understand.
For a more theory-based approach, try
http://www.electronics-tutorials.ws
. This will go a little farther than the theory sections I’ve included here.
For an idiosyncratic selection of electronics topics, try Don Lancaster’s Guru’s Lair (
http://www.tinaja.com
). Lancaster wrote
The TTL Cookbook
more than 30 years ago, which opened up electronics to at least two generations of hobbyists and experimenters. He knows what he’s talking about, and isn’t afraid of getting into some fairly ambitious areas such as writing his own PostScript drivers and creating his own serial-port connections. You’ll find a lot of ideas there.
Books
Yes, you do need books. As you’re already reading this one, I won’t recommend other beginners’ guides. Instead, in keeping with the orientation of this chapter, I’ll suggest some titles that will take you farther in various directions, and can be used for reference. I own all of these myself, and find them valuable:
Practical Electronics for Inventors, by Paul Scherz (McGraw-Hill, Second Edition, 2007)
This is a massive, comprehensive book, well worth the $40 cover price. Despite its title, you won’t need to invent anything to find it useful. It’s my primary reference source, covering a wide range of concepts, from the basic properties of resistors and capacitors all the way to some fairly high-end math. If you buy only one book (in addition to this one, of course!), this would be my recommendation.
Getting Started with Arduino, by Massimo Banzi (Make: Books, 2009)
If you enjoy the simplicity and convenience of the PICAXE programmable microcontroller that I describe later in this chapter, you’ll find that the Arduino can do a lot more.
Getting Started
is the simplest introduction around, and will help to familiarize you with the Processing language used in Arduino (similar to the C language, not much like the version of BASIC used by the PICAXE).
Making Things Talk, by Tom Igoe (Make: Books, 2007)
This ambitious and comprehensive volume shows how to make the most of the Arduino’s ability to communicate with its environment, even getting it to access sites on the Internet.
TTL Cookbook, by Don Lancaster (Howard W. Sams & Co, 1974)
The 1974 copyright date is not a misprint! You may be able to find some later editions, but whichever one you buy, it will be secondhand and possibly expensive, as this title now has collectible value. Lancaster wrote his guide before the 7400 series of chips was emulated on a pin-for-pin basis by CMOS versions, but it’s still a good reference, because the concepts and part numbers haven’t changed, and his writing is so accurate and concise.
CMOS Sourcebook, by Newton C. Braga (Sams Technical Publishing, 2001)
This book is entirely devoted to the 4000 series of CMOS chips, not the 74HC00 series that I’ve dealt with primarily here. The 4000 series is older and must be handled more carefully, because it’s more vulnerable to static electricity than the generations that came later. Still, the chips remain widely available, and their great advantage is their willingness to tolerate a wide voltage range, typically from 5 to 15 volts. This means you can set up a 12-volt circuit that drives a 555 timer, and use output from the timer to go straight into CMOS chips (for example). The book is well organized in three sections: CMOS basics, functional diagrams (showing pinouts for all the main chips), and simple circuits showing how to make the chips perform basic functions.
The Encyclopedia of Electronic Circuits, by Rudolf F. Graf (Tab Books, 1985)
A totally miscellaneous collection of schematics, with minimal explanations. This is a useful book to have around if you have an idea and want to see how someone else approached the problem. Examples are often more valuable than general explanations, and this book is a massive compendium of examples. Many additional volumes in the series have been published, but start with this one, and you may find it has everything you need.
The Circuit Designer’s Companion, by Tim Williams (Newnes, Second Edition, 2005)
Much useful information about making things work in practical applications, but the style is dry and fairly technical. May be useful if you’re interested in moving your electronics projects into the real world.