Sugar Cube (21 page)
Authors: Kir Jensen

•
Whenever I have leftover cupcakes or brownies at the cart, I give them a second life as Chocolate-Chocolate Bread Pudding. I just break them up, put them in a baking dish, add some bittersweet chocolate chips, cover it all in the custard I use for the
Sweet Strata
, and bake until puffed and no longer wet in the middle. A garnish of
Nutella Whoop
turns the dish into a true chocogasm.
Molasses-Buttermilk Corn Bread
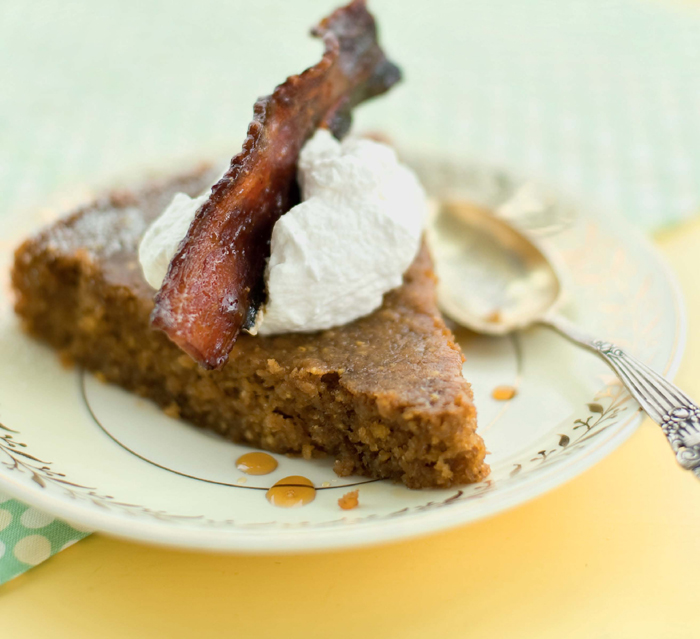
Corn Bread
WITH MAPLE–WHITE DOG WHOOP AND CANDIED BACON

For Southerners, corn bread is a starch. It’s dry and savory, and great for sopping up all those dinner juices. But when you grow up on the sweet, tender muffins from the Jiffy box, like most other Northerners I know, it’s no stretch to turn corn bread into dessert. I make a super-moist version with browned butter and baking spices, then top it with sweet, smoky, candied bacon and a dollop of whipped cream spiked with maple syrup and unaged “white dog” whiskey from House Spirits, one of Portland’s best small-batch distillers. Now, don’t go thinking moonshine and rotgut when you see the words “unaged whiskey.” When properly distilled, unaged whiskey is smooth, with a creamy, sweet, cereal-like flavor that’s not masked by the oaky vanilla notes you get from aging it in a barrel. It’s definitely worth adding to your bar cart, but if you don’t want to spend out, just swap it for a bourbon or whiskey you already have on hand, or omit the booze completely and add
1
/
4
teaspoon vanilla to round out the flavor.
MAKES 8 SERVINGS

corn bread
- Bacon grease, lard, or butter for greasing the pan
- 1
/
4
vanilla bean - 8 tablespoons (1 stick) unsalted butter
- 1
/
2
cup buttermilk - 1 large egg
- 1 egg yolk
- 1
/
3
cup full-fat sour cream or full-fat greek yogurt - 1
/
4
cup granulated sugar - 1
/
4
cup blackstrap molasses - 1
/
2
cup medium-fine yellow cornmeal - 3
/
4
cup all-purpose flour - 1 tablespoon plus 1
1
/
2
teaspoons baking powder - 1 teaspoon ground saigon cinnamon (see tip in
Giddyup Cookies
) - 1
/
4
teaspoon ground ginger - 1
/
2
teaspoon freshly grated nutmeg - 1
/
2
teaspoon sea salt
- 1 cup cold heavy cream
- 1
/
4
cup grade B maple syrup, plus more for drizzling - 2 tablespoons plus 1
1
/
2
teaspoons White Dog whiskey (optional;
see tip, following
) - Candied bacon crunch (recipe follows)
- TO MAKE THE CORN BREAD:
Preheat the oven to 350°F. Coat the bottom and sides of an 8-inch cast-iron skillet or cake pan with bacon grease. Set aside. Split the piece of vanilla bean lengthwise and scrape out the seeds with the back of a knife and add to a small sauté pan. (Make sure the pan is shiny metal, not dark nonstick or cast iron, or you won’t be able to see how dark the butter solids get.) Add the pod and 6 tablespoons of the butter and cook over medium heat until the solids drop to the bottom of the pan and turn a nutty brown, 3 to 5 minutes. Remove from the heat. - IN A MEDIUM MIXING BOWL
, whisk together the buttermilk, egg, egg yolk, sour cream, sugar, and molasses. In a large mixing bowl, whisk together the cornmeal, flour, baking powder, cinnamon, ginger, nutmeg, and salt. Stir the wet ingredients into the dry ingredients just until combined. Stir in the browned butter. Pour the batter into the prepared pan and bake until golden brown and the top springs back when pressed, 20 to 25 minutes. Remove from the oven and rub the top of the corn bread with the remaining butter. - TO MAKE THE MAPLE–WHITE DOG WHOOP:
In the bowl of a stand mixer fitted with a whisk attachment or with a handheld mixer, whip the cream and maple syrup together on medium-high speed until soft peaks form. Whisk in the whiskey (if using), 1 tablespoon at a time. With the mixer on high, continue whipping until medium-stiff peaks form. (The cream can be made ahead and stored in an airtight container in the refrigerator for up to 2 days.) - PLACE A SLICE
of warm corn bread on a plate, top with a dollop of maple whipped cream, and garnish with the candied bacon and a drizzle of maple syrup.
VARIATION:
- SPRINKLE
2 to 3 tablespoons toasted, finely chopped pecans or hazelnuts onto the bacon before serving. To toast the chopped nuts, arrange them on a rimmed sheet pan and toast in a 350°F oven until fragrant and beginning to color, 5 to 8 minutes for pecans and 10 to 15 minutes for hazelnuts.
MAKES ABOUT
3
/
4
CUP
- 1
/
4
cup grade b maple syrup - 3
/
4
teaspoon dijon mustard - 2 grinds of fresh black pepper
- 5 slices (about
1
/
3
pound) thick-cut applewood-smoked bacon (such as nueske’s)
If the words “candied,” “bacon,” and “crunch” don’t clue you in, let me warn you that this stuff is seriously addictive. You will not be able to stop nibbling it, so you might want to make extra. You don’t have to save it for dessert, either. It would be perfect next to your eggs at breakfast if you don’t chop it up.
- PREHEAT THE OVEN
to 400°F. Line a rimmed baking sheet with parchment paper or a Silpat and place a metal oven-safe rack (like a cooling rack for cookies) on top. - IN A SMALL BOWL
, mix together the maple syrup, mustard, and pepper. Dip the bacon in the maple mixture, coating both sides liberally, and arrange on the rack in a single layer. Bake for 10 minutes. Flip the bacon over, baste with more maple mixture, and bake for another 10 minutes, basting once more during the last 5 minutes of baking. The bacon will take on a rich caramelized color and a lacquered sheen. - IF YOU WANT TO TEAR THE BACON
into pieces, let it cool completely first. Or you can cut each slice in half and serve.
•
Sometimes too much of a good thing can be bad. In this case, too much booze will cause the cream to break down and get watery. Don’t be tempted to add more than 2 to 3 tablespoons.

Lard is a wonderful thing. When chilled it doesn’t get as hard as butter, so your pie crusts are more malleable and easier to work with.
It also takes longer to melt than butter, resulting in the flakiest piecrusts imaginable. On top of that, it has ever so slight hints of savoriness, which really bring out the sweet flavors of fruit. I love a lard crust with a fragrant apple pie, or just a little lard mixed into a butter crust, as in the
Apple-Apricot Crostatas
.
You’ve probably seen giant tubs of unrefrigerated lard at the supermarket, but, trust me, you don’t want to use those. They’re partially hydrogenated and not made with the highest-quality fat. For pie crusts, you want the best. That means leaf fat rendered with care. Leaf fat, which is the highest grade of pig fat, is obtained from around the kidneys and inside the loin. It’s great for baking because it has very little pork flavor if you render it right. Don’t confuse it with fatback, which comes from the pig’s back and is a little harder. Fatback isn’t bad; it’s just more appropriate for frying than baking.
Some butcher shops (usually either high end or old school) will sell rendered lard (it should be refrigerated), but you might have an easier time finding unrendered. Besides, it’s cheaper, often cheaper by the pound than butter. So don’t be afraid to pick some up and render it yourself. Get at least a pound, as quarter pounds of fat will yield about 2 cups of rendered lard.
To offer you the best rendering instructions, I consulted Jason French at Ned Ludd, one of my favorite restaurants in Portland. Jason makes everything in a brick oven using the best local ingredients—including plenty of lard from local hogs—and his simple and beautifully rustic approach to cooking is right up my alley.
Jason and I can assure you that rendering lard is easy. But it’s a slow process, so you have to plan ahead. First, be prepared for your house to smell very rich and savory and porky while you do this, so you might want to open a window. Chop the fat into
1
/
2
-inch cubes or coarsely grind it, as Jason does. Put the fat in a deep, heavy-bottomed pot and add enough water to cover it. “The water basically acts as a barrier between the fat and the heating surface,” says Jason. “It is important to do it slowly, so there is no browning of the fats or any solids. Browning limits the quality and affects the flavor.” In other words, your lard will end up tasting meaty.
Bring the lard and water to a boil over medium heat, stirring occasionally. Reduce the heat to the lowest setting and continue to cook. “It will take several hours,” says Jason. “By the time all the water has evaporated, the rendering process is almost complete.” You should see the solids (a.k.a. cracklins) float to the surface. You can also slowly render the lard in a slow cooker set on low (it’ll take all day), or in a 200°F oven.
Strain the fat through a cheesecloth-lined sieve into a mason jar and allow to cool (it’ll solidify and look white). Cover and refrigerate or freeze. It’ll keep for months.
Jason gets his fat (and pork) from Afton Field Farm and Square Peg Farm near Portland. If you’re a local, you can stop into Laurelhurst Market for rendered leaf lard or Gartner’s Country Meats for actual leaf fat. If you don’t live in Portland, ask around at real butcher shops near you. If they don’t carry leaf lard, they might be able to order it for you. Or shop for rendered leaf lard online.
