Windows Server 2008 R2 Unleashed (206 page)
Read Windows Server 2008 R2 Unleashed Online
Authors: Noel Morimoto

4. Expand the Domains node to reveal the Group Policy Objects container.
5. Either create a new GPO or edit an existing GPO.
6. After the GPO is opened for editing in the Group Policy Management Editor, expand
the Computer Configuration node, expand the Policies node, expand the Windows
Settings node, and select the Security Settings node.
7. Expand the Security Settings node and select application control policies.
8. Expand the application control policies node and select AppLocker.
9. In the Settings pane, click on the Configure Rule Enforcement link in the center of
the page.
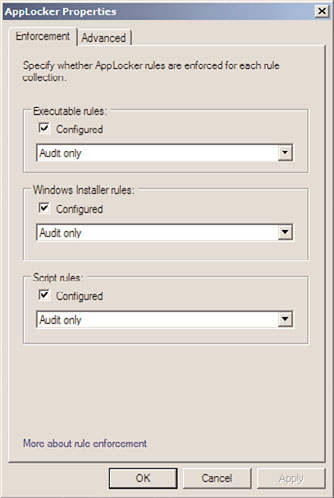
10. In the AppLocker Properties window, check the three check boxes for Executable
Rules, Windows Installer Rules, and Script Rules, select the Audit Only option from
the pull-down menus, as shown in Figure 27.9, and click OK to define the rule
enforcement properties.
Managing Computers with Domain Policies
1053
ptg
FIGURE 27.9
Configuring the AppLocker enforcement rules to audit only.
11. Now before any auditing can be logged, new rules will need to be created. For this
example, right-click on the Executable Rules node beneath AppLocker and select
27
Create New Rule.
12. On the Permissions page, set the Action to Deny and leave the default group of
Everyone, and then click Next to continue.
13. On the Conditions page, select the Path option button to define a folder path that will
contain executables to which we want to prevent access, and click Next to continue.
14. On the Path page, type in %ProgramFiles%\* and click Create to define the rule. This
defines the c:\Program Files folder as an example.
15. Once this is completed, save the domain policy and link it to an organizational unit
that contains Windows 7 Enterprise or Ultimate or Windows Server 2008 R2 systems.
16. Log on to the desired test system, verify that the new AppLocker policy has been
applied and that the Application Identity service is set to automatic and is running
on the desired machine. Reboot the machine.
17. Log back on to the test machine and run Internet Explorer or any other executable
that is located beneath the c:\Program Files folder.
18. Now open the Event Viewer console using an elevated account so the audit events
can be reviewed.
1054
CHAPTER 27
Group Policy Management for Network Clients
19. In the Event Viewer window, expand Applications and Services Logs, expand
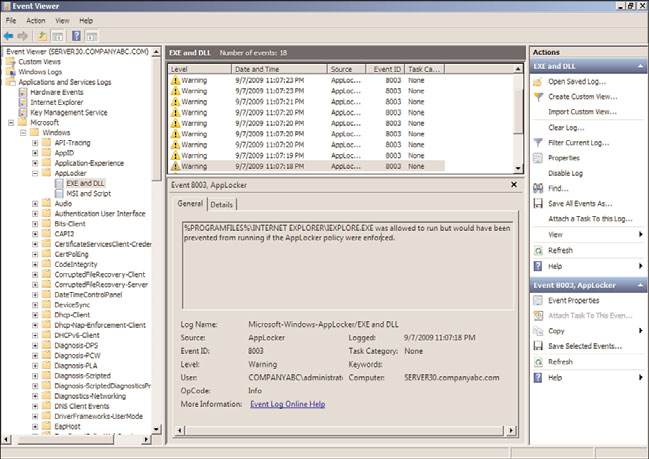
Microsoft, and expand AppLocker.
20. Select the EXE and DLL log and in the Settings pane, verify that warning events are
logged, as shown in Figure 27.10. If no warning events are logged, the Application
Identity service might not be running and/or a reboot might not have been
performed after the initial AppLocker policy was applied.
ptg
FIGURE 27.10
Viewing AppLocker EXE and DLL event log audit events.
21. Close the event log on the test machine to complete this exercise.
AppLocker rules are applied to the computer object only but unlike software restriction
policies, AppLocker rules applied to a computer can be defined or configured to apply on
a per-user or per-security group basis. Using software restriction policies, this functionality
would apply to all users who log on to the system based on the enforcement settings.
AppLocker will block all executables, Windows Installer files, and scripts once each of
those rules are enforced. Under each of the rules nodes beneath AppLocker in the tree
pane, policy administrators can use the built-in function of creating rules based on a
wizard and by creating the default rules. The default executable rules, as an example, once
created will define that everyone can run executables in the Program Files and Windows
folders, including all subfolders, but only administrators can run executables without path
restrictions. To create or populate the default rules for executables, in the tree pane under
Managing Computers with Domain Policies
1055
AppLocker, expand AppLocker and right-click on the Executable Rules node and click
Create Default Rules. This generates the three rules described previously.
Deploying Printers
Starting with Windows Server 2003 R2 edition, and the release of the Print Management
console, Windows administrators are now able to easily deploy printers to multiple
computers and users using domain policies. Printers can be deployed to computers and/or
users and when a printer is removed from a deployed printer domain policy, it is also
removed from the computer or user profile during the next startup or logon cycle. Of
course, this means that this setting also requires the Windows XP and Windows Vista
systems to wait for the network to start before running this policy because the printer is
deployed using Group Policy settings as well as a startup or logon script. Also it must be
noted that simply removing the policy does not remove the printer.
Deploying a printer using domain policies can be performed by using the GPMC on a
Windows Server 2008 R2 system that also has the Print Services Tools installed. Deploying
printers with group policies can also be performed using the Print Management console,
which is one of the Print Services Tools, and using this tool actually provides more func-
tionality during printer deployment. Because of the added functionality, the recom-
mended deployment method for Group Policy deployed printers is to use the Print
ptg
Management console. To deploy a printer to a computer using Group Policy, perform the
following steps:
1. Log on to a designated Windows Server 2008 R2 administrative server.
2. If necessary, install the Group Policy Management Console and Print Services Tools
features on the system, as detailed previously in this chapter and in Chapter 19.
27
3. After the tools are installed, click Start, click All Programs, click Administrative Tools,
and select Print Management.
4. In the tree pane, expand the Print Servers node to reveal domain print servers. If no
servers are listed, right-click the Print Servers node and select Add/Remove Servers.
Browse to find a print server or type the server name, click Add to List, and then
click OK to return to the Print Management console.
5. After a print server is added, expand the server and select the Printers node in the
tree pane. If no printers are listed in the Printers pane, a printer must be installed.
Please refer to the Print Management console Help file if assistance with printer
installation is required.
6. In the Printers pane, right-click a desired printer, and select Deploy with Group Policy.
7. When the Deploy with Group Policy window opens, click the Browse button to
locate the group policy that will contain the deployed printer settings.
8. When the Browse for a Group Policy Object window opens, select the All tab and
select the desired group policy. To create a new GPO for this task, select the Create a
New Group Policy Object icon near the upper right of the window.
1056
CHAPTER 27
Group Policy Management for Network Clients
9. The new group policy will be created with the default name of New Group Policy
Object; right-click the policy and rename it to DeployPrinterGPO. Select the
renamed policy, and click OK to return to the Deploy with Group Policy window.
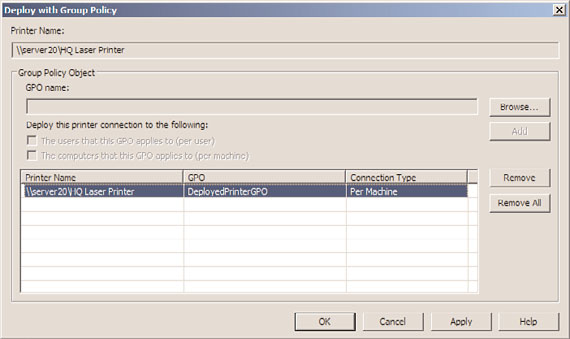
10. Back in the Deploy with Group Policy window, check the “The Computers That This
GPO Applies to (per Machine)” check box, and click the Add button to load the
printer into the policy, as shown in Figure 27.11.
ptg
FIGURE 27.11
Configuring the printers for GPO computer deployment.
11. Click OK to apply the changes. A window opens to display the results of the printer
deployment. Click OK if the operation succeeded; otherwise, click the Details button
to review the log for possible errors.
12. Click OK again to close the Deploy with Group Policy window and return to the
Print Management console.
13. In the tree pane, select the Deployed Printers node and verify in the Printers pane
that the printer is now listed.
14. Close the Print Management console.
15. Open the Group Policy Management Console and locate the new GPO and link it to
the domain, site, or organizational unit that contains the desired computers this pol-
icy will apply to.
NOTE
Only Windows Vista, Windows 7, Windows Server 2008, and Windows Server 2008 R2
are capable of adding printers through policies using built-in functionality. Older operat-
ing systems must use startup scripts for computers or logon scripts for users and must
run the pushprinterconnections.exe utility from a Windows Server 2008 system.
Managing Computers with Domain Policies
1057
To support deployed printer domain policies for systems other than Windows Vista,
Windows 7, Windows Server 2008, and Windows Server 2008 R2, perform these addi-
tional steps:
1. On a Windows Server 2008 NOT R2 system, open Windows Explorer and browse to
the c:\Windows\System32 folder.
2. Locate the pushprinterconnections.exe file and copy it to the Clipboard.
3. Browse to the domain Netlogon share in the Windows Explorer window. For this
example, it will be \\companyabc.com\Netlogon. Paste the
pushprinterconnections.exe file into this share and close the Windows Explorer
window.
4. Open the Group Policy Management Console.
5. Expand the domain and expand the Group Policy Objects container.
6. Select the DeployPrintersGPO policy and open it for editing.
7. Expand the Computer Configuration node, expand the Policies node, and expand
the Windows Settings node.
8. Select the Scripts (Startup/Shutdown) node, and in the Settings pane double-click the
Startup setting.
9.
ptg
In the Startup Properties window, click the Add button. In the Add a Script window
that opens, click the Browse button to search for the file.
10. In the Browse window, browse to the \\companyabc.com\netlogon share, select the
pushprinterconnections.exe file, and click Open.
11. Back in the Browse window, leave the script parameters blank, verify the path and
executable name are correct, and click OK.
27
12. Click OK again to close the Startup Script Properties window, and close the Group
Policy Management Editor also.
13. Back in the Group Policy Management Console, link the DeployPrinterGPO to a test