Windows Server 2008 R2 Unleashed (224 page)
Read Windows Server 2008 R2 Unleashed Online
Authors: Noel Morimoto

4. Click OK when the report options are configured.
5. A new window opens, prompting you to decide to wait for the report to generate
and automatically display the report or to generate the report in the background and
store it in the default report location. Select the Wait for Reports to be Generated
and Then Display Them option and click OK.
6. Each report will be displayed in a separate browser window or tab; close or save the
reports as desired.
Scheduling Reports to Be Generated on a Regular Basis
Reports can be generated on a regular basis (such as weekly or monthly), typically for the
purpose of reporting file storage information to management. To schedule a report, right-
click the Storage Reports Management node of the FSRM utility, and choose Schedule a
New Report Task. Then do the following:
1. Click on the Add button to choose the volume or file share that you want to gener-
ptg
ate a report, such as R:\UserShares.
2. Choose which report or reports will be generated; by default, all reports will be
selected except the Files by Property report.
3. Choose the report format you want to use—for example, the default option of
DHTML.
4. Select the Delivery tab if the report should be emailed as well as stored in the global
StorageReports folder.
5. Select the Schedule tab, and click the Create Schedule button to create a schedule for
the automated report generation. Click OK when the desired schedule or schedules
are defined.
6. Click OK when you are finished.
The report or reports specified will be generated at the scheduled intervals and any email
addresses specified on the Delivery tab will have the reports emailed to them when the
reports are generated. The scheduled report will be listed in the tasks pane when the
Storage Reports Management node is selected. The scheduled report can be generated at
will by right-clicking on the scheduled report and selecting Run Report Task Now.
File Classification Management
As stated earlier in this chapter, Windows Server 2008 R2 FSRM includes a new feature
called file classification, based on the new File Classification Infrastructure or FCI. File
classification allows an organization to define properties and rules that will add specific
file properties to better define the characteristics of the classified files. File classification
properties are supported on a Windows Server 2008 R2 NTFS partition and the file classifi-
File Server Resource Manager (FSRM)
1141
cation properties will follow Microsoft Office 2007 files and SharePoint files when moved
around. All other files that are classified will have their properties stored within the NTFS
volume they are hosted on, but if the files are moved to other Windows Server 2008 R2
NTFS volumes, these properties will follow the files.
File classification in Windows Server 2008 R2 is the first release of this feature and is sure
to be more and more valuable as third-party Microsoft partners and independent software
vendors extend the functionality included with the default framework provided.
Currently, out of the box, Microsoft Windows Server 2008 R2 allows administrators to
create file properties and automatically classify files with these properties based on the file
location and, in some cases, based on the content stored within the file. The steps to file
classification include, first, enabling and defining file properties that can be used for clas-
sification and, second, creating classification rules that will actually classify files according
to the criteria defined within the rule, and properties and values that are applied to this
rule. Once files are classified, file management tasks can be created to perform tasks upon
classified files, such as moving files to designated folders or performing custom tasks such
as running automated scripts to perform any number of tasks related to the particular file
classifications.
The best way to understand file classification is to start defining file classification proper-
ties, file classification rules, and file management tasks on data that has been copied from
ptg
a server share to an isolated lab server running Windows Server 2008 R2. Once a file is
classified and has properties defined, these properties cannot be removed—they can only
be overwritten or merged with other properties, so performing any sort of learning or
testing on production data can result in undesired changes that would require heavy
manual work to reverse. To begin using the file classification features of Windows Server
2008 R2, install the File Server Resource Manager service and tool as previously described
in this chapter, then perform the steps outlined in the proceeding sections.
Classification Properties
28
Classification properties are used to categorize files to be used later for file management
tasks or reporting. A classification property, as included with Windows Server 2008 R2,
includes the following classification property types:
. Yes/No
. Date-time
. Number
. Ordered List
. String
. Multichoice
. Multistring
To get a good understanding of how classification can be used, this section and the
following sections provide an example of how classification can be used to classify files
1142
CHAPTER 28
File System Management and Fault Tolerance
based on content that includes the word
password
. To do this, we will create a file property
type of Yes/No and create a classification rule to search the E:\ITDept folder for any files
containing the word and to classify these files as necessary. To perform this task, we must
first create the classification property. Perform the following steps to create the classifica-
tion property:
1. Log on to a Windows Server 2008 R2 system with the FSRM service and tool
installed, with an account with administrative rights.
2. Click Start, click All Programs, click Administrative Tools, and select Server Manager.
3. Expand Roles, expand File Services, expand Share and Storage Management, and
double-click on the File Server Resource Manager node beneath it.
4. Double-click Classification Management and select the Classification Properties node.
5. In the Actions pane, click on the Create Property link to start the creation of the
classification property.
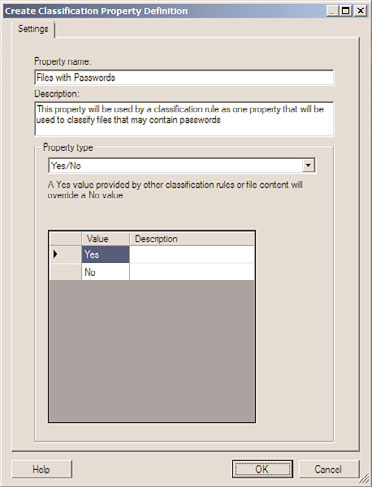
6. In the Create Classification Property Definition window, type Files with
Passwords in the Property name section, enter a description, and choose the
Property type of Yes/No.
7. In the Value section, enter a description as desired and click OK to create the classifi-
cation property, as shown in Figure 28.16.
ptg
FIGURE 28.16
Creating a new classification property.
Once the new classification property is created, we can create a classification rule that will
use this property to classify files that the rule determines to meet the criteria.
File Server Resource Manager (FSRM)
1143
Classification Rules
Once the file administrator has created the necessary file classification properties, they can
proceed in creating classification rules that will actually process and classify the files that
meet the rule criteria, by applying the necessary classification property values to the file
collections. To create a new classification rule, perform the following steps:
1. Log on to the same Windows Server 2008 R2 system that the Files with Passwords
classification property was previously defined on, with an account with administra-
tive rights.
2. Click Start, click All Programs, click Administrative Tools, and select Server Manager.
3. Expand Roles, expand File Services, expand Share and Storage Management, and
double-click on the File Server Resource Manager node beneath it.
4. Double-click Classification Management and select the Classification Rules node.
5. In the Actions pane, click on the Create a New Rule link to start the creation of a
new classification rule.
6. In the Classifications Rule Definitions window, type in the name of the rule as
Classify files with passwords and enter a description.
7. In the Scope section of the page, click the Add button to define the volumes and or
folders that this classification rule will be applied to. For our example, we will apply
ptg
this rule to E:\ITDept. When the location is specified, all subfolders will be included.
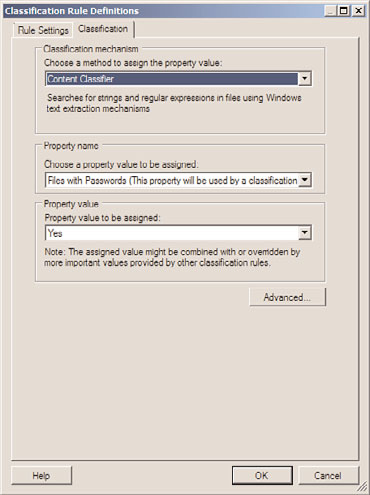
8. Once the name, description, and file locations are defined, click on the
Classification tab and select Content Classifier from the Classification mechanism
drop-down menu.
9. In the Property Name section, select the Files with Passwords property and set the
property value to be assigned as Yes, as shown in Figure 28.17.
10. Click the Advanced button to set the additional parameters that will actually be used
to determine if the files match the criteria and should be classified with the property
defined in this rule.
28
11. In the Additional Rule Parameters window, select the Additional Classification
Parameters tab. On this tab, administrators can define three different types of criteria
used to search with a files content. These three types are as follows:
.
RegularExpression—
The RegularExpression is the same as is used with .NET
programming and can be used to find complex or multiple types of data
formats, for more complex searches.
.
String—
The String type is used to find a very specific string, such as
password
that will not be dependent on the case of the string, although the string must
be an exact match. For example, the string
password
will not match
passwords
,
as that is a different string.
.
StringCaseSensitive
—The StringCaseSensitive is the same as the string, in
that the entire string must be an exact match, but the case must match. For
example, the StringCaseSensitive string of
Password
will not match the string
password
.
1144
CHAPTER 28
File System Management and Fault Tolerance
ptg
FIGURE 28.17
Defining the classification criteria on a file classification rule.
12. For our example, we will specifically look for the word
password
and will not care
about the case. In the Name section, type in String and in the value type in
password, as shown in Figure 28.18. Click OK when completed.
13. Back on the Classification Rule Definitions page, click OK to complete the rule cre-
ation.
Once the rule is created, it can be scheduled or run manually. To run all of the rules
manually, in the tasks pane, right-click on the Classification Rules node and select Run
Classification with All Rules Now. Follow the steps to select the type of report that will be
generated and whether the administrator will wait for the classification to complete and
display the window or to have the process run in the background. If a schedule or a
manual run is performed, any files that meet the properties of any enabled classification
rules will be classified, unless these files have been previously classified.
File Management Tasks
File Management tasks is a new feature within the FSRM console. File Management tasks
can be run out of the box on a Windows Server 2008 R2 system, to either expire classified