Windows Server 2008 R2 Unleashed (223 page)
Read Windows Server 2008 R2 Unleashed Online
Authors: Noel Morimoto

1134
CHAPTER 28
File System Management and Fault Tolerance
FIGURE 28.11
Creating a new FSRM quota.
ptg
Adjusting Quotas
When an auto apply quota is created on a folder, all new subfolders of that parent folder
will inherit the quota. In some cases, it might be necessary to exclude a particular
subfolder from the parent folder quota or to modify the quota of that particular subfolder.
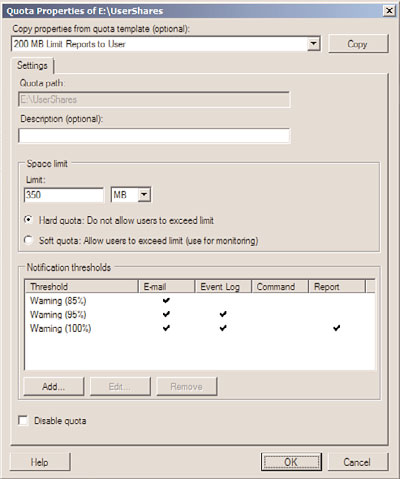
When this is necessary, an administrator simply needs to right-click the quota of the
particular folder and select Edit Quota Properties. In the Quota Properties window, the
quota can be disabled by checking the Disable Quota check box or the quota space limit
can be adjusted, as shown in Figure 28.12.
Creating a Quota Template
When working with quotas, rather than defining the storage limits on each and every
folder being issued a quota, an administrator can create a quota template and apply the
template to the folder, simplifying the quota policy creation process. Within the quota
template, the administrator can define the following:
.
Amount of disk space of the quota—
The administrator can define in KB, MB, GB,
or TB the amount of space to be set as the quota for the template.
.
Hard limit or soft limit—
A hard limit does not allow a user to extend beyond the
hard limit for storage, whereas a soft limit gives the user a warning they have
File Server Resource Manager (FSRM)
1135
ptg
FIGURE 28.12
Adjusting the quota space limit of a quota managed folder.
exceeded the policy limit; however, it allows the user to continue to save files
beyond the limit.
.
Notification thresholds—
When the storage limit nears or reaches the quota limit,
a series of events can occur, such as the automatic generation of an email warning,
event log entry, or a script can be executed.
To create a new quota template, click on the Quota Templates node beneath the FSRM
28
console within the Server Manager File Services Role node, and perform the following steps:
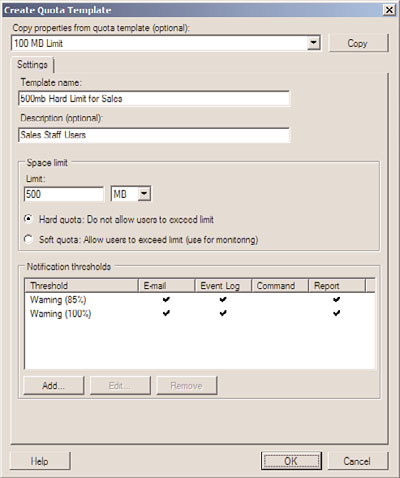
1. Click on Create Quota Template in the Actions pane to open the Create Quota
Template window.
2. Type in a name of the template—for example, 500mb Hard Limit for Sales—and
enter a label of Quota Template for Sale Staff Users.
3. Specify the storage limit for the quota; for this example, enter 500 and choose MB
from the list.
4. Pick whether you want a hard limit or soft limit for the quota; for this example,
select Hard Quota: Do Not Allow Users to Exceed Limit.
5. Create notification thresholds by clicking the Add button and defining limits. A
common threshold is an 85% limit that notifies users via email that they have
1136
CHAPTER 28
File System Management and Fault Tolerance
achieved 85% of their limit and to consider deleting files so they do not exceed
their limit.
6. The quota limit will look similar to Figure 28.13. Click OK when you are satisfied
with your settings.
ptg
FIGURE 28.13
New quota template settings.
The administrator can now create quotas and apply this template or other templates to
the quota settings.
Creating File Screens
Another function of the File Server Resource Manager is the ability to create file screens. A
file screen applied to a folder inspects the file to be stored and either allows or disallows a
user from saving the file based on the file screen. A file screen blocks files from being
stored within folder and all subfolders. As an example, an organization can allow the
storage of all undefined documents and deny the storage of *.mp3 audio files and *.mpg
video files by applying a file screen that contains these two file types to a particular folder
or set of folders.
To create a file screen, perform the following steps:
1. Open the File Server Resource Manager and expand it.
2. Double-click File Screening Management.
3. Select the File Screens node. In the Actions pane, click Create File Screen.
File Server Resource Manager (FSRM)
1137
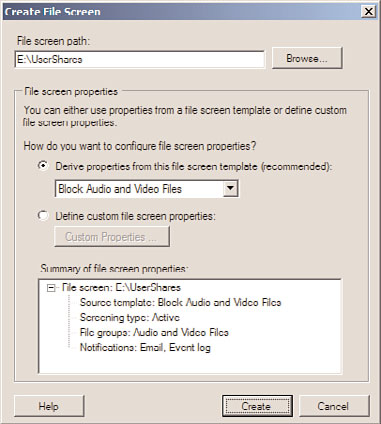
4. In the Create File Screen window, specify the path for the file screen, such as
E:\UserShares.
5. In the File Screen Properties section of the window, select the Derive Properties from
This File Screen Template option button, or choose Define Custom File Screen
Properties depending on whether you want to apply a template or create a custom
screen. For this example, choose the Derive Properties from This File Screen
Template option button, and select Block Audio and Video Files from the drop-down
menu, as shown in Figure 28.14. Click Create to create the new file screen.
ptg
FIGURE 28.14
Creating a new file screen.
28
Creating a File Screen Template
Windows Server 2008 R2 provides several functional file screen templates, but when
customized file screens are required, administrators can create new file screen templates. A
file screen template includes file groups, screening policies, and notification settings:
.
File groups—
The administrator can define the file types into groups, such as Office
2007 file groups containing *.docx Microsoft Word files and *.xlsx Microsoft Excel
files.
.
Active screening and passive screening—
An active screen does not enable a user
to save file types by design, whereas a passive screen allows the file type, but it is
logged for monitoring and reporting functionality.
.
Notifications—
When a user attempts to save a file that matches the file screen des-
ignation, a notification can be generated. The notification can be the automatic gen-
eration of an email warning or event log, a script can be executed, and a report can
be generated and sent out immediately.
1138
CHAPTER 28
File System Management and Fault Tolerance
To create a new file screen template, perform the following steps:
1. Open the File Server Resource Manager and expand it.
2. Double-click File Screening Management.
3. Select File Screen Templates. In the Actions pane, click Create File Screen Template.
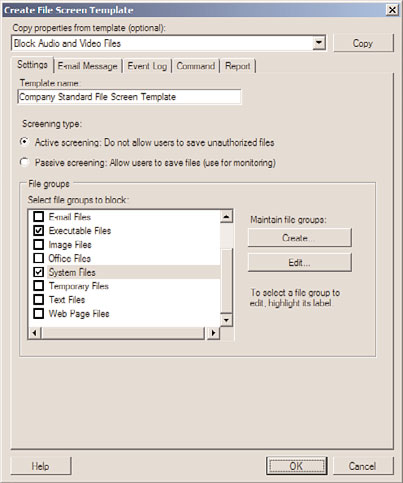
4. In the Create File Screen Template window, enter a name for the template—for
example, Company Standard File Screen Template.
5. Select the Active Screening option button.
6. In the File Group section, check the boxes next to the following file groups:
. Audio and Video Files
. Backup Files
. Executable Files
. System Files
7. Configure the notification settings on the E-mail, Event Log, Command, and Report
tabs, as required.
8. On the Settings tab, review the configuration, and click OK to create the new file
screen, as shown in Figure 28.15.
ptg
FIGURE 28.15
New file screen template settings.
The new file screen template can now be used to create a new file screen.
File Server Resource Manager (FSRM)
1139
NOTE
It is important to note that file screens are based on the filename or filename exten-
sions defined within the file groups applied to the file screen. A savvy end user can
simply rename a screened file to bypass the file screen, but Windows Server 2008 R2
has the ability to detect some files by their characteristics and not necessarily by the
file extension name, so extended testing should be performed when very strict file
screening enforcement is required to ensure the highest level of reliability.
File Screen Exceptions
In many cases, as with quotas, file screen standards can be created and applied to server
storage, but certain file types might be required or certain users might require storage of
blocked file types. In these cases, file screen exceptions can be created and applied to
subfolders of a file-screened parent folder. For example, in the previous example, a
template was created to block executables but a file screen exception could be created to
allow executable files in a subfolder. Of course, the subfolder should be secured by NTFS
permissions to limit who can save these types of files to the folder.
Generating Storage Reports with FSRM
ptg
The File Server Resource Manager provides the ability to create or automatically generate
reports for quota and file screen activity. The various reports that can be generated include
the following:
. Duplicate Files
. File Screening Audit
. Files by File Group
. Files by Owner
28
. Files by Property
. Large Files
. Least Recently Accessed Files
. Most Recently Accessed Files
. Quota Usage
Generating Reports in Real Time
Reports can be generated on a real-time basis to view the file storage information on
demand. To generate a report, right-click the Storage Reports Management node of the
FSRM utility, and choose Generate Reports Now. Then do the following:
1. Click on the Add button to define the scope of the volumes or folders that the
report will be based on (for example E:\UserShares) and click OK to return to the
Storage Report Task Properties window.
1140
CHAPTER 28
File System Management and Fault Tolerance
2. Choose which report or reports will be generated by checking the check box for the
particular report type.
3. Choose the report format for the new report (for example, the default option of
DHTML) by checking the appropriate check box in the Report Formats section of
the window.