Microsoft Visual C# 2005 Express Edition: Build a Program Now! (13 page)
Read Microsoft Visual C# 2005 Express Edition: Build a Program Now! Online
Authors: Patrice Pelland
Tags: #General, #Computers, #C♯ (Computer program language), #Programming Languages, #C#, #Microsoft .NET Framework, #Computer Books: Languages, #Computer Graphics, #Application software, #C# (Computer program language), #Programming, #Microsoft Visual C# .NET, #Microsoft Visual C♯ .NET, #Electronic books, #Game Programming & Design, #Computing: Professional & Programming, #C (Computer program language), #Computers - Languages, #Programming Languages - C#, #Programming & scripting languages: general


We’re now going to add three Windows Forms controls to your browser application: a text box control in which to enter the destination URL, a button to navigate to the Web page, and a Web browser control in which the Web page content will be displayed.
Drag and drop a Web browser control onto the designer surface. The Web browser control is located 5 in the
toolbox
on the left side of the IDE; it’s the last control in the
common controls
section. By
default, this control will fill the designer surface entirely. As we don’t want this behavior for this particular
To add a control to a form, you
application, you’ll click on the following black triangle
need to perform a drag-and-drop
operation. This means you’ll move
your mouse to the toolbox, drag
the desired control to the designer
surface, and drop the control
onto it.
which will produce the content of a smart tag. (If you’re familiar with Microsoft Office 2003, you’ve probably encountered smart tags before. Smart tags will be explained further in Chapter 5.) In this particular example, it will help you to undock the control from its parent container (the form). Click on the smart tag and select
Undock in parent container
.
Expand the control
6 so that it occupies
almost the entire
designer space. To do
this, click on any of the
control handles to
change its size.
To make sure you
7 have the same
size as shown in
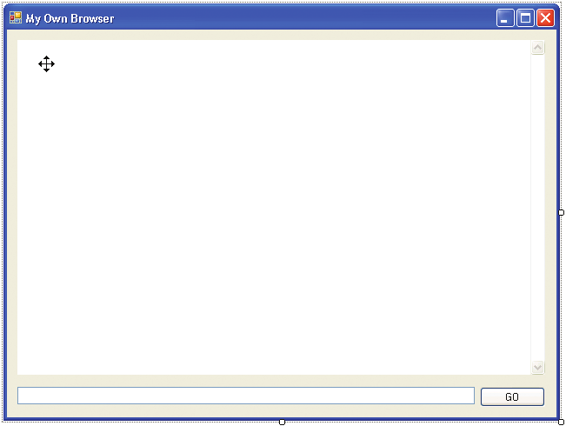
Figure 4-2, select the
Web browser control by
clicking anywhere on
the control. Then go to
the Properties window
and modify the values
for the all the properties
listed in Table 4-2.
Figure 4-2
MyOwnBrowser application
50
Microsoft C# 2005 Express Edition: Build a Program Now!
Ch4.indd 50
Ch4.indd 50
10/24/05 3:07:59 PM
10/24/05 3:07:59 PM
Modify the values in the same way you modified the form controls in step 4.
Property Value
(Name)
myBrowser
Size:Width
607
Size:Height
385
Location:X
12
Location:Y
12
Table 4-2
Web Control properties to change
Drag and drop a text box control and a button control from the toolbox common controls section so 8 that your form looks like Figure 4-2. Change the properties of the controls as you did with the Web browser control in step 7. Select one control at a time and modify its properties with the data in Table 4-3.
Control
Property
Value
Textbox
(Name) txtURL
Textbox
Location:X
12
Textbox
Location:Y
411
Textbox
Size:Width
526
Textbox
Size:Height
20
Button
(Name) btnGo
Button
Location:X
544
Button
Location:X
411
Button
text
GO
Table 4-3
Controls, Properties, and Values
At this point, we now have a complete application. You can compile and execute your application by 9 pressing
F5
.
Chapter 4: Create Your Own Web Browser in Less Than Five Minutes!
51
Ch4.indd 51
Ch4.indd 51
10/24/05 3:08:00 PM
10/24/05 3:08:00 PM
If you followed the previous steps exactly, your application should now be running. Because we didn’t code any functionality, entering an URL and hitting the GO button will not do anything.
I will use an analogy to explain a fundamental concept. A light bulb by itself is not a useful piece of hardware. To obtain light from it, you need to connect two wires carrying electricity. Similar to what an electrician would do to create this electrical circuit, we need to attach or
wire
the control and the action together by writing code to handle the event of clicking the GO button. Keep this analogy in mind when you see references to the term
wire
or
wiring
used within this book.
Before we try to execute this application, let me explain the line of code you'll add in step 2 on the next page and link it to the OOP concepts previously introduced in Chapter 1. When you dropped the controls onto the designer surface, you created instances of the
class
represented by those controls. For example, when you dropped the Web browser control, you created an
instance
of the class System.Windows.Forms.WebBrowser that you named myBrowser. The WebBrowser class has many methods, and the Navigate
method
is the one you chose. As its name implies, this method allows the WebBrowser to navigate to an URL. The URL was passed as an
argument
to the Navigate method. An argument, also called a parameter, is used to pass data to a method.
The argument in your case is the text the user entered in the instance of the System. Windows.Forms.TextBox class that you appropriately named txtURL. To retrieve the content of the TextBox named txtURL, you used the Text
property
of that control. A property allows you to set or retrieve the content of a
data member
in a class without accessing the data member directly. That way, the provider of the class (e.g., Microsoft) can modify the implementation of the Text property without concerning the user with implementation details. In OOP, this is called
encapsulation
. You can compare this process to a person driving a car: you don’t need to know how the engine and transmission work in order to drive the car. The car example is a good one, but another good example is the Navigate method. You don't need to know how it's implemented, you simply want it to do its job. As mentioned earlier, many things are happening when you design a form with Visual Studio. You have seen that you didn’t need to create any of the classes or instances representing your controls because Visual Studio is doing all of that for you!
52
Microsoft C# 2005 Express Edition: Build a Program Now!
Ch4.indd 52
Ch4.indd 52
10/24/05 3:08:00 PM
10/24/05 3:08:00 PM


TO WIRE THE CLICK ACTION TO A BUTTON
If you try to type some code and
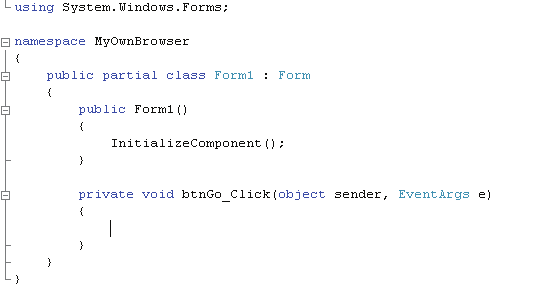
Close the running application and go back to the IDE. Double-click the button control. You‘ll see the
it doesn’t work, your application is
1 code window as shown in Figure 4-3.
probably still running. If you don’t
close the application and you go
back to Visual C#, you won’t be
able to modify the source code.
If you terminated the execution of your application properly, you should see the source code window with the
A good way to verify that you
btnGo click
event template. When you double-clicked the button control, you signaled Visual Studio that you
have closed and terminated the
wanted to wire the click action to the
application is to look in the Visual
button control. Typically, each control
C# Express title bar. If you see the
can trigger multiple events depending
name of your application followed
by the word
(running)
, this means
on which behavior you want to intercept
your application is still active and
with your code. Each control has a
you won’t be able to add code.
default event that is triggered by the
If you try to add code, the status
programmer by using a double-click
bar will report that you are in
read-only mode with the following
action on the control on the designer
message: Cannot currently modify
surface. In your case, Visual Studio creat
this text in the editor. It is in read-
ed the click event template so that you
only..
could enter the following code.
Figure 4-3
Code window for the btnGo click event
2 Type in the following code at the
cursor:
myBrowser.Navigate(txtUrl.Text);
Everything in C# is case-sensitive, so txtURL and txtUrl
are two different values.
Press
F5
to compile and execute the application. If you
3 named your controls correctly in step 8 in the previous
exercise and entered the line of code as shown in step 2, you
should now have your own Web browser application. Of
course, you won’t have all the bells and whistles of Internet
Explorer, but be patient—we’re getting there. Try going to
your favorite URLs to see if it's working as expected. For
instance, I went to
www.microsoft.com
and it worked just
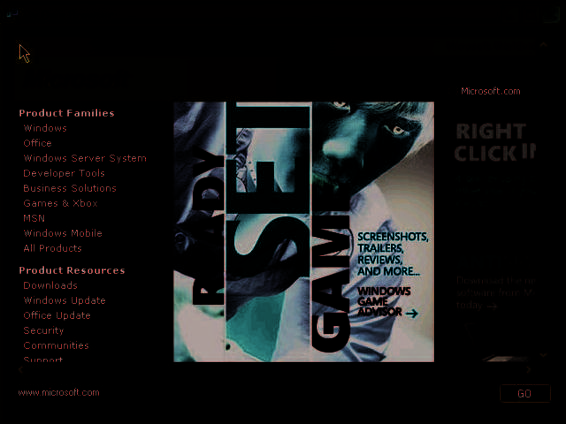
fine! You can see the result in Figure 4-4.
Figure 4.4
MyOwnBrowser showing the Microsoft.com Web site
Chapter 4: Create Your Own Web Browser in Less Than Five Minutes!
53
Ch4.indd 53
Ch4.indd 53
10/24/05 3:08:00 PM
10/24/05 3:08:00 PM
Putting It All Together
We’ve just seen that when you drag a control onto the design surface, you’re actually creat
Before moving on, I’m inviting
ing an object of that control class. When you’re naming the control in the Properties win
you to look at a video from the
MSDN® Web site that talks about
dow, you’re actually assigning a name to the variable you’ve just created—which is exactly
Object-Oriented Programming, or
what we did for the three controls used in your browser. In fact, this is why you want to give
OOP. You’ve had a good introduc-
tion to OOP both in this chapter
your controls meaningful names so that you can use them later programmatically.
and in Chapter 1. To understand
As you now know, there was a great deal of activity taking place when you dropped
the concept from another angle,
navigate to
http://go.microsoft.com/
controls onto the designer surface. To better understand what was taking place in the
fwlink/?linkid=44030&clcid=0x409
background, we've talked about important OOP concepts behind the line of code you've
and view Lesson 6, Parts 1 and 2.
added to respond to the click event.
Now that you've run the application, here is a list of questions you may have:
Philosophies differ when it comes
■ What happens if I put nothing in the text box and hit Enter?
