Microsoft Visual C# 2005 Express Edition: Build a Program Now! (15 page)
Read Microsoft Visual C# 2005 Express Edition: Build a Program Now! Online
Authors: Patrice Pelland
Tags: #General, #Computers, #C♯ (Computer program language), #Programming Languages, #C#, #Microsoft .NET Framework, #Computer Books: Languages, #Computer Graphics, #Application software, #C# (Computer program language), #Programming, #Microsoft Visual C# .NET, #Microsoft Visual C♯ .NET, #Electronic books, #Game Programming & Design, #Computing: Professional & Programming, #C (Computer program language), #Computers - Languages, #Programming Languages - C#, #Programming & scripting languages: general

After aligning the labels vertically, do the same with the text box controls
Figure 5-2
4 immediately to the right of each label. The designer surface should look
All the controls are now aligned
like the one shown in Figure 5-2.
Notice that the labels are aligned with the bottom of the text box controls. 5 For a cleaner appearance, the labels should align with any text that will be entered in the text box. To align the labels correctly, move each label until you see a horizontal purple line instead of a blue line, as shown in Figure 5-3. In Figure 5-4, Labels 1 and 2 have been properly aligned with the baseline of the
Figure 5-3
corresponding text box contents, but Label 3 is still aligned with the bottom of
Example of alignment with the com-
the text box itself.
mon text baseline
Figure 5-4
Run-time execution of this alignment problem
Do not close the test project; you’ll need it for the sections that follow. If
you close the test project and Visual C# 2005 Express Edition and then re-
open them later, you might lose the current view and your form and code
might not show up automatically. If you do happen to close the test form,
click the View Code button on the Solution Explorer toolbar to get the code
of the selected form or on the View Designer button to get the Designer of
the selected form. Alternatively, you can right-click on the form filename, in
this case
Form1.cs
, and then select View Code to get to the source code or
View Designer to get to the design surface.
Using IntelliSense—Your New Best Friend!
IntelliSense® is one of the greatest tools developed for both beginner and experienced programmers. This feature provides contextual language references within the code editor and can even complete the typing for you. This means you can get immediate code syntax help specific to the code you’re writing without leaving the code editor. For example, if you’re inside a form and you ask IntelliSense for help, you’ll get access to code constructs that make sense for that particular form. You’ve already experienced IntelliSense while doing the previous examples without really knowing that’s what you were using.
Chapter 5: Creating Your First Full Windows Application
59
C05.indd 59
C05.indd 59
10/24/05 3:15:41 PM
10/24/05 3:15:41 PM
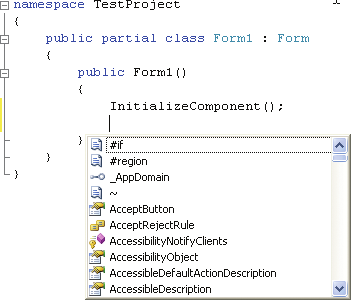
IntelliSense and Ctrl+Spacebar
One of the easiest ways to bring up the IntelliSense window is to press Ctrl+Spacebar. Figure 5-5 shows an example from the project currently opened in the code editor. You can see in this figure a list of all possible choices based on the context of a form element named Form1.
Figure 5-5
IntelliSense invoked by hitting the
CTRL+Spacebar keystroke combina-
tion
M O R E I N F O
There’s a neat feature in Visual
Studio that tracks the changes you
made to the source code, similar
to the Track Changes feature in
Microsoft Word. In Visual Studio,
however, whenever you modify
IntelliSense and Period/Left Parenthesis
your code, a colored line is added
to the beginning of that line. A
yellow line indicates that a change
The second way you can get help using IntelliSense is by typing a period (“.”) after an ele
was made but has not been saved
ment. The IntelliSense window will show up whether you are using .NET objects or your own
yet. If the line is green, it means
the change was saved and is now
objects. For example, I requested the list of possible constructs involving the variable Form1.
part of the code even if you exit
In this example, I was looking for the variable textBox1, which represented the first text box
Visual Studio. It’s a really useful
feature, and if you want to enable
on our Form. By typing a period (“.”) after the keyword
this
, I got the list of all relevant
it, just click Tools/Options. In the
objects in this context. Then by typing the letter
t
, I got the list of all relevant components
tree view, expand Text Editor,
select General, and then select
that have names beginning with that letter. I just had to scroll down to the item I was look
Track Changes. In Visual C# this
feature is enabled by default, but
ing for:
textBox1
. Figure 5-6 illustrates these steps in the code editor (when you insert the
if you change this setting, you can
button control in the following section). Finally, I pressed the Tab key to insert my selection,
always change it back.
textBox1
, in the code.
60
Microsoft Visual C# 2005 Express Edition: Build a Program Now!
C05.indd 60
C05.indd 60
10/24/05 3:15:41 PM
10/24/05 3:15:41 PM
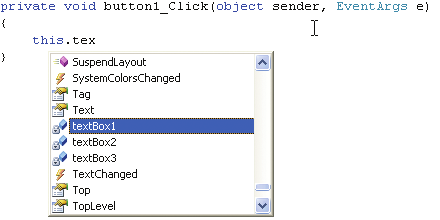
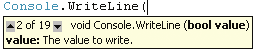
Figure 5-6
Getting help from IntelliSense by
typing in a period (.) after a valid
object
TO USE INTELLISENSE
From the toolbox, drag a button control to the
Start typing
textbox
. Before you finish the
1 form.
4 word, IntelliSense should bring up
textBox1
.
Press the Tab key to insert the component.
Double-click the button to bring up the button
2
Type a period (“
.
”) again, type
text
, then press
click event handler in the code editor. Then,
5 the Tab key or the Spacebar. The code line
where the cursor is blinking, press CTRL+Spacebar.
should look like this one:
The IntelliSense window will open.
this.textBox1.Text
Type the letter
t
,
h
and normally you should
3
Now add the equal sign (=) and the string
be on
this
in IntelliSense. Press Tab and then
6 literal
“Hello World”;
in the end, the line
period (
.
).
should look like this:
this.textBox1.Text = “Hello World”;
You can now build and execute the application by pressing F5 and verify that it works.
Know that at any time while
you’re using IntelliSense, you can
When you click the button you created, you should get the string “Hello World” in TextBox1,
press the Tab key to move quickly
which normally should be the first one of the three text boxes.
through the selections Intellisense
presents if the item you’re looking
You can also get additional help from IntelliSense if there’s more than one available
for is already selected.
choice for your situation. Typing a left parenthesis ("(") displays a list of all possible choices. For instance, when we did the console application, we wrote to the console using the Console.WriteLine method. We used this method with a string argument, but you can do more with
Console.WriteLine
than just use a
string
as an argument. IntelliSense will indicate if there is more than one option. For Console.WriteLine, IntelliSense indicates there are 19
Figure 5-7
possible variations, as you can see in Figure 5-7. I was looking for the second variation,
IntelliSense gives you the list of
all possible variations of using the
which is a Boolean argument. Now it’s your turn to try it.
WriteLine method
Chapter 5: Creating Your First Full Windows Application
61
C05.indd 61
C05.indd 61
10/24/05 3:15:42 PM
10/24/05 3:15:42 PM
TO SELECT FROM A LIST OF OPTIONS IN INTELLISENSE
If the source code is not visible, just click on the tab over the code editor where you see the filename 1 Form1.cs. Add a new line in the
Button1_Click
event and type
MessageBox.Show
and then type a left parenthesis (“
(
”). The IntelliSense Window opens and shows there are 21 possible variations for MessageBox. Show.
Scroll through the list of options using the up or down arrows on your keyboard. Select the option 2 identified by the “1 of 21” in the yellow rectangle, which is called a tooltip. 3 Complete the following line of code so that it looks like:
MessageBox.Show("Hello Again");
Build and execute the application. When you click the button you should see the Hello World string 4 and then a dialog box should show up with the message Hello Again..
IntelliSense Filtering: Pre-Selecting the "Most Recently Used"
You might have noticed that when the IntelliSense window appears, except for the first time you invoke it, you immediately jump to an element in the list. This element has been preselected by IntelliSense because it’s the most recently used construct. Therefore, to be more productive, IntelliSense picks it up automatically to save you some typing. Another type of filtering is selection based purely on the context you’re in at the moment of the invocation. If you’re in the code for handling an exception, say in a catch statement in a try-catch block, then IntelliSense will present you the exception types. That’s IntelliSense filtering at its best.
62
Microsoft Visual C# 2005 Express Edition: Build a Program Now!
C05.indd 62
C05.indd 62
10/24/05 3:15:43 PM
10/24/05 3:15:43 PM

IntelliSense Code Snippets: The Time Saver
The next IntelliSense feature is IntelliSense code snippets. Code snippets were invented for only one reason–developer productivity. They are a big part of the new IntelliSense features. The code snippets in C# are related to language constructs but can be extended. In Visual C#